


A student recently asked me:
When I am setting up my own personal VM or lab, is there a list of things I should know how to do and what to look for so I can test what I know on my own?
I have taught networking, Linux, Windows, cybersecurity, ethical hacking, and digital forensics. This question comes up in different forms because students often know how to complete a guided exercise but are less certain about how to test themselves after the instructions are gone.
My answer is yes, but I would not treat it as a list of products to install. Installing a firewall, a SIEM, or a vulnerable VM proves that you can follow installation instructions. A useful lab tests whether you can explain the system, make a controlled change, observe the result, diagnose a failure, and recover.
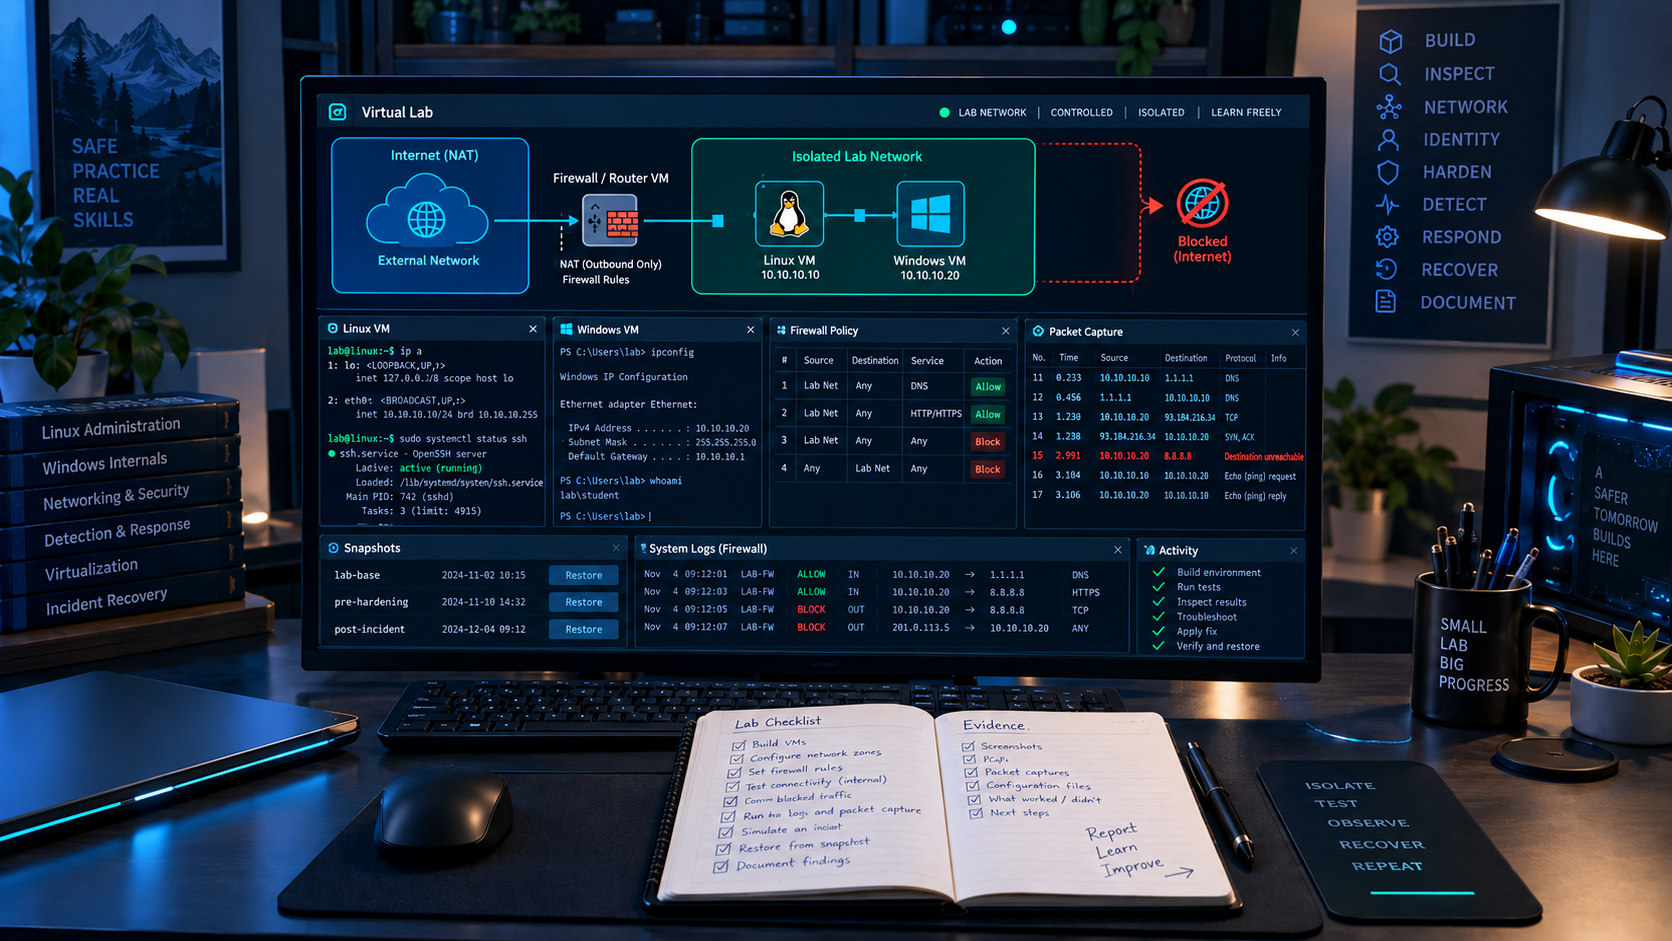
That gives you a better definition of lab competence:
You know a skill when you can perform it without a walkthrough, prove the result with evidence, explain why it worked, and undo it safely.
The lab does not need to be large. I would rather see a student understand two or three virtual machines completely than collect twenty appliances they cannot explain. One computer with enough memory for a few VMs is enough to learn operating systems, networking, access control, hardening, logging, vulnerability management, incident response, and recovery. Start small enough that you understand every component.
This is also how I frame practical development in Cybersecurity Architect's Handbook, Second Edition. Chapter 7, "Entry-Level to Architect Roadmap," treats home labs as safe places to experiment, maintain technical currency, and develop architectural judgment. The point is not to collect products. It is to learn how controls interact, where they conflict, and how to support a decision with evidence.
Build a safe practice area first
Before I evaluate what a lab can teach, I look at whether it is safe. Set boundaries that protect your home network and everyone else on the internet.
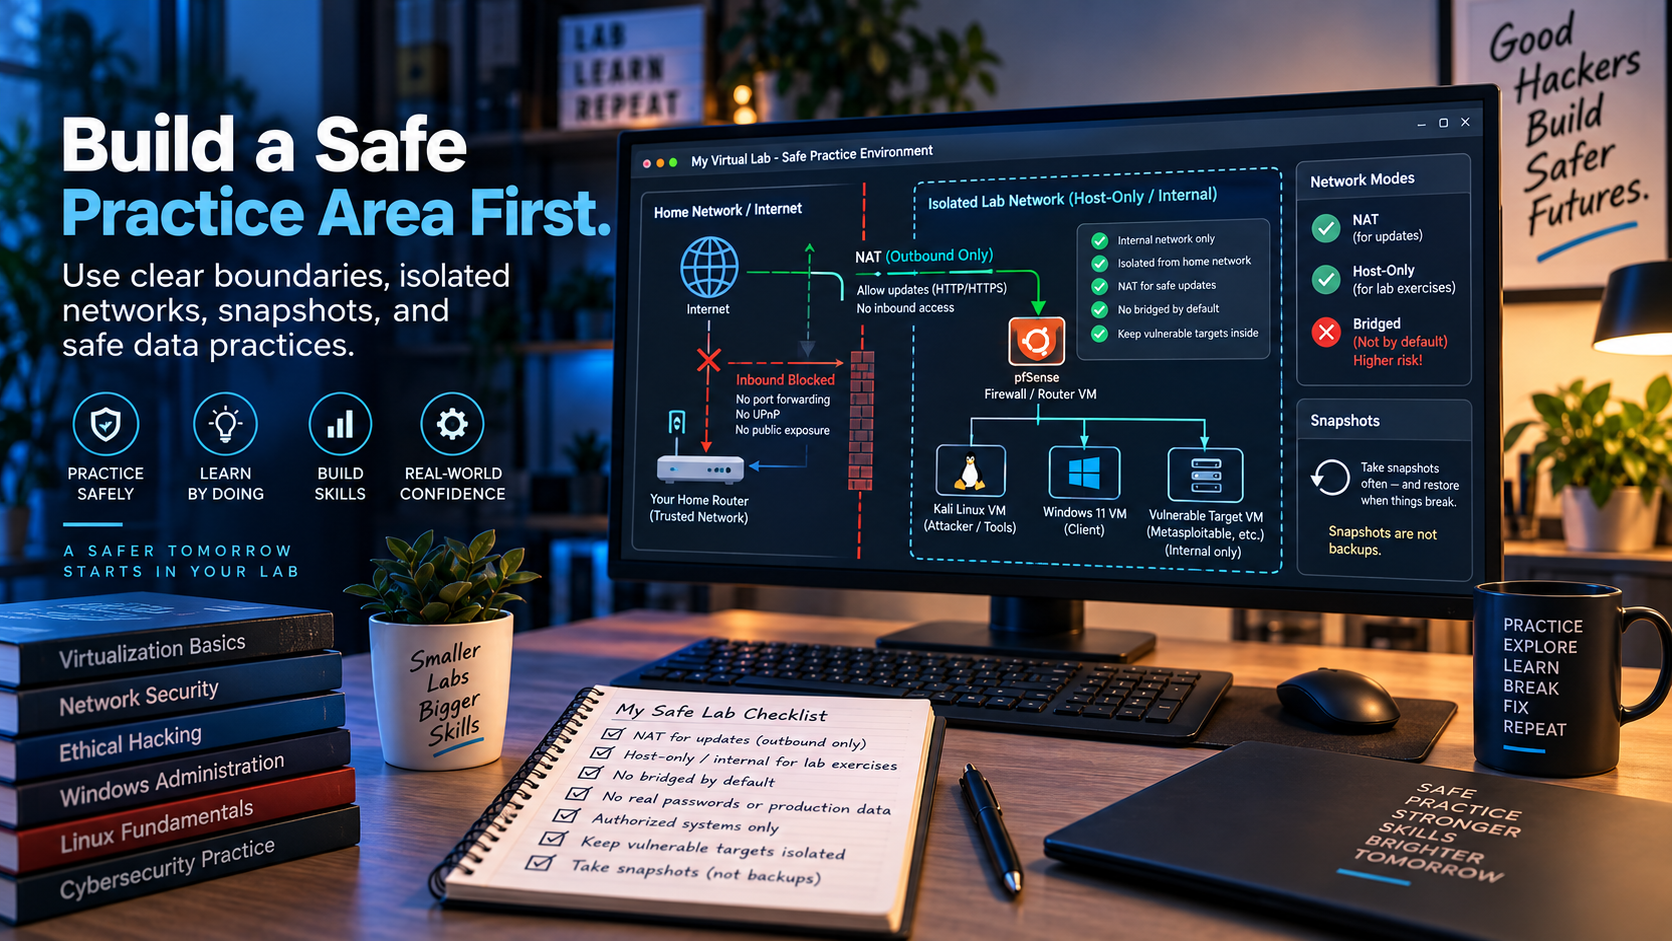
Use virtual networks deliberately:
- NAT networking is useful when a VM needs outbound access for updates but should not appear as a separate device on your home network.
- Host-only or internal networking is useful for isolated exercises between VMs.
- Bridged networking places the VM directly on the physical network. Do not use it by default, especially for intentionally vulnerable systems.
- Keep vulnerable targets away from port forwarding, universal plug and play, public cloud addresses, and any network you do not own.
Take a clean snapshot after installing and updating an operating system. Take another before a risky exercise. A snapshot is a convenient reset point, but it is not a backup. Store important notes, scripts, and configuration exports outside the VM.
Use only systems you own or are explicitly authorized to test. Scanning your own isolated subnet is a lab exercise. Scanning a school, employer, apartment, hotel, or internet range without permission is not.
Do not put real passwords, personal files, browser profiles, API keys, or production data in the lab. Use invented identities and synthetic data. If you practice malware analysis later, use a dedicated containment design and instruction from a trusted course. A beginner lab should not allow untrusted code to reach the home LAN or internet.
Write down the boundary before you build:
Purpose: Practice Linux administration, firewall policy, logging, and recovery
Hypervisor: VirtualBox, VMware Workstation, Hyper-V, Proxmox, or another platform
Networks: NAT for updates, isolated lab network for exercises
Systems: One Linux server, one Windows client, one firewall or router VM
Real data: None
Inbound access from the internet: None
Reset method: VM snapshots plus exported configuration
If you cannot describe where traffic can go, the lab is not ready for security testing.
Use outcomes instead of a random tool list
I use outcomes rather than product names because products change and foundational skills transfer. The NIST Cybersecurity Framework 2.0 organizes cybersecurity outcomes into six functions: Govern, Identify, Protect, Detect, Respond, and Recover. A personal lab does not need an enterprise governance program, but the functions make a good learning map:
- Govern: define the lab's purpose, rules, risks, and boundaries.
- Identify: inventory systems, software, users, services, data, and dependencies.
- Protect: configure access control, updates, hardening, segmentation, and encryption.
- Detect: collect logs and recognize expected and suspicious activity.
- Respond: investigate an event, contain it, and preserve useful evidence.
- Recover: restore service and prove that the restored system works.
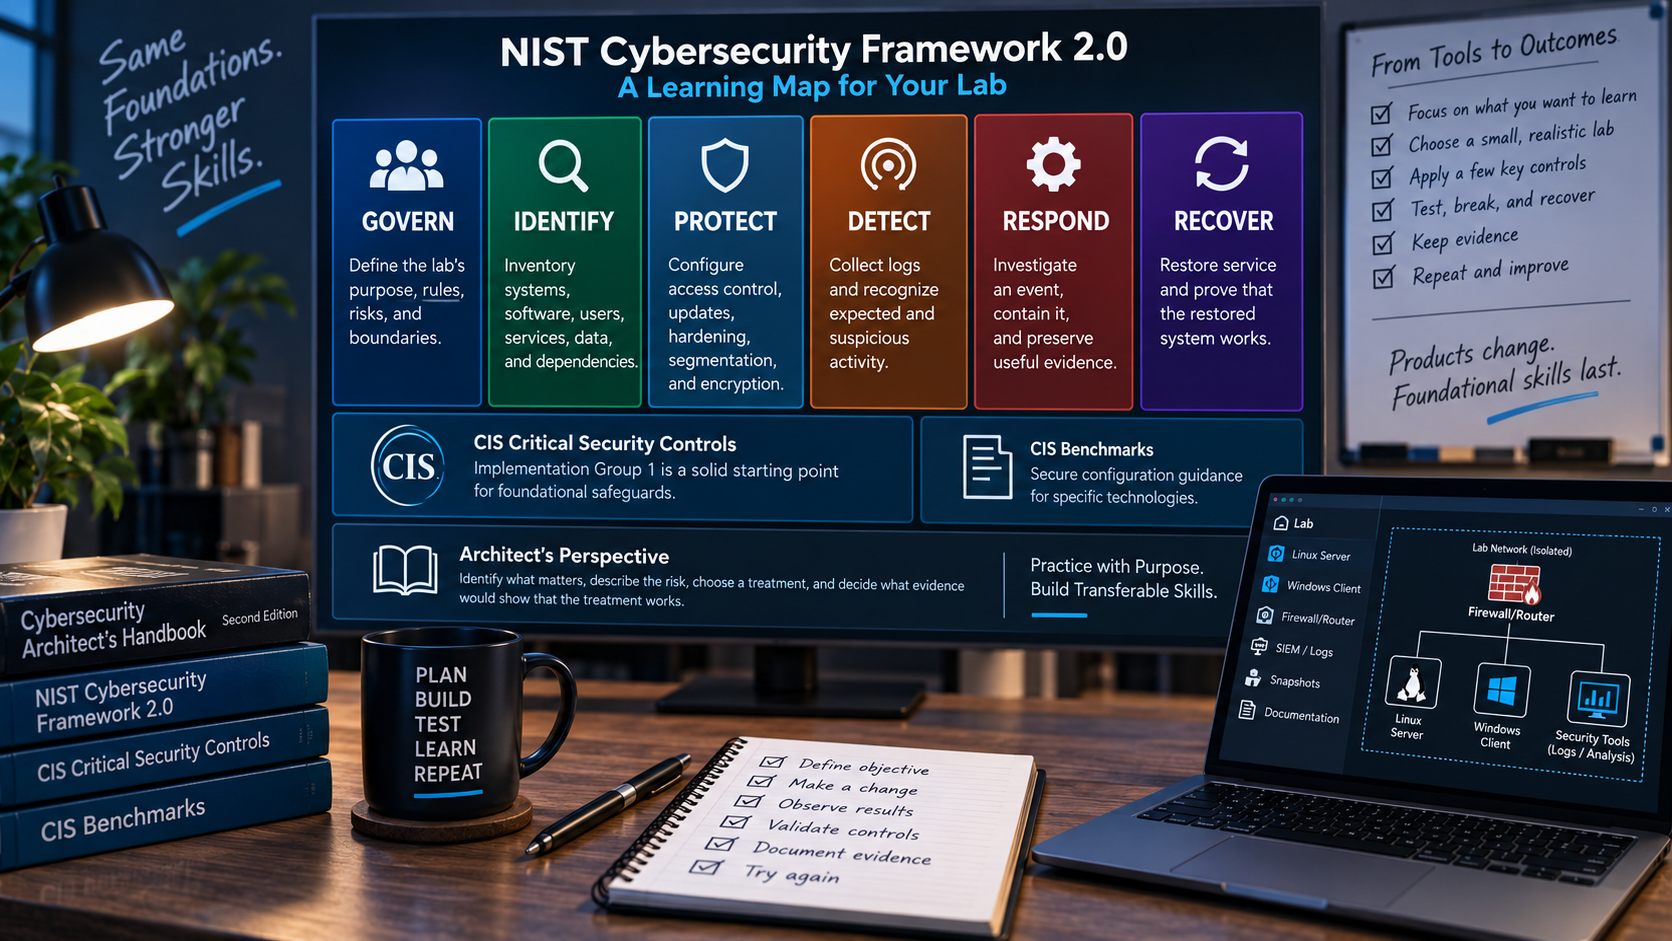
The CIS Critical Security Controls provide another practical reference. Implementation Group 1 is intended as a starting point and contains a foundational set of safeguards. CIS Benchmarks provide community-developed secure configuration recommendations for specific technologies. Do not try to implement every control at once. Pick a small number, apply them, and test them.
The book's Chapter 5, "Threat/Risk/Governance Considerations as an Architect," adds the decision layer: identify what matters, describe the risk, choose a treatment, and decide what evidence would show that the treatment works. Even in a one-person lab, this keeps the exercise tied to an objective instead of turning it into random configuration work.
The core skills checklist
The checklist below follows the order I would use with a student. Later skills depend on the earlier ones. Do not install a SIEM before you know where the source logs live and what a normal event looks like on the endpoint.
1. Build, rebuild, and describe a VM
You should be able to:
- Create a VM with an intentional CPU, memory, disk, firmware, and network configuration.
- Install Linux or Windows from trusted installation media.
- Apply updates and verify the installed operating system version.
- Install hypervisor integration tools when appropriate.
- Create, restore, and delete a snapshot.
- Export the VM or rebuild it from notes.
- Explain the difference between the hypervisor, guest operating system, virtual disk, virtual switch, and snapshot.
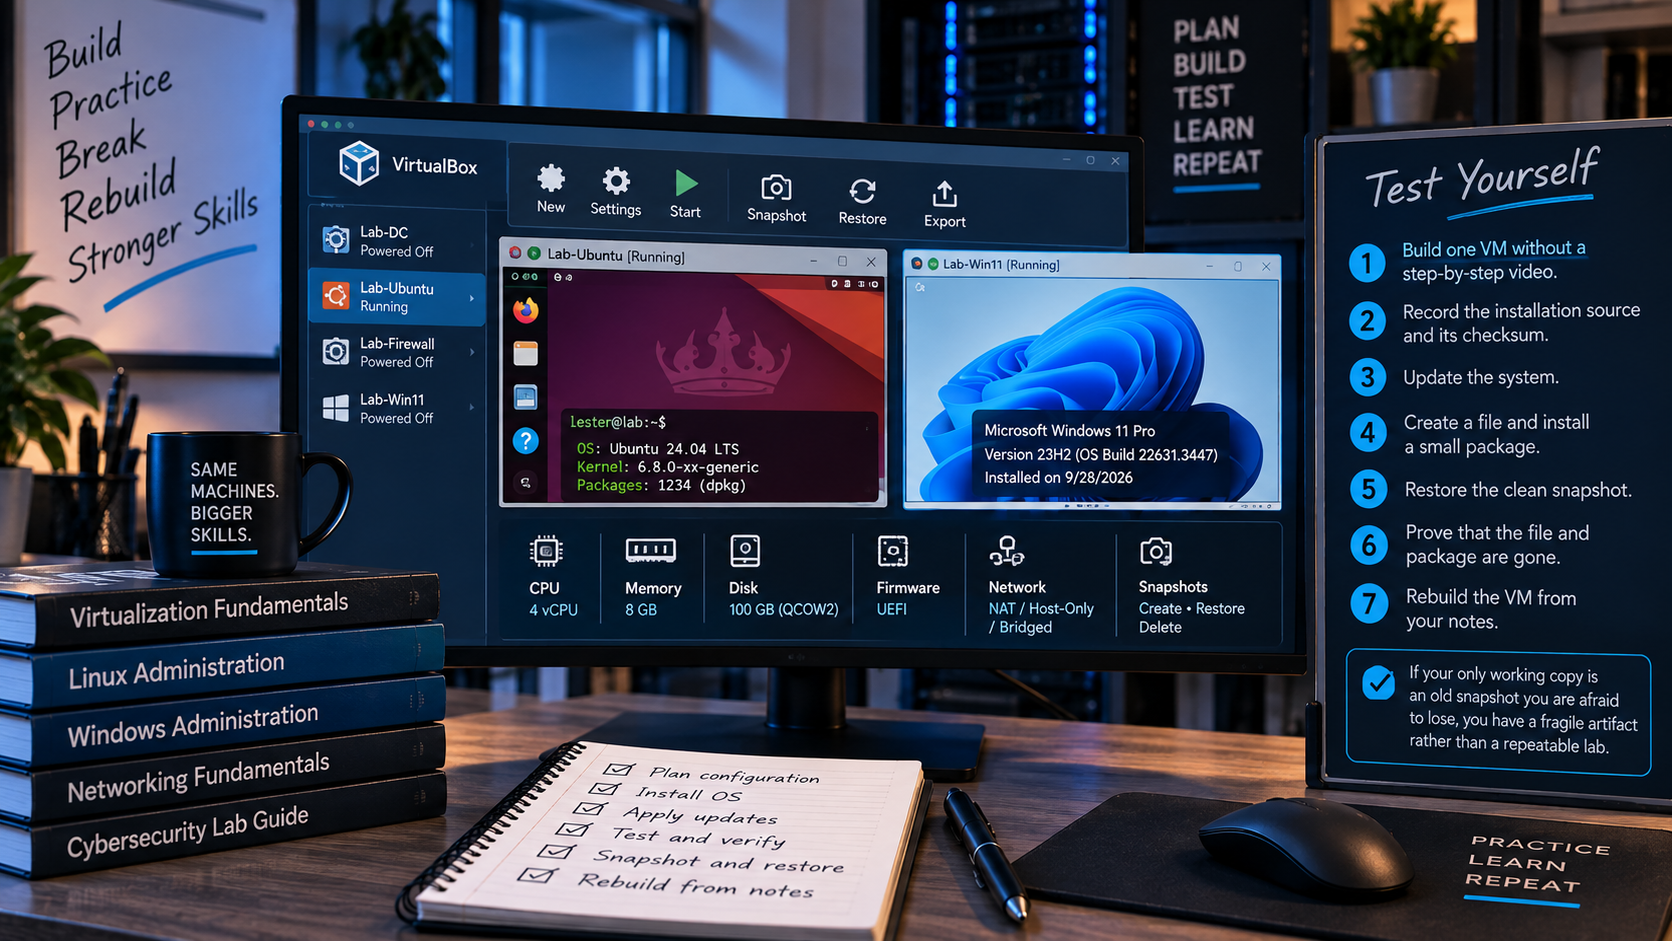
Test yourself:
- Build one VM without a step-by-step video.
- Record the installation source and its checksum when the publisher provides one.
- Update the system.
- Create a file and install a small package.
- Restore the clean snapshot.
- Prove that the file and package are gone.
- Rebuild the VM from your notes.
The real test is the rebuild. If your only working copy is an old snapshot you are afraid to lose, you have a fragile artifact rather than a repeatable lab.
2. Identify the machine and its current state
On Linux, become comfortable with commands such as:
hostnamectl
uname -a
ip address
ip route
ss -lntup
systemctl --failed
journalctl -p warning..alert -b
lsblk
findmnt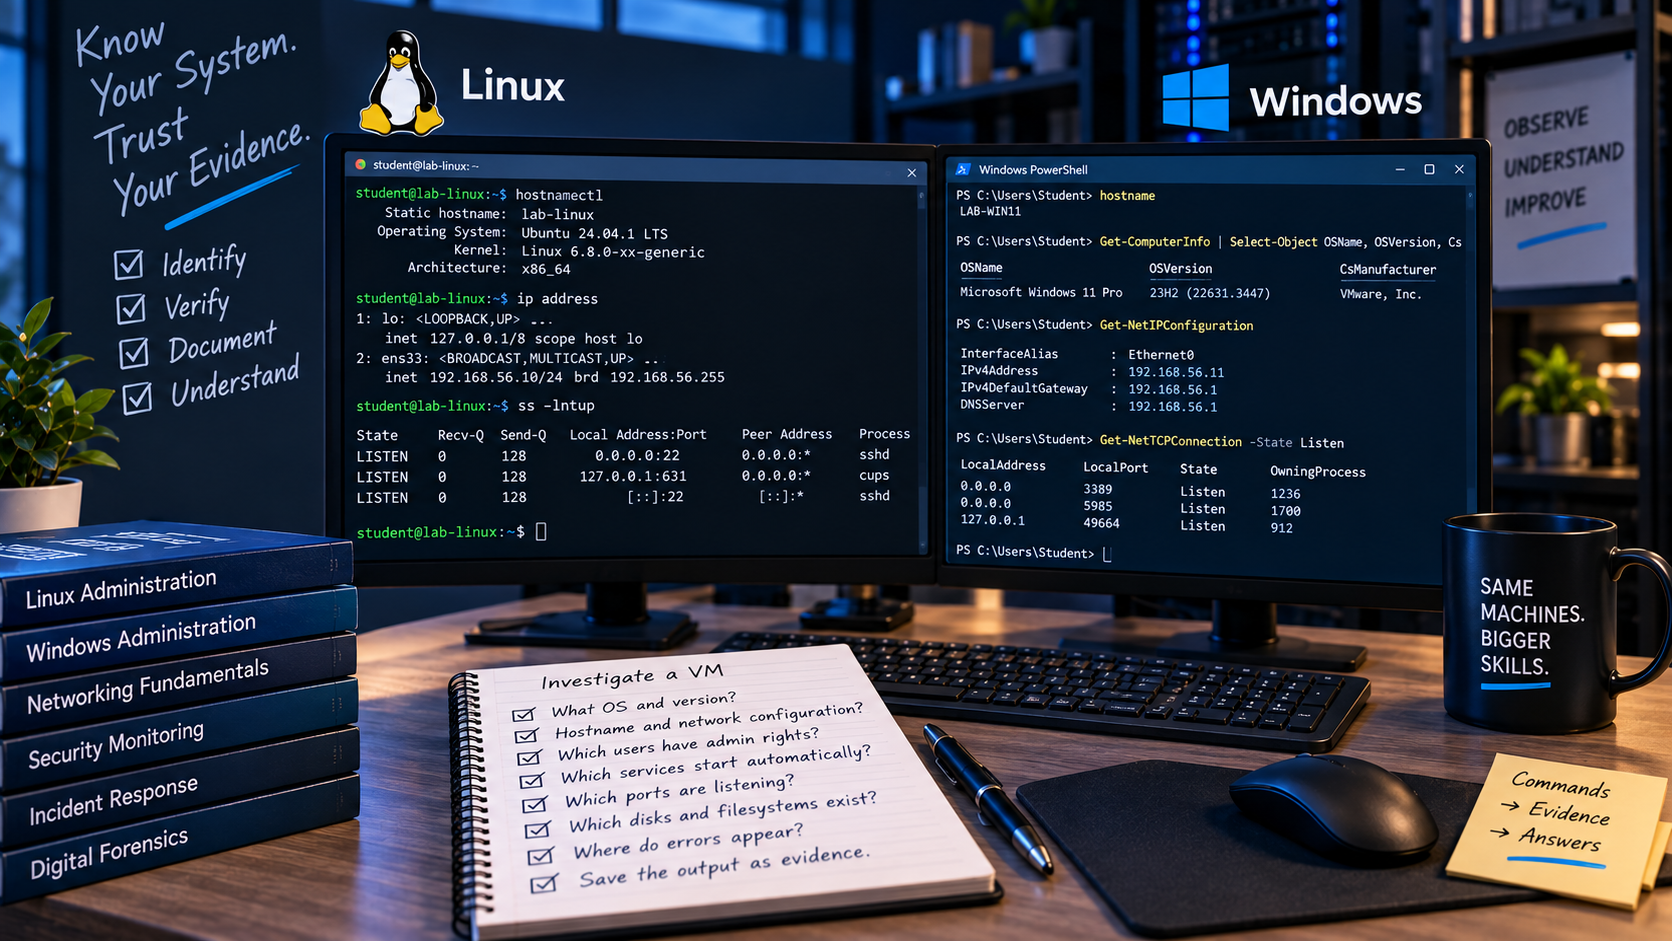
On Windows, learn the corresponding graphical tools and PowerShell commands:
hostname
Get-ComputerInfo
Get-NetIPConfiguration
Get-NetRoute
Get-NetTCPConnection -State Listen
Get-Service | Where-Object Status -ne 'Running'
Get-WinEvent -LogName System -MaxEvents 20
Get-Volume
Do not memorize output without understanding it. For each listening port, identify the process, service, executable, local address, protocol, and reason it exists.
Test yourself by inheriting one of your own VMs as if someone else built it. Without looking at your build notes, answer these questions:
- What operating system and version is this?
- What is its hostname, address, subnet, gateway, and DNS configuration?
- Which users have administrative authority?
- Which services start automatically?
- Which ports are listening?
- Which disks and filesystems exist?
- Where do authentication, service, and system errors appear?
Save the command output. Your answer should be evidence, not a guess.
3. Understand the network path
You should be able to explain how a packet travels from one VM to another and then to the internet. That includes:
- IP addressing and subnet masks
- Default gateways and routing tables
- ARP for IPv4 and neighbor discovery for IPv6
- DNS resolution
- TCP and UDP ports
- NAT
- Host and network firewalls
- The difference between a failed name lookup, failed route, blocked port, and stopped service
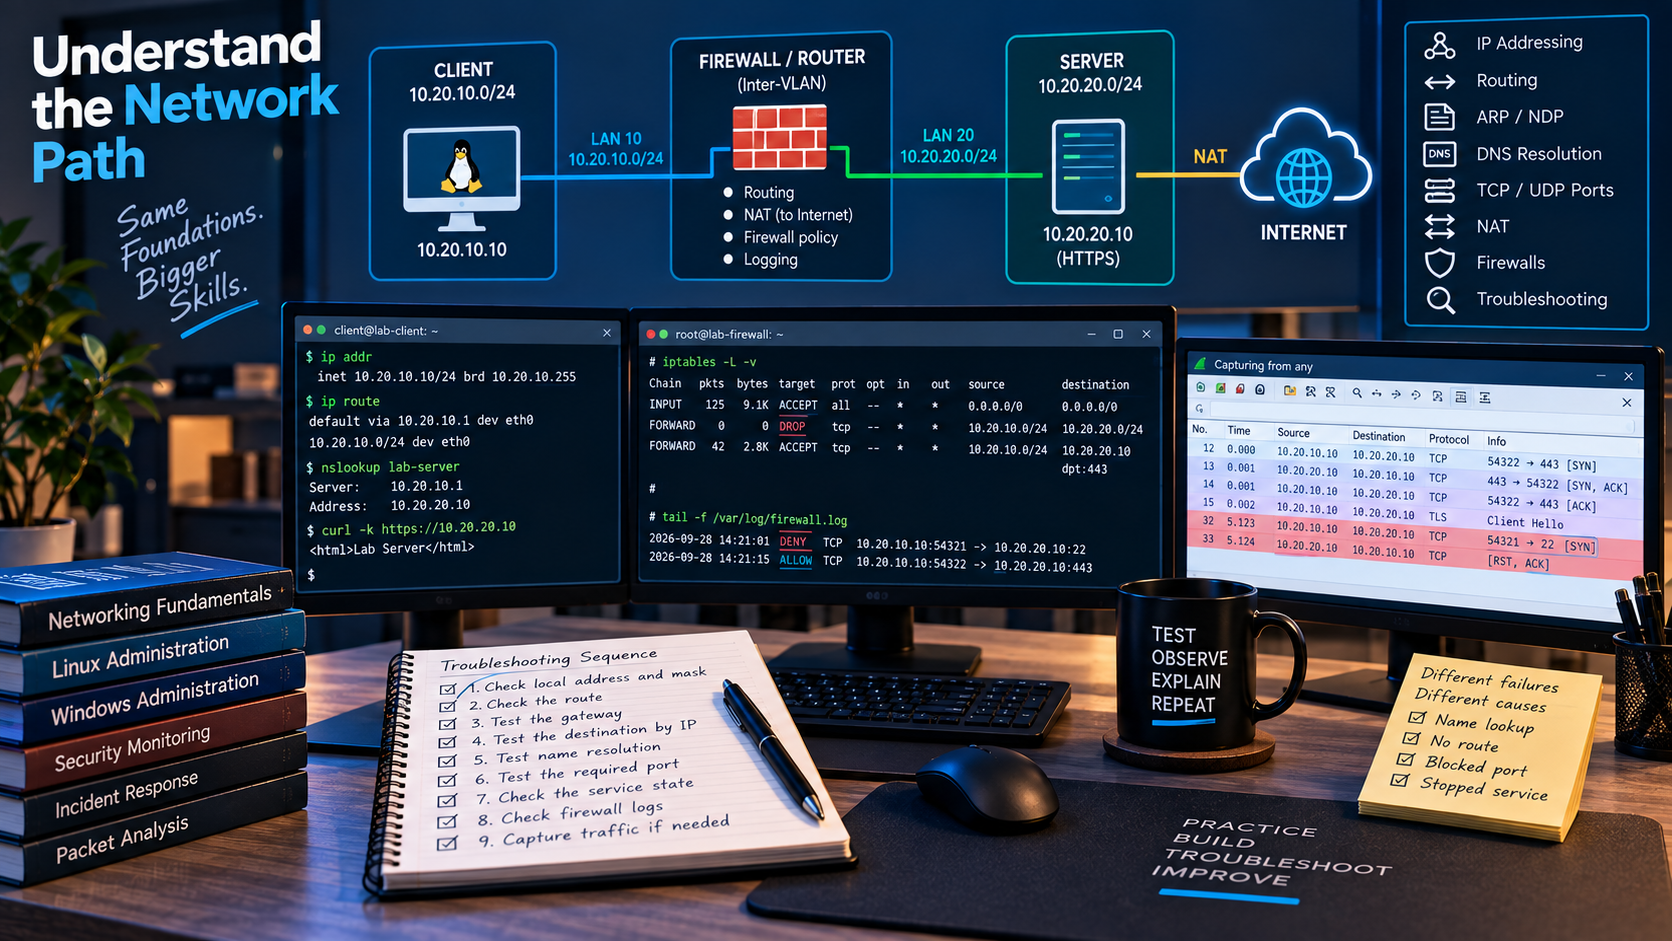
Build two networks, for example:
CLIENT: 10.20.10.0/24
SERVER: 10.20.20.0/24
Place a router or firewall VM between them. Start with no permitted path. Then allow the client to reach one server on one application port.
Test both outcomes:
- The permitted application connection succeeds.
- A different port fails.
- The firewall counter or log increases for each test.
- A packet capture shows the successful connection attempt and the blocked or unanswered attempt.
Do not use ping as proof that HTTPS works. Test HTTPS. A successful ICMP echo says nothing about whether TCP 443 is listening or allowed.
A useful troubleshooting sequence is:
- Confirm the local address and mask.
- Confirm the route.
- Test the gateway.
- Test the destination by IP address.
- Test name resolution separately.
- Test the required transport port.
- Check the service state.
- Check host and network firewall logs.
- Capture traffic when the previous evidence does not explain the failure.
If you change three things before retesting, you will not know which change fixed the problem.
4. Administer identity and permissions
Create separate identities for separate purposes:
- A standard user for ordinary work
- An administrative identity used only for elevated tasks
- A service identity for a scheduled process
- A disabled test account for lifecycle exercises
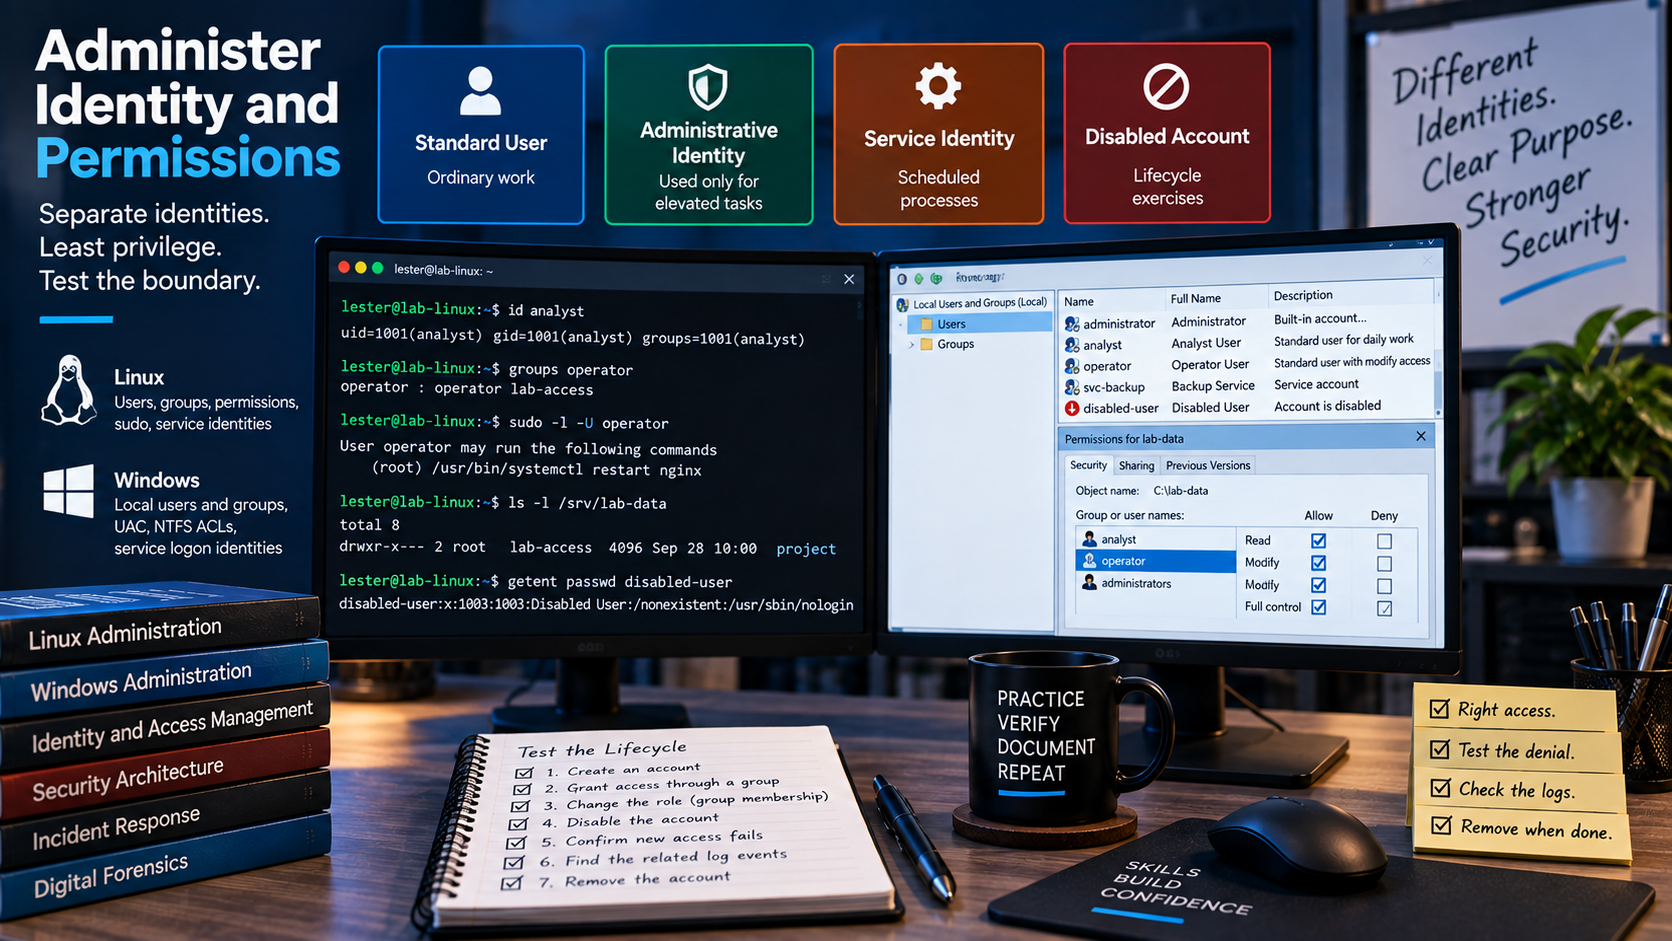
On Linux, practice users, groups, file ownership, permission bits, sudo, and service identities. On Windows, practice local users and groups, User Account Control, NTFS access control lists, service logon identities, and scheduled-task principals.
Test yourself with a small access matrix:
| Identity | Read | Modify | Administer |
|---|---|---|---|
| analyst | Yes | No | No |
| operator | Yes | Yes | No |
| administrator | Yes | Yes | Yes |
| disabled-user | No | No | No |
Create the policy, then sign in or run a process as each identity. Test required access and prohibited access. A permissions screen that looks correct is not enough. The denial test proves the boundary.
Also test the lifecycle:
- Create an account.
- Grant it access through a group.
- Change its role by changing group membership.
- Disable it.
- Confirm that new access fails.
- Find the related authentication and account-management events.
- Remove it according to your written procedure.
5. Patch and harden a baseline
Start from a fully updated system. Inventory what changed, whether a restart is required, and whether the system still provides its intended service after patching.
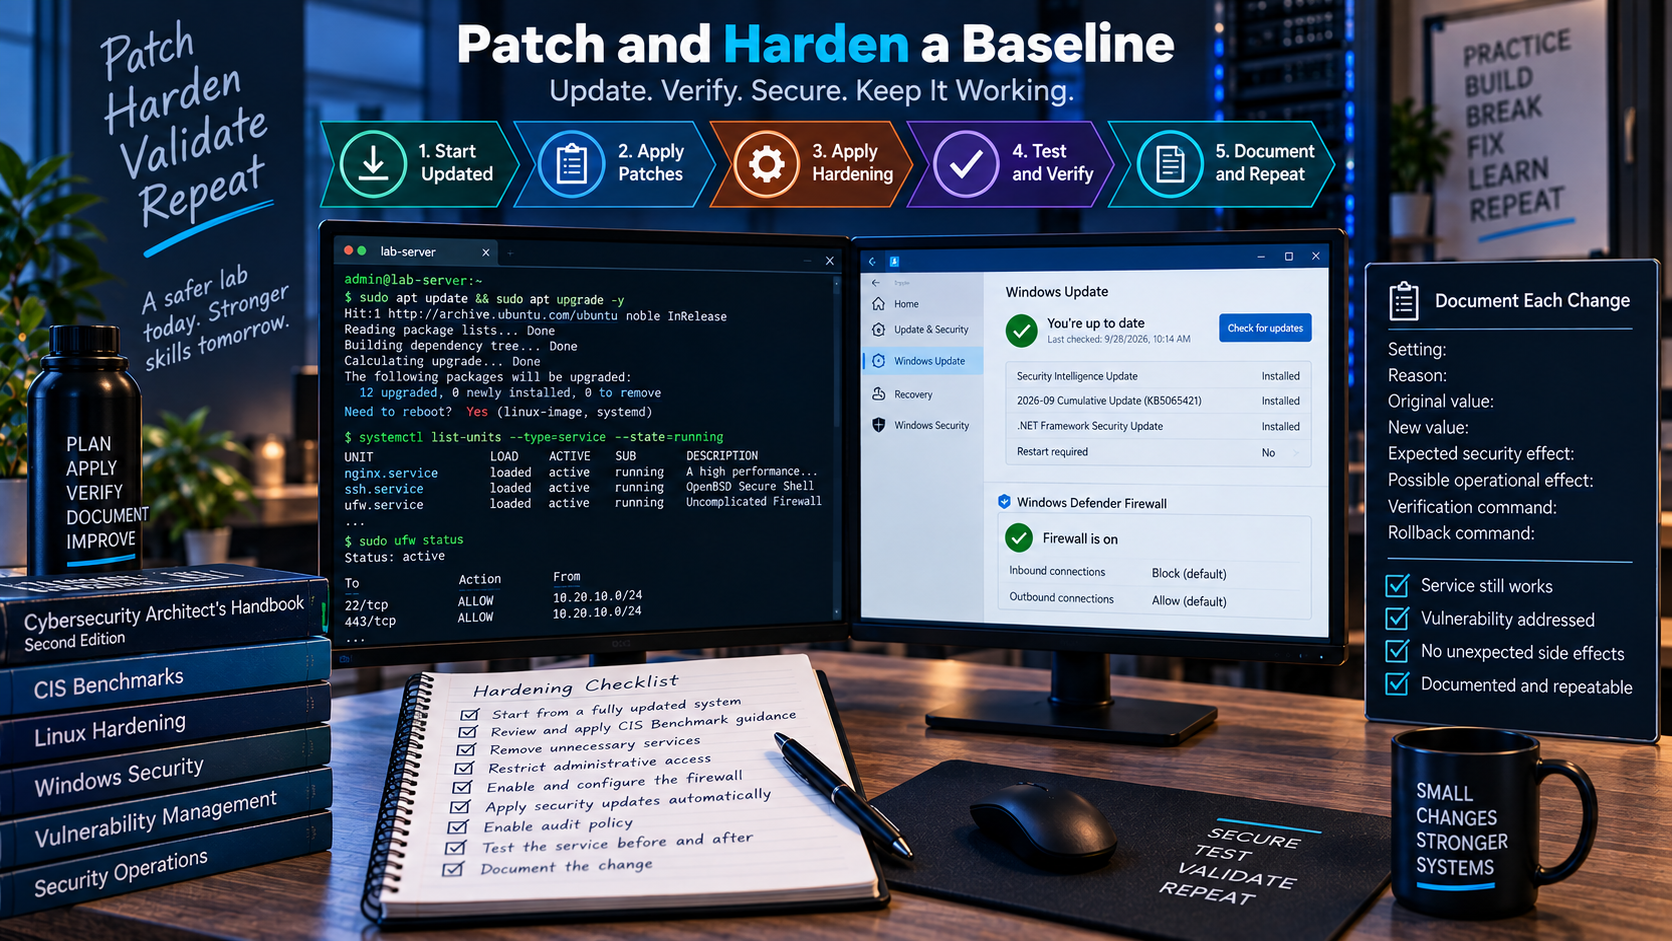
Chapter 10, "Best Practices," applies the same discipline to production patching: validate changes where the stakes are lower, define success and rollback criteria before deployment, and verify that the update closes the vulnerability without breaking the workload. A personal lab is where you can practice that sequence until it becomes routine.
Choose a relevant CIS Benchmark or vendor hardening guide rather than copying a generic script. Read each recommendation before applying it. Some settings reduce functionality, change authentication behavior, or block software your lab needs.
For each hardening change, record:
Setting:
Reason:
Original value:
New value:
Expected security effect:
Possible operational effect:
Verification command:
Rollback command or procedure:
Good beginner changes include:
- Removing or disabling an unnecessary service
- Restricting administrative access
- Enabling the host firewall
- Limiting inbound rules to required sources and ports
- Configuring automatic security updates or an explicit patch routine
- Enabling useful audit policy
- Setting appropriate file or registry permissions
- Protecting SSH or remote management with keys, strong authentication, and source restrictions
Test the service before and after each change. A hardening script that leaves the VM unusable did not succeed.
6. Inventory and assess vulnerabilities
Learn the difference between an asset inventory, software inventory, configuration finding, missing patch, exposed service, and exploitable vulnerability.
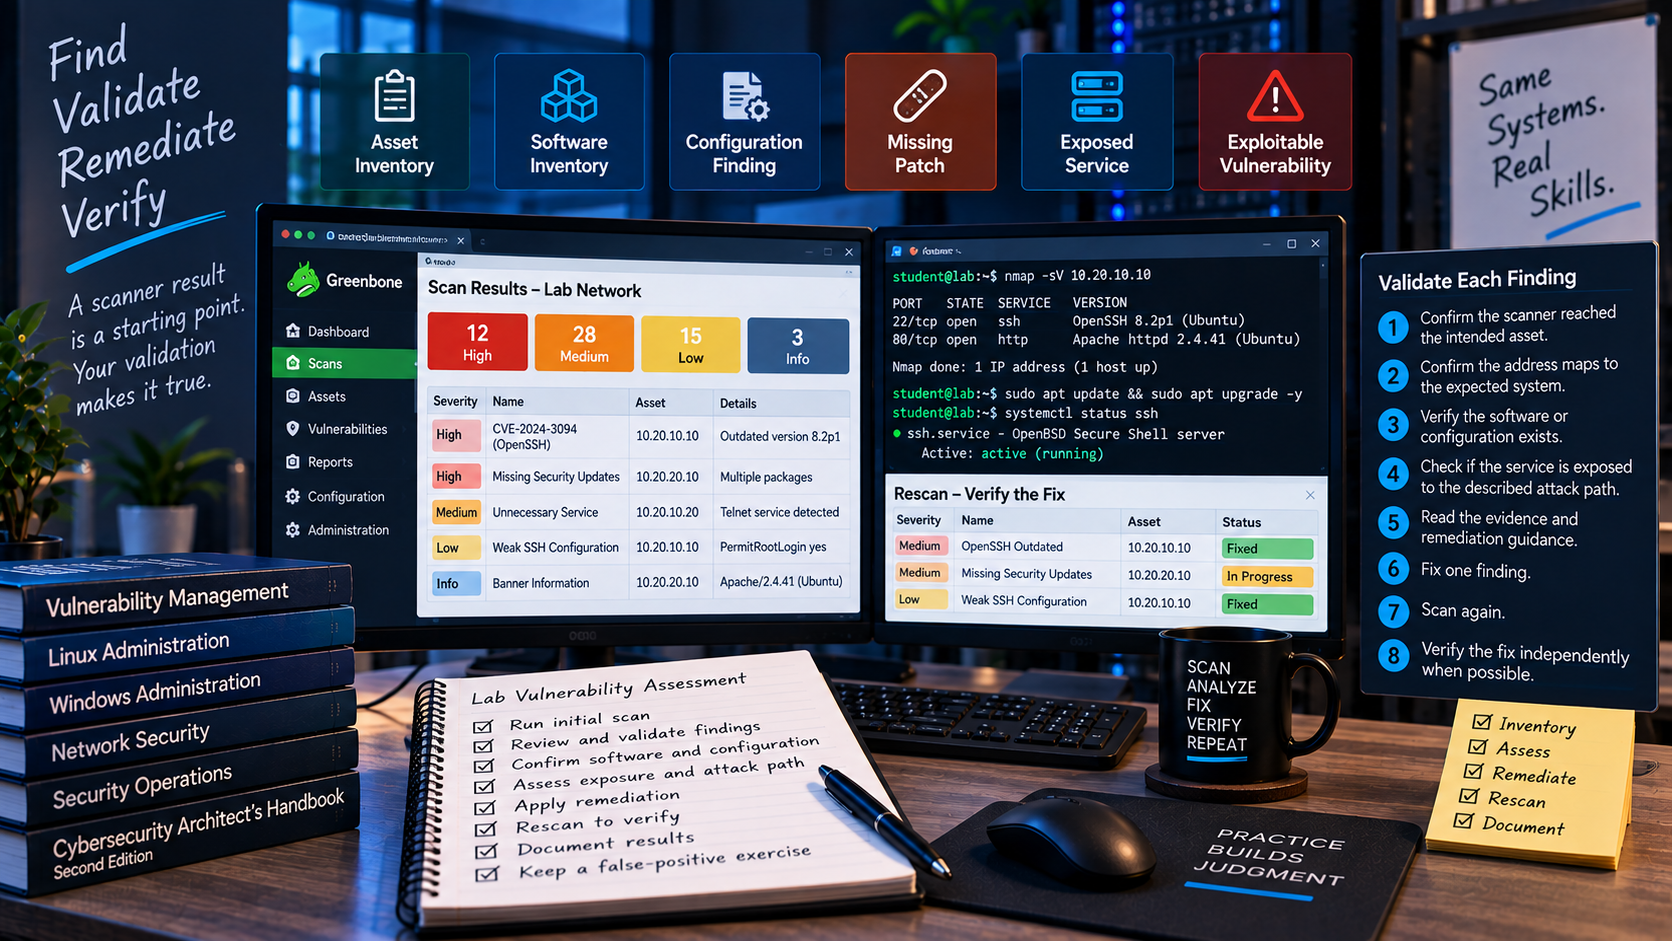
Run a vulnerability scanner only against your authorized lab systems. Before accepting a finding:
- Confirm the scanner reached the intended asset.
- Confirm the address maps to the system you think it does.
- Confirm the affected software or configuration exists.
- Check whether the service is exposed to the attack path described.
- Read the evidence and remediation guidance.
- Fix one finding.
- Scan again.
- Verify the fix independently when possible.
The rescan is part of remediation. Closing a finding because you ran an update command is not enough.
Keep one safe false-positive exercise. For example, let a scanner identify a version from a banner, then compare that result with the package database and vendor backport information. This teaches you why scanner results require validation.
7. Generate and read logs before installing a SIEM
Find the native evidence first.
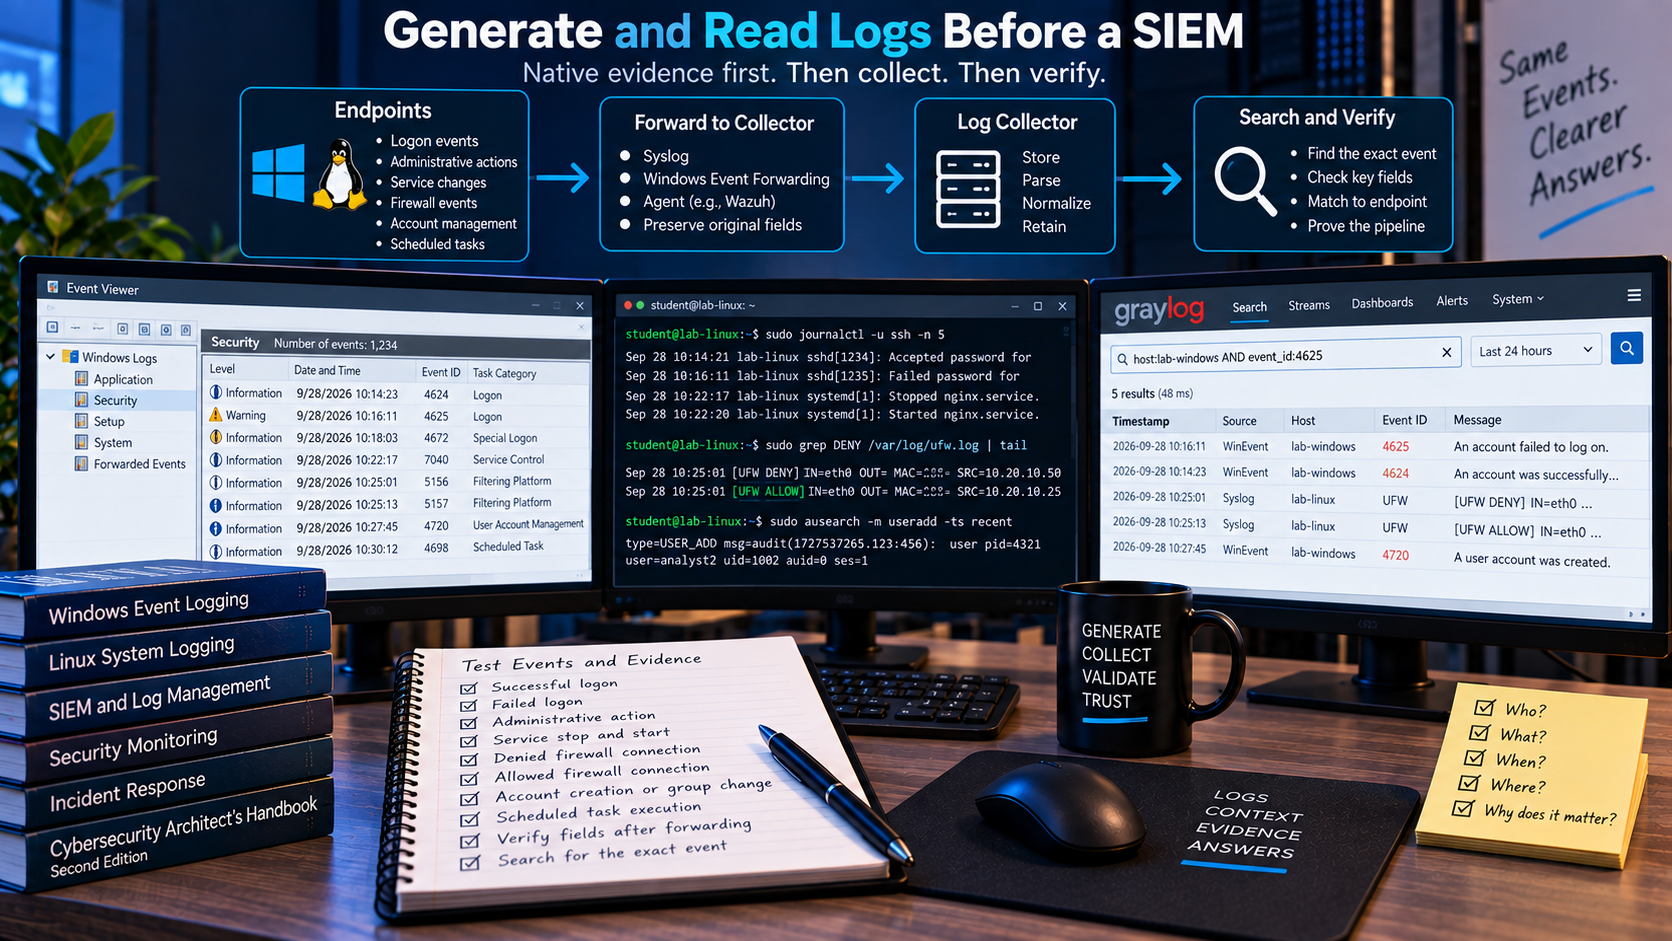
Generate several known events:
- One successful logon
- One failed logon
- One administrative action
- One service stop and start
- One denied firewall connection
- One allowed firewall connection
- One account creation or group-membership change
- One scheduled task or timer execution
For every event, record:
Action performed:
Expected log source:
Timestamp and timezone:
Event identifier or message:
User or process:
Source and destination:
What would make this suspicious:
Then forward those logs to a separate collector. Confirm that the original timestamp, hostname, username, source address, event identifier, and message survive the trip.
A dashboard is not the test. Search for the exact event you caused and connect it to the endpoint record. If the collector says an event occurred but you cannot identify who, where, and when, the pipeline is incomplete.
8. Write one detection and test it
A useful first detection is repeated failed authentication followed by a successful logon from the same source or against the same account. Keep the lab traffic controlled and harmless.
Define the detection before implementing it:
Behavior: Multiple failed logons followed by success
Data source: Operating-system authentication logs
Time window: Chosen for the exercise
Required fields: Timestamp, account, source, result, host
Expected benign causes: Typing errors, saved credentials, service misconfiguration
Test action: Deliberately enter the wrong lab password several times, then the correct one
Pass condition: One alert links the failures and success to the correct host and account
Now test the negative case. A single typing mistake should not produce the same response as a sustained pattern unless that is your stated policy.
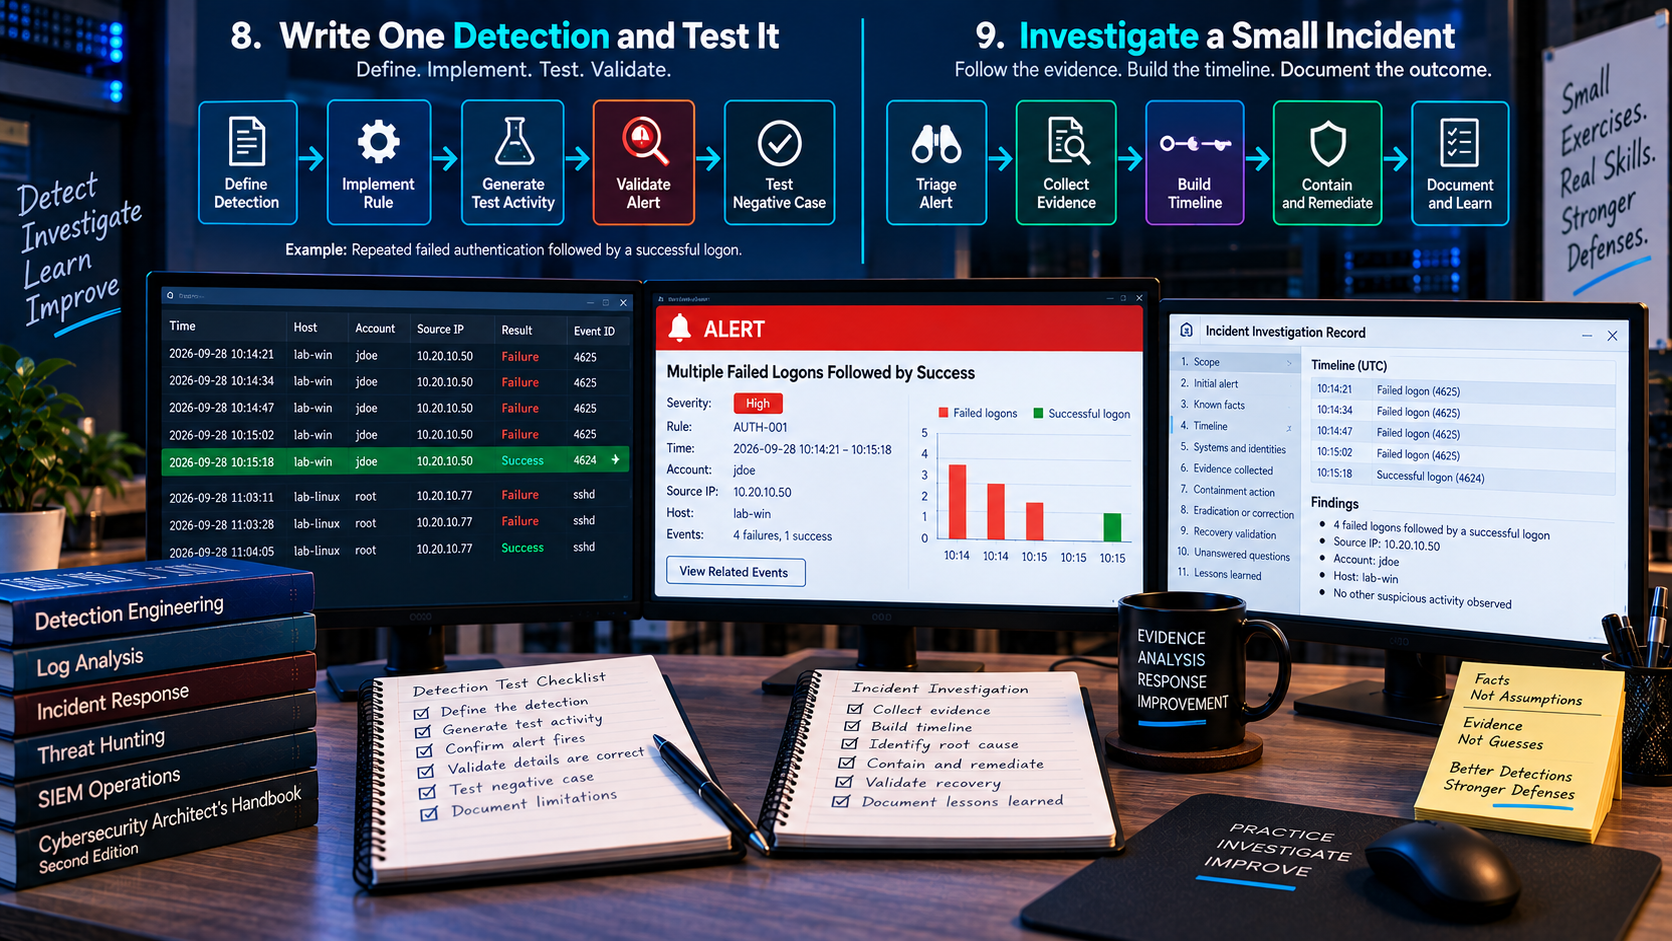
Record what the detection cannot see. If source addresses are missing, say so. If the event only exists on one operating system, say so. Detection engineering includes the blind spots.
9. Investigate a small incident
Create a benign scenario with a known answer. Examples include:
- A new local administrator appears.
- A web service starts listening on an unexpected port.
- A scheduled task creates a file at a known time.
- Repeated failed logons precede a successful logon.
- A firewall begins denying a connection after a rule change.
Investigate without reading the answer first. Build a timeline from logs and system state. Your notes should distinguish facts, hypotheses, and unanswered questions.
Use an incident record with these sections:
Scope:
Initial alert:
Known facts:
Timeline:
Systems and identities involved:
Evidence collected:
Containment action:
Eradication or correction:
Recovery validation:
Unanswered questions:
Lessons and control changes:
Hash exported evidence if you want to practice integrity checking. Keep the original files unchanged and perform analysis on copies.
The exercise is complete when another person could follow your record and reach the same conclusion.
10. Back up and recover the service
Backups feel successful because the job reports success. Recovery proves whether they are useful.
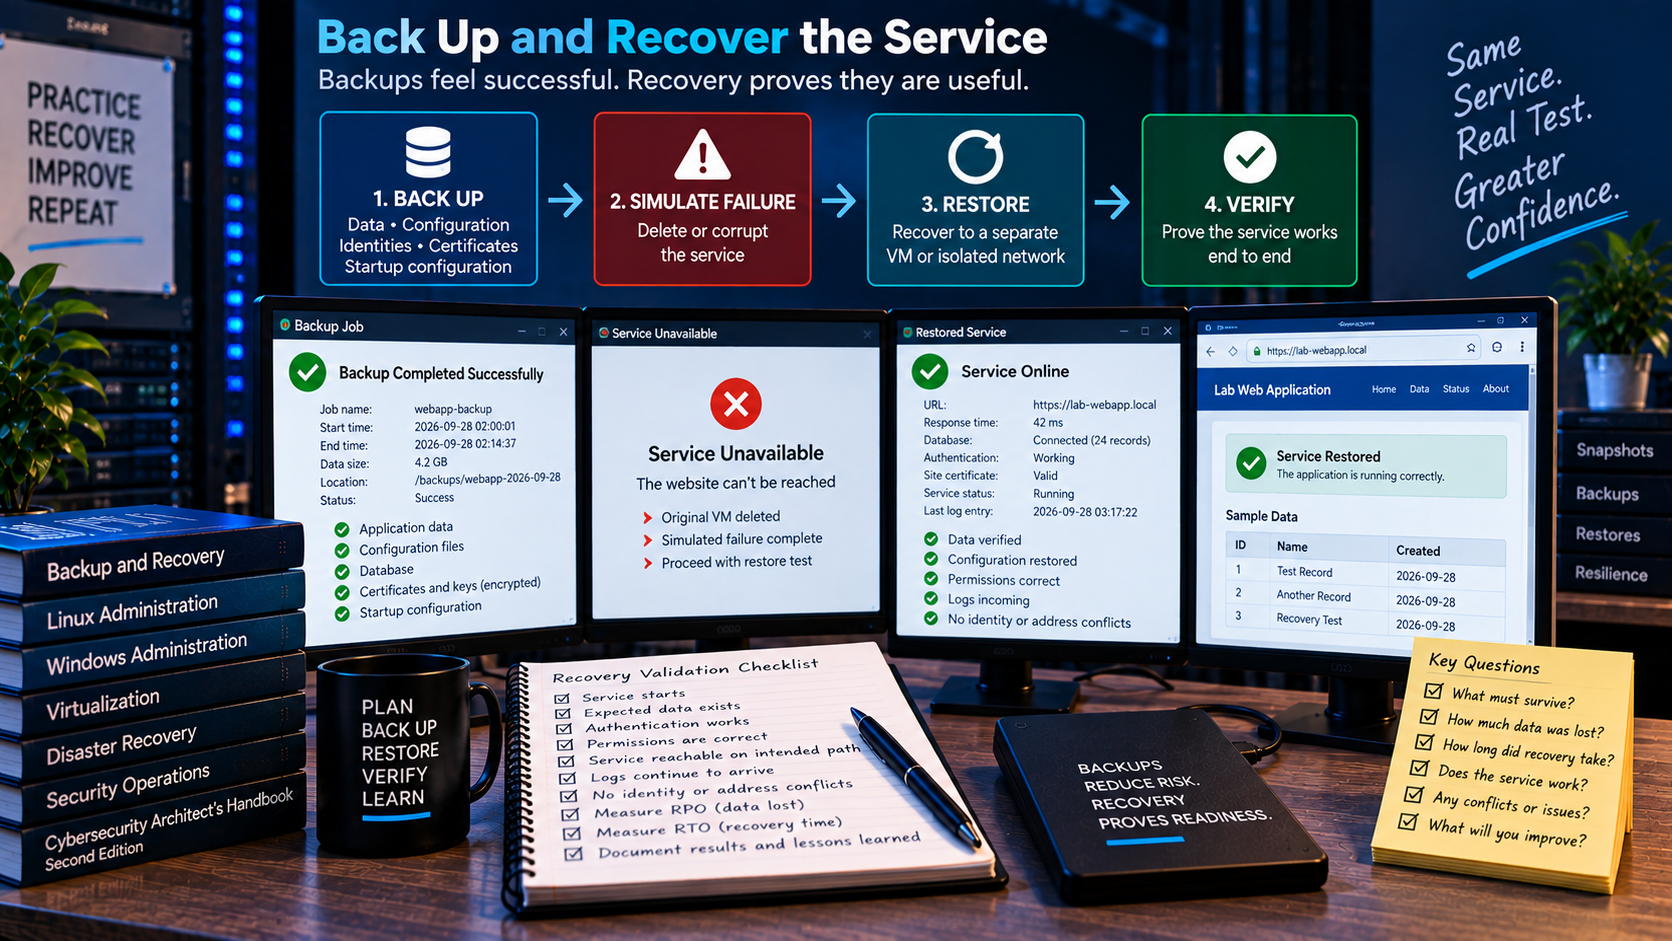
Choose a simple service, such as a small website or database. Define what must survive:
- Application data
- Configuration
- User or service identity
- Certificates or keys, handled safely
- Dependencies
- Startup configuration
- The backup procedure itself
Delete or corrupt the lab copy after taking the required snapshot and backup. Restore it to a separate VM or isolated network.
Verify more than boot:
- The service starts.
- The expected data exists.
- Authentication works.
- Permissions remain correct.
- The application is reachable on the intended path.
- Logs continue to arrive.
- The restored system does not conflict with the original identity or address.
Measure how much data you lost and how long recovery took. Those are your observed recovery point and recovery time, not targets copied from a template.
11. Automate one repeatable task
Automation should come after you can perform and verify the task manually.
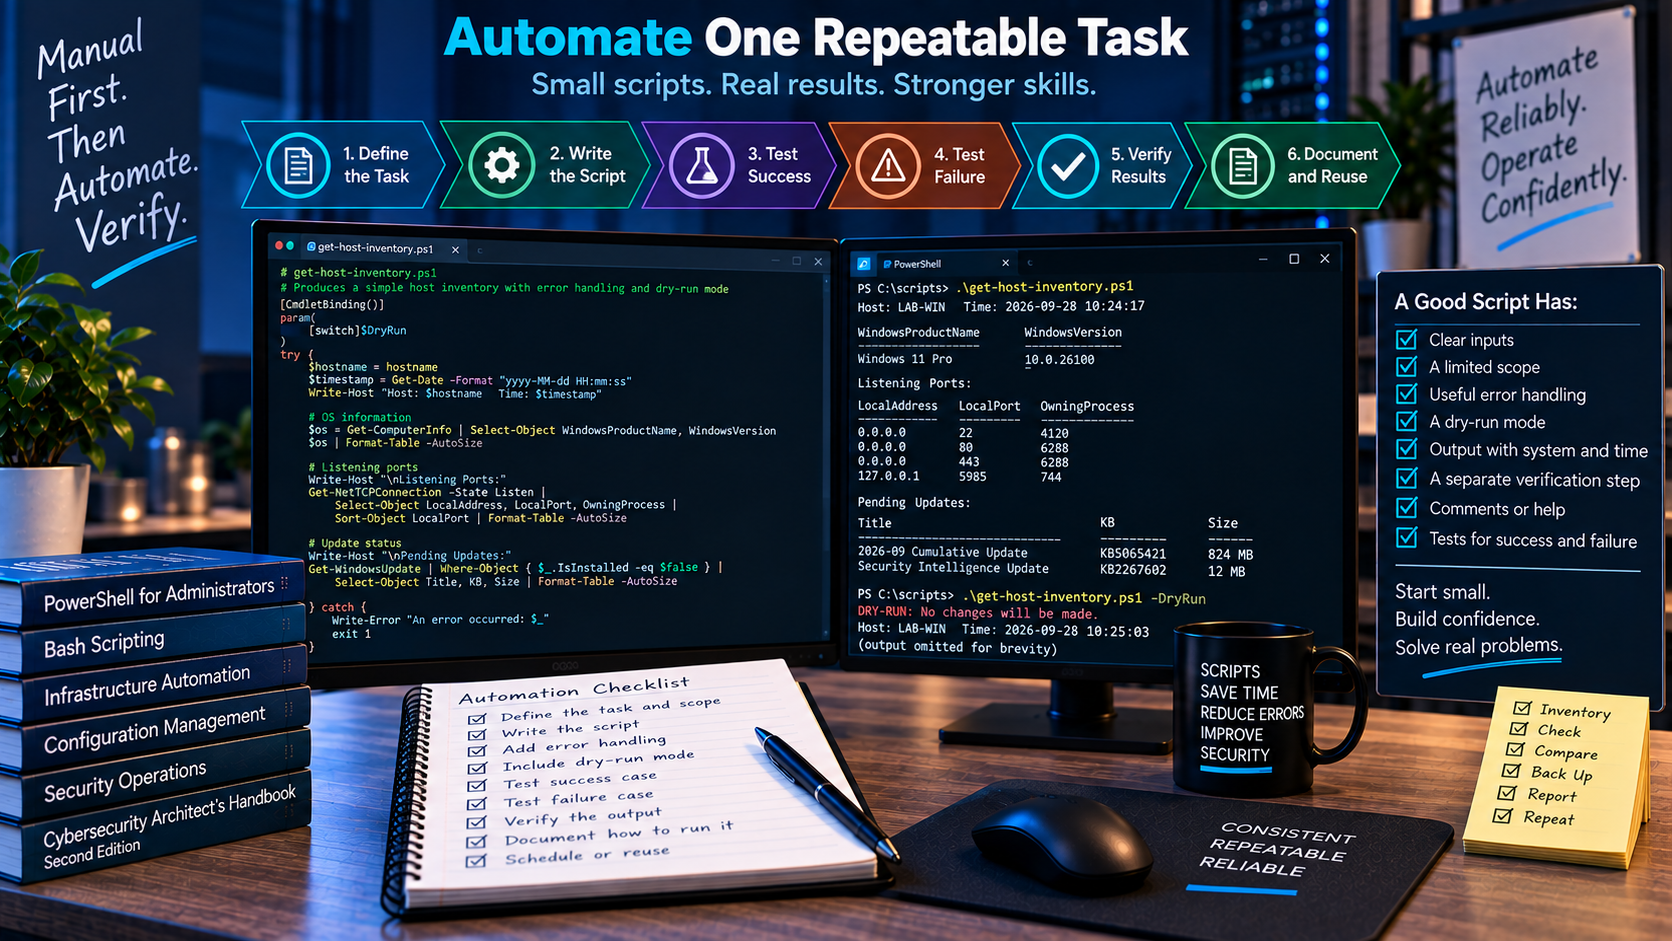
Good first projects include:
- Producing a host inventory
- Listing listening ports and their owning processes
- Checking update status
- Finding failed logons during a chosen period
- Comparing a current configuration with a baseline
- Backing up a configuration file and verifying the copy
Your script should have:
- Clear inputs
- A limited scope
- Useful error handling
- A dry-run mode when changes are possible
- Output that identifies the system and time
- A separate verification step
- Comments or help that explain how to run it
Test success and failure. Disconnect the network, remove a required permission, or provide an invalid path and confirm that the script reports the error instead of claiming success.
12. Document the system so you can leave it alone for a month
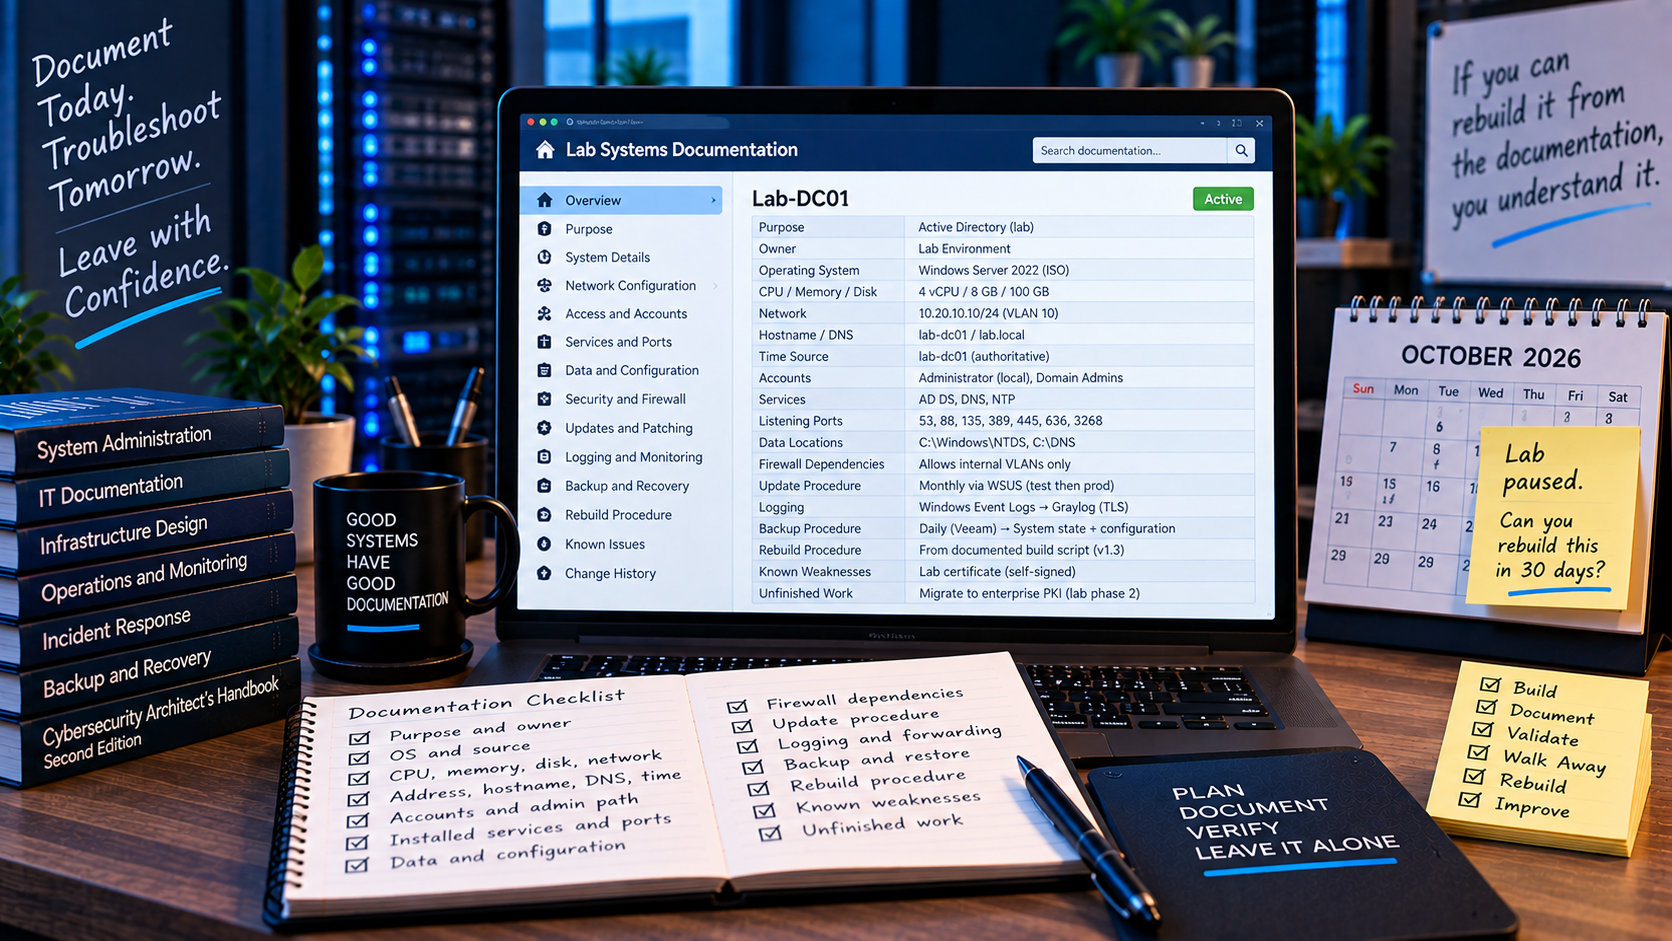
For each VM or service, maintain:
- Purpose and owner
- Operating system and source
- CPU, memory, disk, and network allocation
- Address, hostname, DNS, and time source
- Accounts and administrative path
- Installed services and listening ports
- Data and configuration locations
- Firewall dependencies
- Update procedure
- Logging location and forwarding path
- Backup and restore procedure
- Rebuild procedure
- Known weaknesses and unfinished work
Leave the lab alone for a month. Then try to rebuild or troubleshoot it using only the documentation. Every question you have to answer from memory identifies a documentation gap.
Chapter 6, "Documentation as a Cybersecurity Architect: Valuable Resources and Guidance," explains why this matters beyond the lab. Requirements, design decisions, implementation artifacts, and test cases need traceability. Your build notes and evidence notebook are the small-scale version of that architecture record.
A compact test matrix
Use this table as a scorecard. Do not mark a row complete until you have saved the proof.
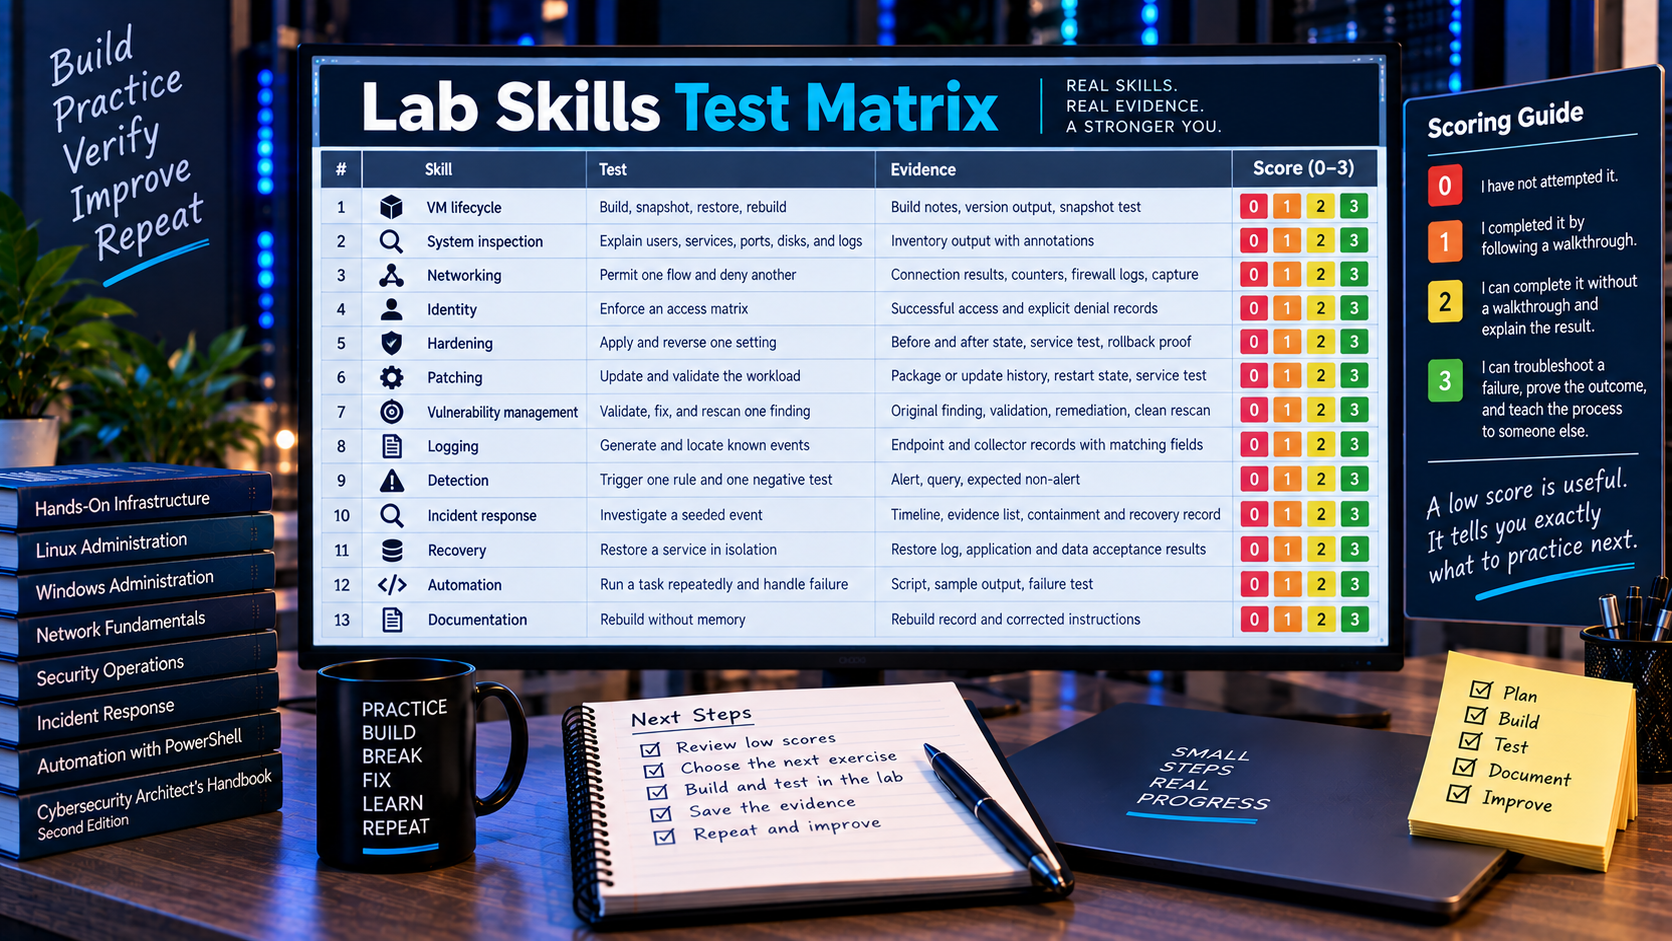
| Skill | Test | Evidence |
|---|---|---|
| VM lifecycle | Build, snapshot, restore, rebuild | Build notes, version output, snapshot test |
| System inspection | Explain users, services, ports, disks, and logs | Inventory output with annotations |
| Networking | Permit one flow and deny another | Connection results, counters, firewall logs, capture |
| Identity | Enforce an access matrix | Successful access and explicit denial records |
| Hardening | Apply and reverse one setting | Before and after state, service test, rollback proof |
| Patching | Update and validate the workload | Package or update history, restart state, service test |
| Vulnerability management | Validate, fix, and rescan one finding | Original finding, validation, remediation, clean rescan |
| Logging | Generate and locate known events | Endpoint and collector records with matching fields |
| Detection | Trigger one rule and one negative test | Alert, query, expected non-alert |
| Incident response | Investigate a seeded event | Timeline, evidence list, containment and recovery record |
| Recovery | Restore a service in isolation | Restore log, application and data acceptance results |
| Automation | Run a task repeatedly and handle failure | Script, sample output, failure test |
| Documentation | Rebuild without memory | Rebuild record and corrected instructions |
Score each item from zero to three:
- 0: I have not attempted it.
- 1: I completed it by following a walkthrough.
- 2: I can complete it without a walkthrough and explain the result.
- 3: I can troubleshoot a failure, prove the outcome, and teach the process to someone else.
I would use the score to find the next exercise, not to create another credential. A low score is useful because it tells you exactly what to practice next.
A four-stage lab progression
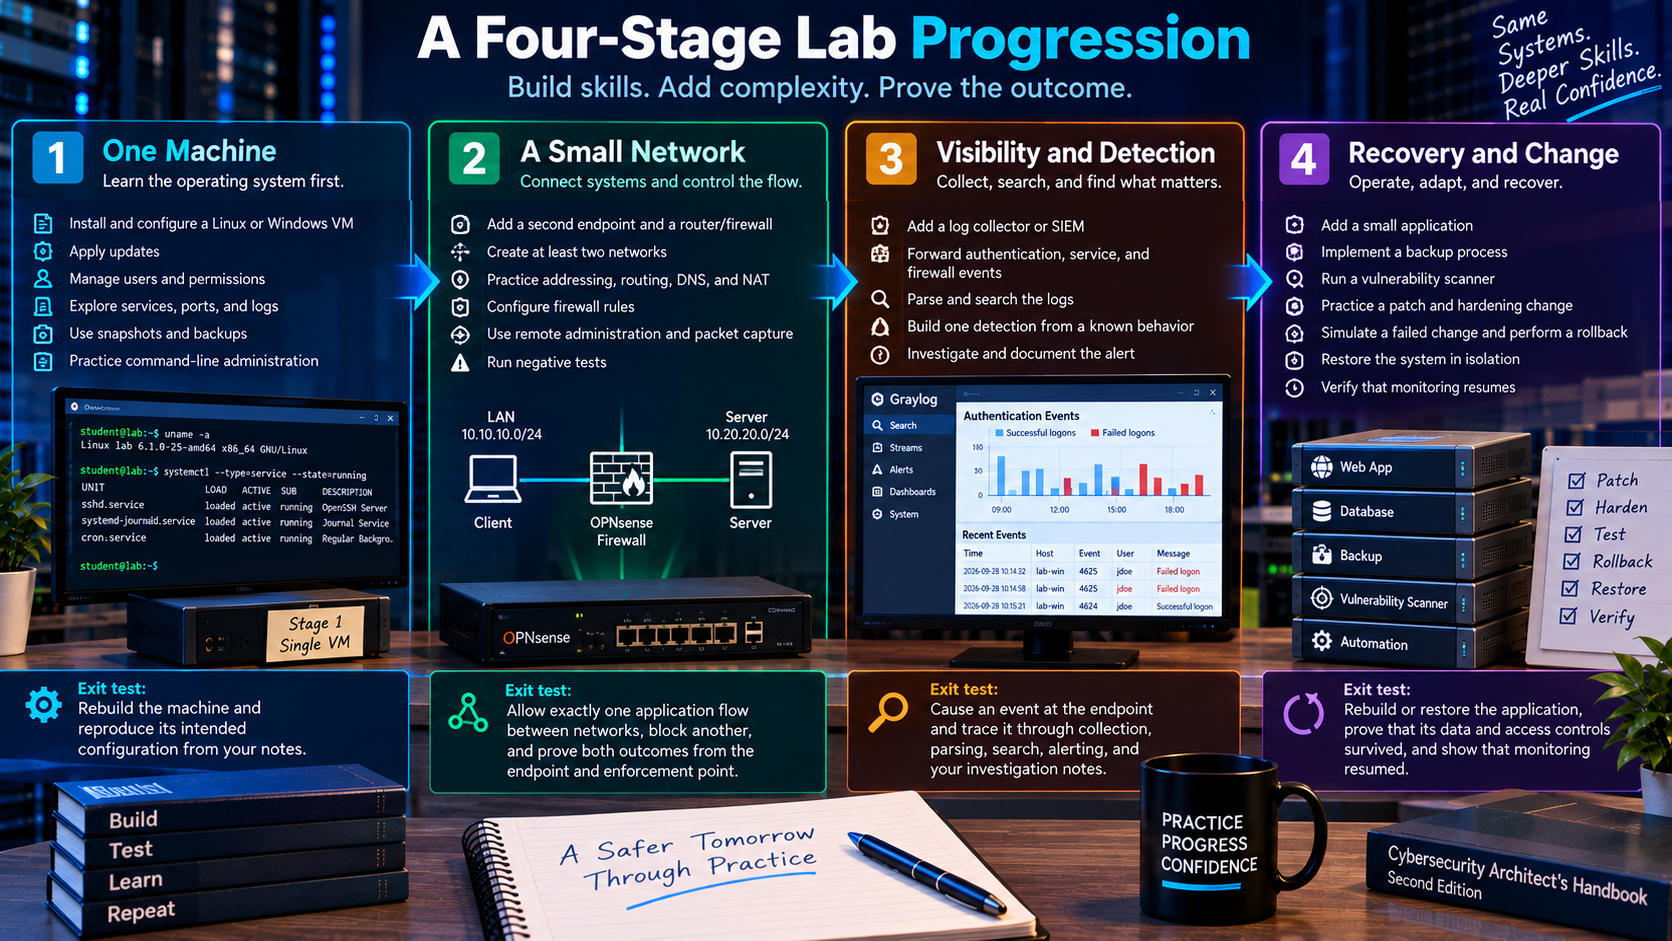
Stage 1: one machine
Build one Linux or Windows VM. Learn installation, updates, users, permissions, services, ports, logs, snapshots, backups, and command-line administration.
Do not add security products yet. Learn what the operating system already records.
Exit test: rebuild the machine and reproduce its intended configuration from your notes.
Stage 2: a small network
Add a second endpoint and a router or firewall. Create at least two networks. Practice addressing, routing, DNS, NAT, firewall rules, remote administration, packet capture, and negative tests.
Exit test: allow exactly one application flow between networks, block another, and prove both outcomes from the endpoint and enforcement point.
Stage 3: visibility and detection
Add a log collector or SIEM. Forward authentication, service, and firewall events. Build one detection from a behavior you can safely reproduce.
Exit test: cause an event at the endpoint and trace it through collection, parsing, search, alerting, and your investigation notes.
Stage 4: recovery and change
Add a small application, backup process, vulnerability scanner, and simple automation. Practice a patch, hardening change, failed change, rollback, and isolated restore.
Exit test: rebuild or restore the application, prove that its data and access controls survived, and show that monitoring resumed.
A capstone you can run more than once
Use this scenario after completing the first three stages:
A small internal web server is reachable from the client network on HTTPS. After a maintenance change, users report that the site is unavailable. At about the same time, monitoring reports repeated failed administrative logons to the server.
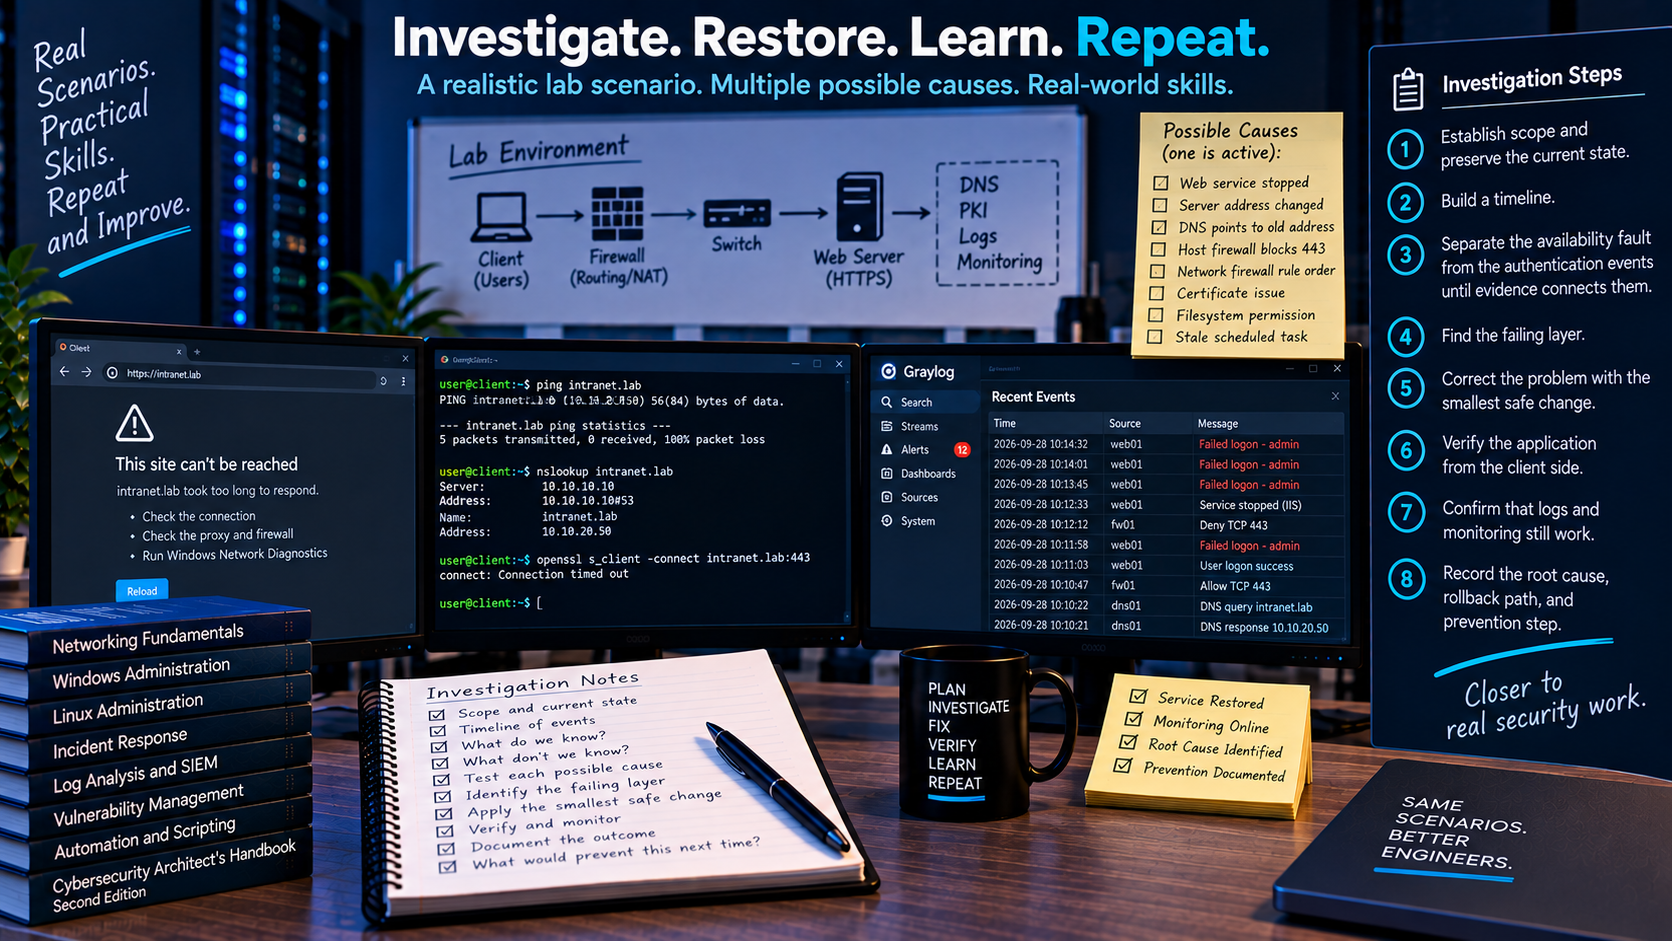
Have a friend seed the fault, or randomly select one of these causes without looking during the investigation:
- The web service is stopped.
- The server address changed.
- DNS points to the old address.
- The host firewall blocks TCP 443.
- The network firewall rule is in the wrong order.
- The certificate expired or does not match the name.
- The filesystem permission prevents the service from reading its content.
- The failed logons come from an old scheduled task with stale credentials.
Your job is to:
- Establish scope and preserve the current state.
- Build a timeline.
- Separate the availability fault from the authentication events until evidence connects them.
- Find the failing layer.
- Correct the problem with the smallest safe change.
- Verify the application from the client side.
- Confirm that logs and monitoring still work.
- Record the root cause, rollback path, and prevention step.
This is much closer to real security work than installing another product. Real incidents mix technical faults, suspicious signals, incomplete context, and pressure to restore service.
What to look for while you practice
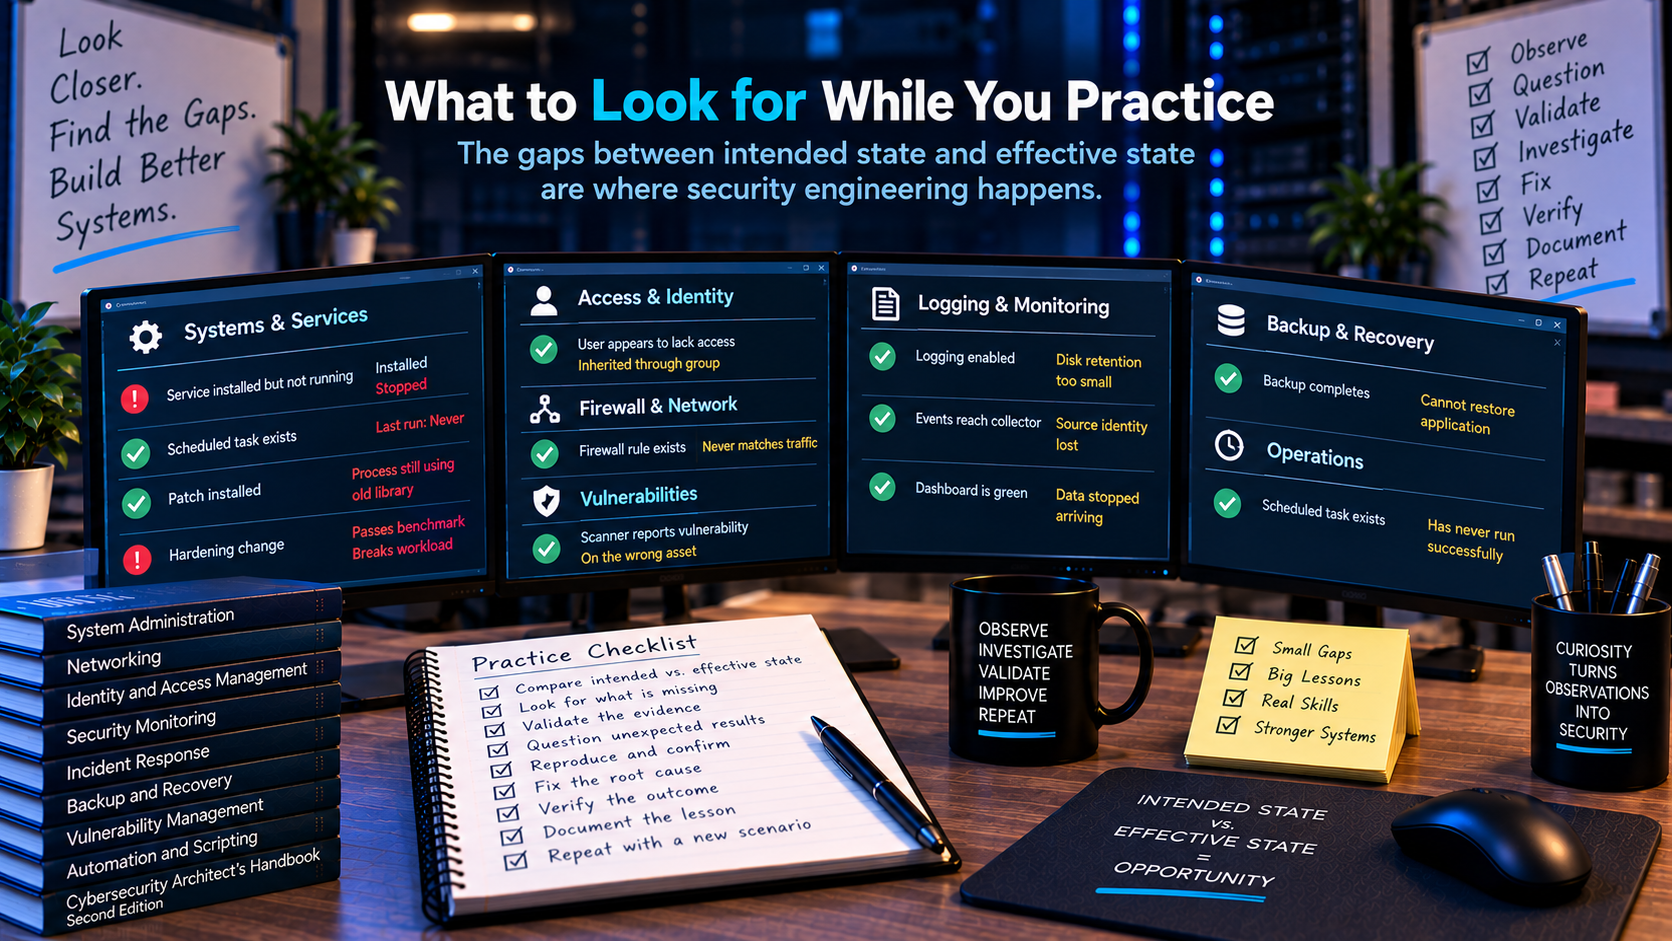
Pay attention to the gaps between intended state and effective state:
- A service is installed but not running.
- A firewall rule exists but never matches traffic.
- A user appears to lack access but inherits it through a group.
- Logging is enabled but the disk retention is too small.
- Events reach the collector but lose the source identity.
- A scanner reports a vulnerability on the wrong asset.
- A backup completes but cannot restore the application.
- A scheduled task exists but has never run successfully.
- A hardening change passes a benchmark check but breaks the workload.
- A patch is installed but the vulnerable process still uses an old library until restart.
- A dashboard is green because the data stopped arriving.
Those gaps are where security engineering happens.
Keep an evidence notebook
For every exercise, save five things:
- The question you were trying to answer.
- The expected result.
- The command, configuration, or action you used.
- The evidence you observed.
- The conclusion and next step.
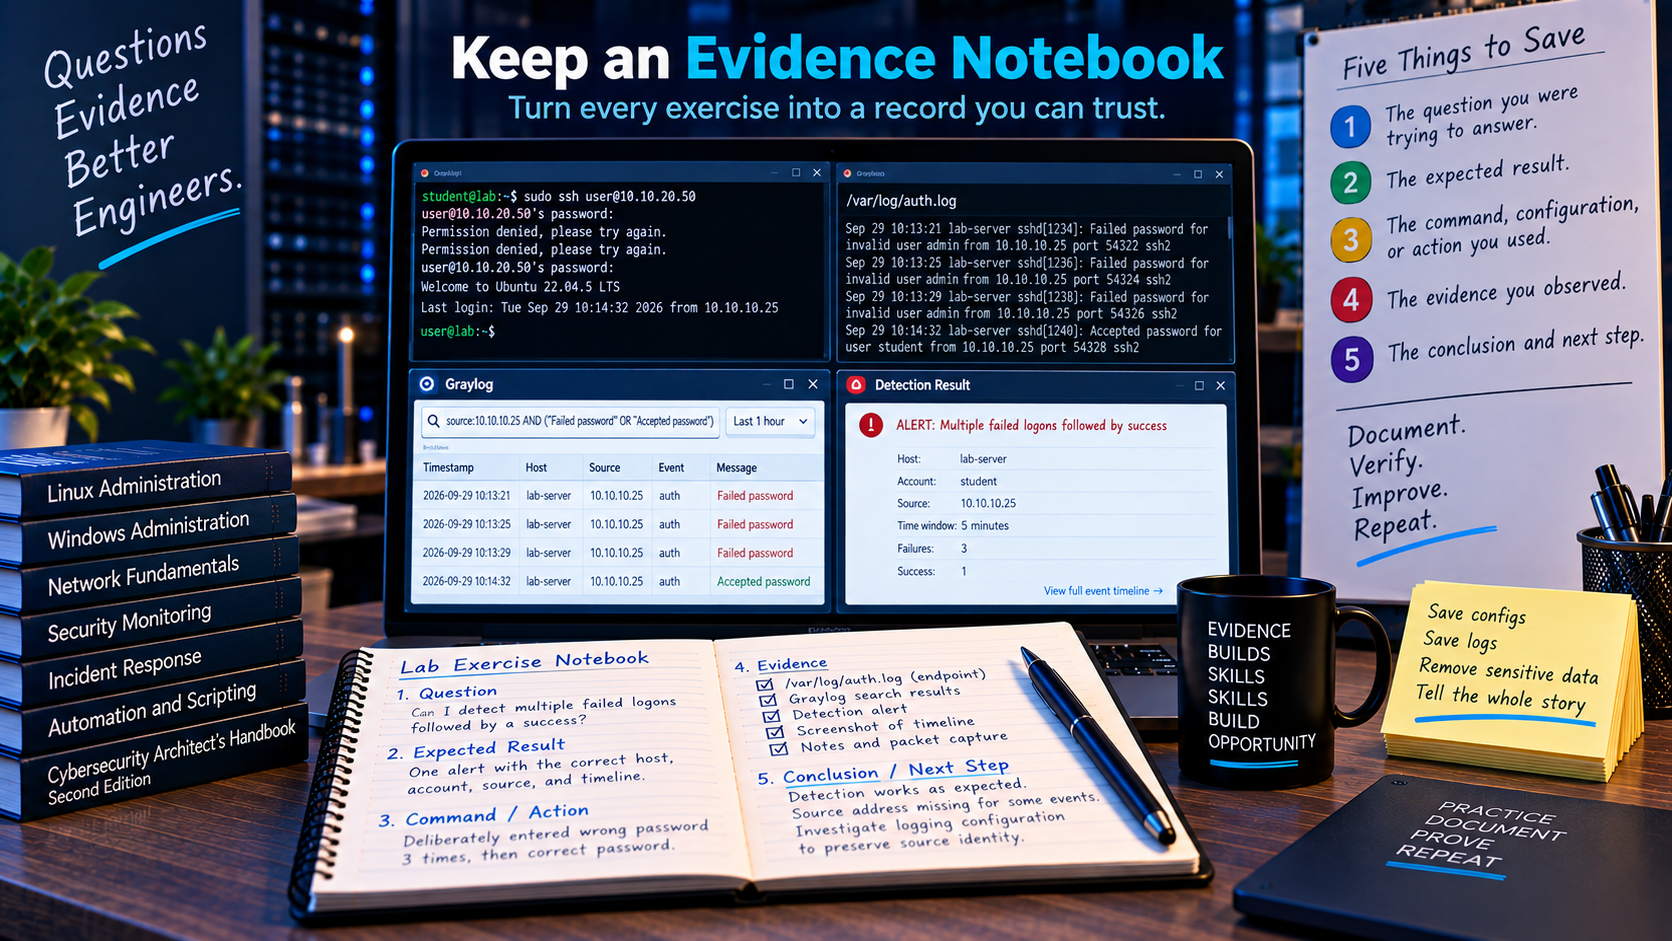
Screenshots are useful for visual state, but text output is easier to search, compare, and reproduce. Save configuration exports, logs, command output, packet captures, and short Markdown notes. Remove credentials and personal data before sharing anything publicly.
A good portfolio entry does not say, "I built a SIEM." It says:
I generated a failed logon on a Linux server, located the native event, forwarded it to a collector, verified that the host and source fields survived parsing, wrote a detection for repeated failures, tested one alert and one non-alert case, and documented the visibility gap when the source address was absent.
That statement shows a complete chain of reasoning and proof.
Chapter 12, "Architecture Considerations: Design, Development and Other Security Strategies," carries that idea into architecture delivery. Testing should cover normal operation, invalid inputs, component failures, degraded networks, recovery procedures, and the security controls themselves. It should also produce an explicit decision: the design met its acceptance criteria, or it did not.
How this lab connects to the book
If you are reading Cybersecurity Architect's Handbook, Second Edition, use this article as a practice map for five parts of the book:
- Chapter 5, "Threat/Risk/Governance Considerations as an Architect": define the purpose, risk, treatment, owner, and evidence for each exercise.
- Chapter 6, "Documentation as a Cybersecurity Architect: Valuable Resources and Guidance": record the intended state, implementation, test results, and changes so another person can reproduce your work.
- Chapter 7, "Entry-Level to Architect Roadmap": use the lab to build judgment across operating systems, networking, identity, security operations, and adjacent domains.
- Chapter 10, "Best Practices": practice least privilege, patch validation, vulnerability management, rollback, and recovery without risking a production system.
- Chapter 12, "Architecture Considerations: Design, Development and Other Security Strategies": turn each exercise into requirements, acceptance criteria, negative tests, failure tests, and evidence.
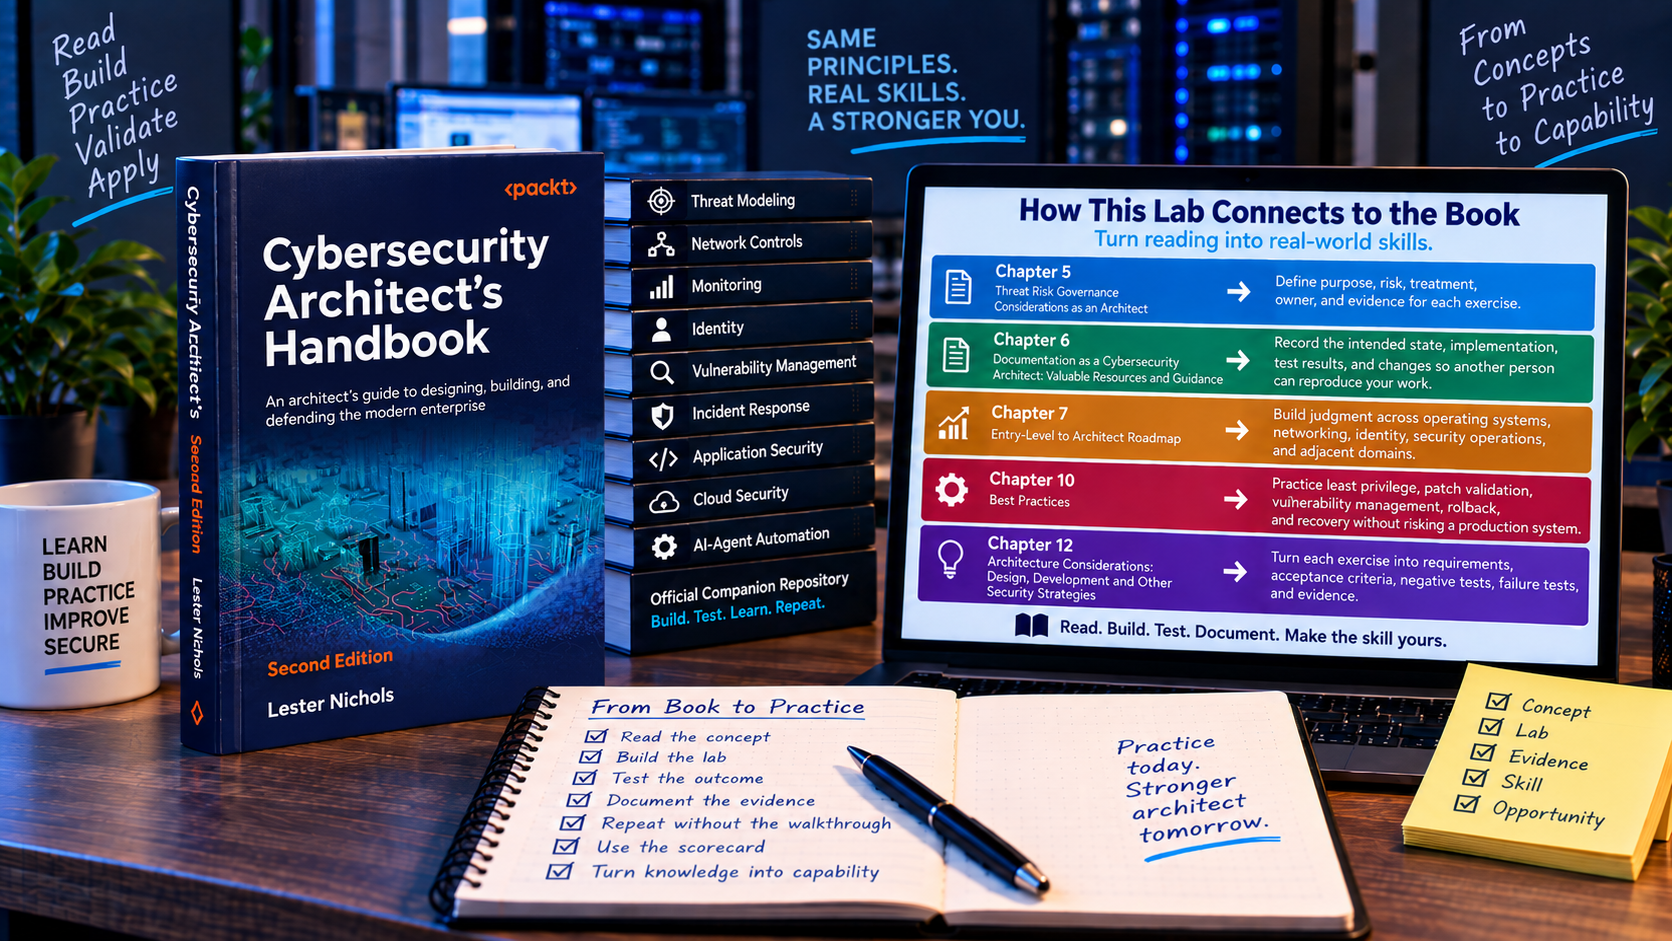
The book's official companion repository adds build-it-yourself exercises across threat modeling, network controls, monitoring, identity, vulnerability management, incident response, application security, cloud security, and bounded AI-agent automation. Each lab includes objectives, prerequisites, validation checks, and troubleshooting guidance. Use those labs when you want a guided build. Then repeat the exercise without the walkthrough and use the scorecard in this article to test whether the skill is actually yours.
Start with this weekend's exercise
If you were one of my students starting from zero, this is the exercise I would give you first:
- Create one Linux VM on a NAT network.
- Update it and record the version.
- Create a standard user and practice one elevated task.
- List the machine's addresses, routes, services, listening ports, disks, and recent errors.
- Start a simple web service.
- Confirm the listening port locally.
- Allow the port through the host firewall and test it from a second VM on an isolated network.
- Block the port again and find the denial evidence.
- Stop the service and distinguish that failure from the firewall block.
- Restore a clean snapshot, then rebuild the same result from your notes.
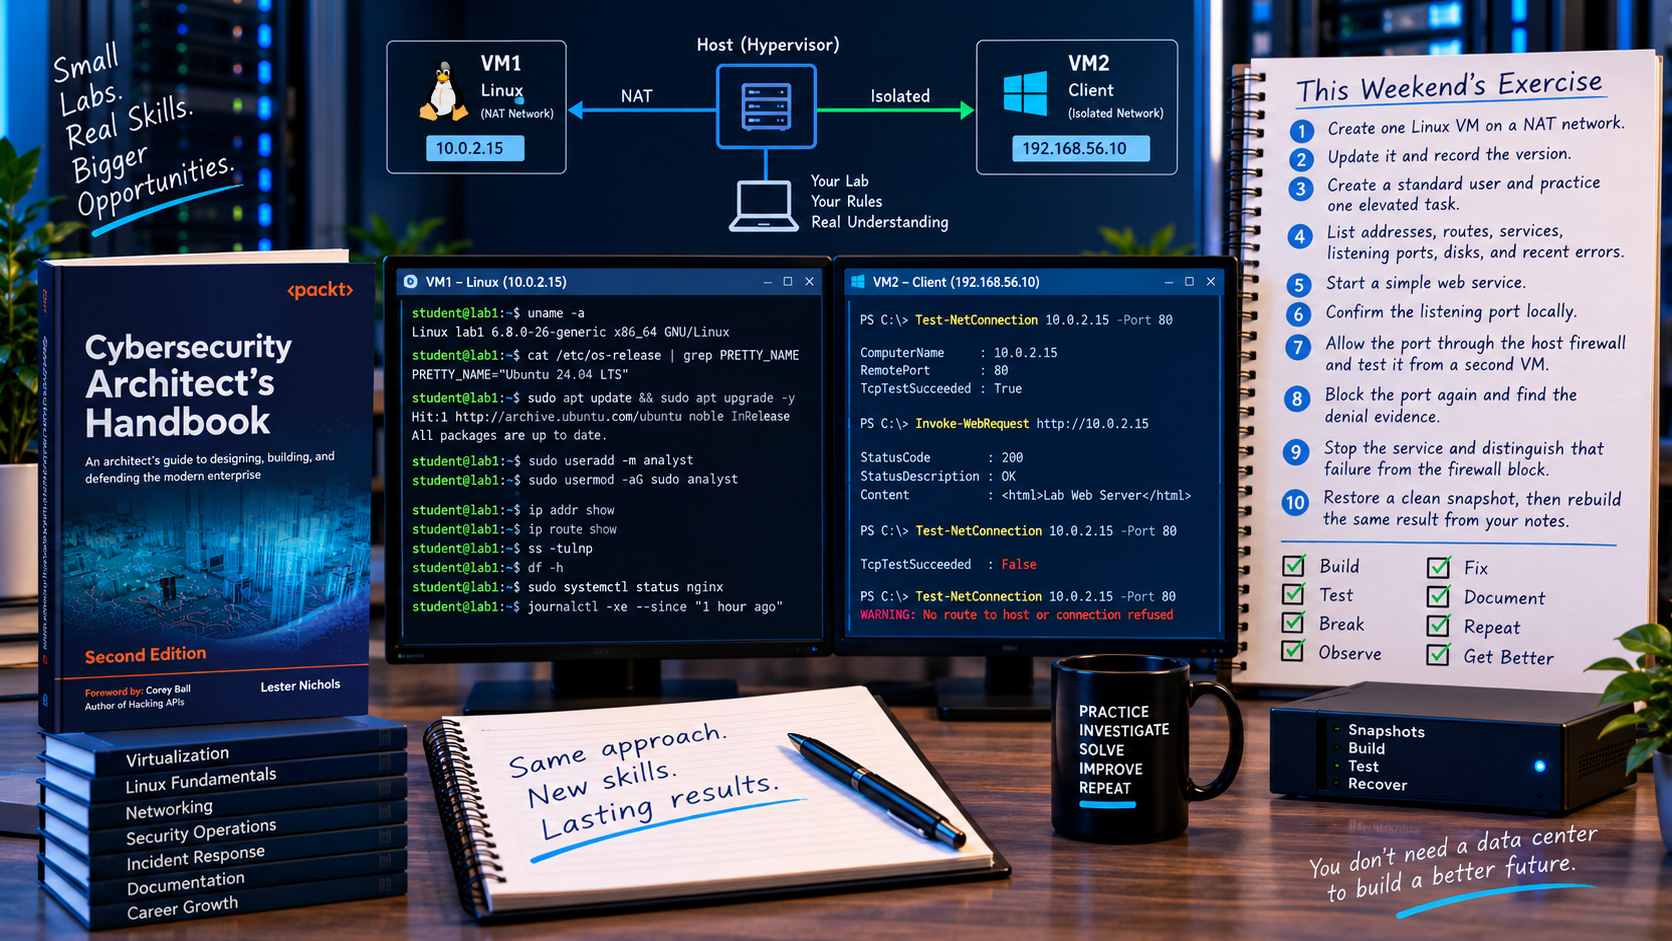
That one exercise covers the VM lifecycle, operating-system administration, identity, networking, service management, firewall policy, evidence, troubleshooting, recovery, and documentation.
You do not need a rack of servers to test whether you understand cybersecurity. You need a small system with clear boundaries, a question you can answer, a failure you can diagnose, and evidence that proves your conclusion.
That last point matters most. During my career, the systems and products have changed repeatedly. The durable skill is being able to look at a system, explain what should happen, observe what actually happened, account for the difference, and make a safe correction. Build your lab to practice that process, and it will keep teaching you long after the installation guide ends.


