


Welcome back to the Basics Series. If you've been following along, you already have the hard part behind you. In Basics Series - #3 we compared the firewall market, picked OPNsense for the lab, and installed it as a VM with two NICs — one facing your hypervisor's internet-connected network as the WAN, one on an isolated internal network as the LAN. In Basics Series - #4 we worked through the traditional-versus-transparent-bridged decision and I promised you the configuration walkthrough, including Zenarmor. This is that post — with one addition. Before the hands-on work, I'm going to widen the frame beyond Part 2's traditional-versus-transparent split, because what we build today doesn't fit inside it, and I'd rather you understand why than just follow the steps.
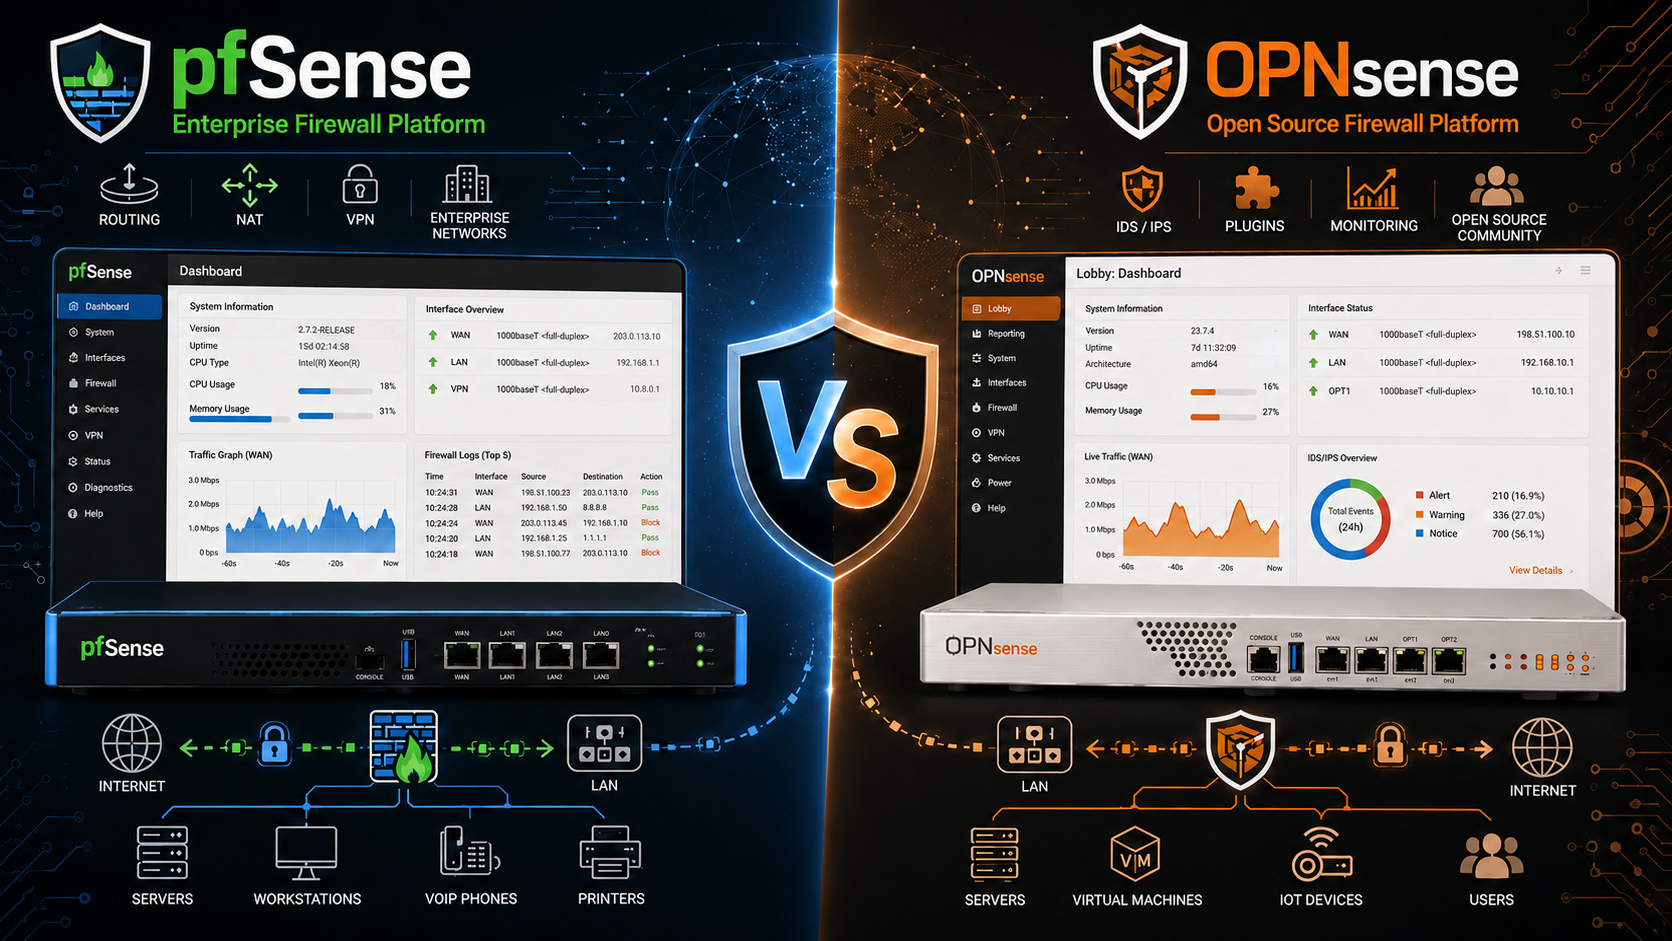
The two open-source firewalls we compared back in Part 1 — the series builds on OPNsense, but nearly everything here transfers.
If you're landing here fresh: you need a working OPNsense VM before any of this makes sense. The topology is deliberately minimal — the firewall VM in the middle, a client VM on the LAN side to drive the web UI and generate traffic, and nothing else. Go build that from Part 1 first, then come back. The whole series runs on free and open-source tooling on purpose, because the free stack teaches the discipline the commercial product sells — and by the end of this post that claim gets literal. We'll have application-aware inspection, category-based policy, and cloud-managed reporting running on a lab VM. That's the feature list of a commercial NGFW, built for the cost of your time.

The lab topology from Part 1 — OPNsense between two virtual networks, with a client VM on the LAN side.
If the Basics Series has been useful, the Cybersecurity Architect's Handbook, Second Edition takes this same build-it-yourself approach across the full architecture discipline — the Zero Trust material in particular is the deeper story behind what we're doing with Zenarmor today.
Why Traditional vs. Transparent Isn't the Whole Map
Part 2 framed the firewall decision as traditional versus transparent bridged, and for the decision that post had to make — how the firewall inserts into the network — that framing was correct. But I lumped a second question underneath it, and today it comes due. Traditional versus transparent is a deployment axis: it tells you where the firewall sits and whether it participates in routing. It says nothing about the inspection axis — what the firewall can actually see and decide on once traffic reaches it. A transparent bridge can carry a dumb packet filter or a full application-inspection engine; so can a routed gateway. Two independent axes, and Part 2 only drew one of them.
The reason I'm expanding the picture now rather than earlier is that this post is the first time both axes are live at once. By the end of today's build, one lab VM will run stateful inspection at its core, application-layer inspection on top of it, and an endpoint agent beyond it — three different points on the inspection axis, stacked on the deployment choice Part 2 made. If your mental model is still "traditional or transparent," the Zenarmor wizard's mode question will look like the whole decision when it's actually the smaller half. So here is the map, compressed from a much longer treatment — enough to place every piece of today's work on it.
Packet Filtering Firewalls
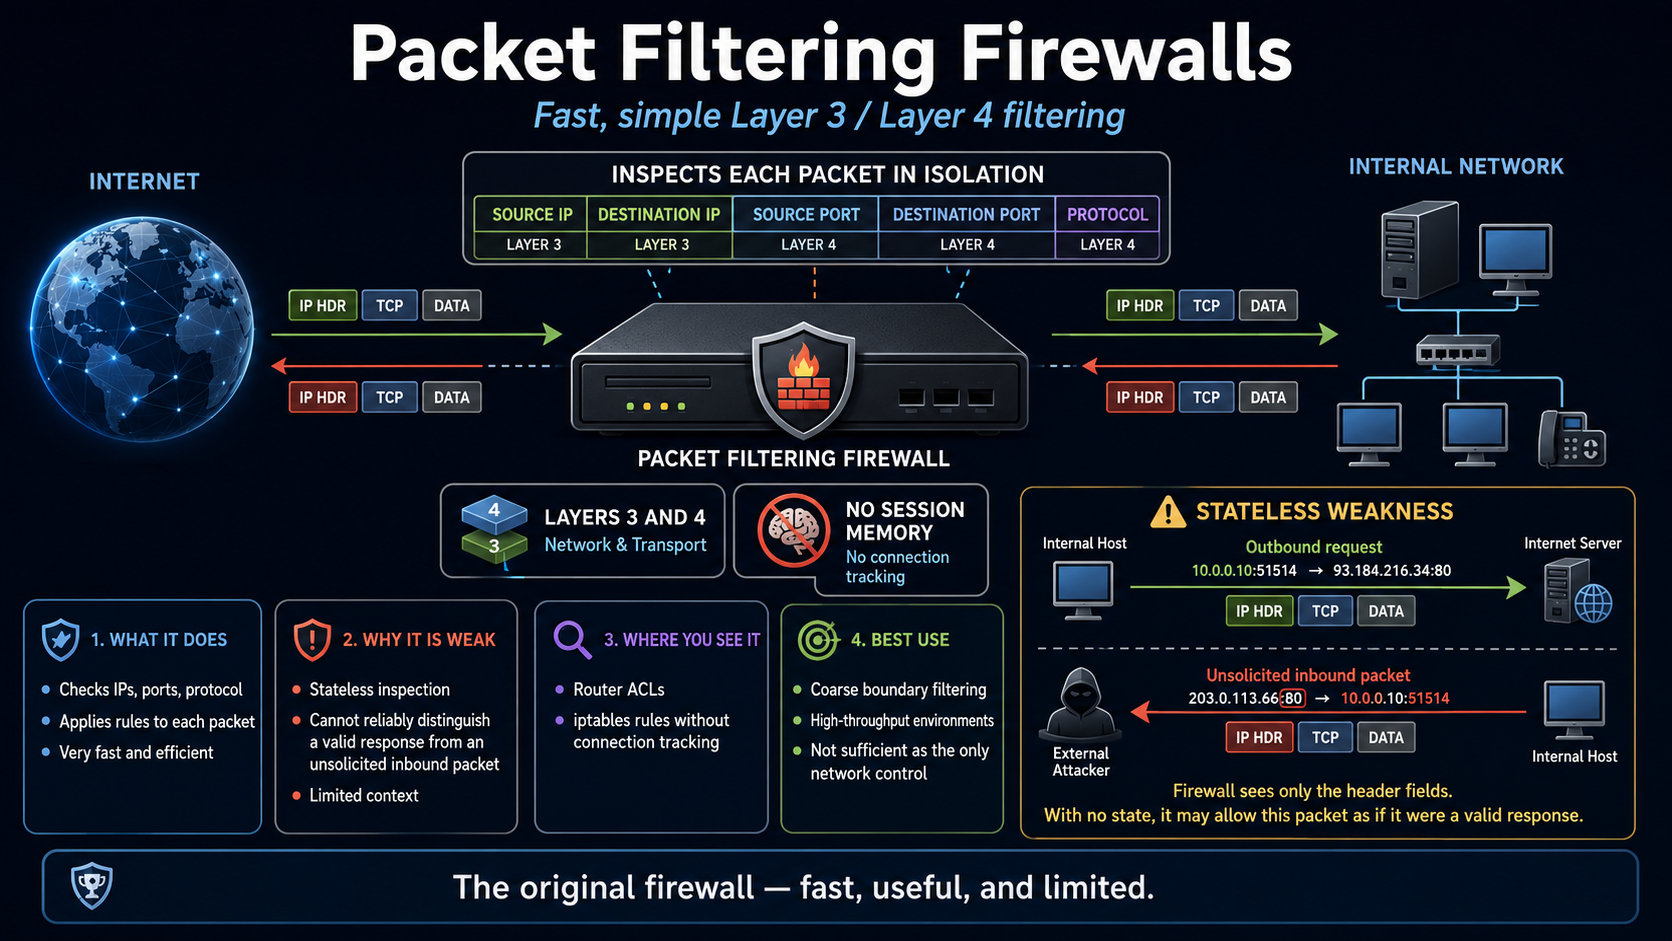
The original firewall, and still the fastest. Packet filters inspect each packet in isolation — source and destination IP, ports, protocol — at Layers 3 and 4, with no memory of what came before. That statelessness is the weakness: the filter can't tell a legitimate response to an outbound request from an unsolicited inbound packet wearing the right source port. Router ACLs and iptables rules without connection tracking live here. Useful for coarse, high-throughput filtering at boundaries; insufficient as a network's only control, which is exactly why the next generation exists.
Stateful Inspection Firewalls
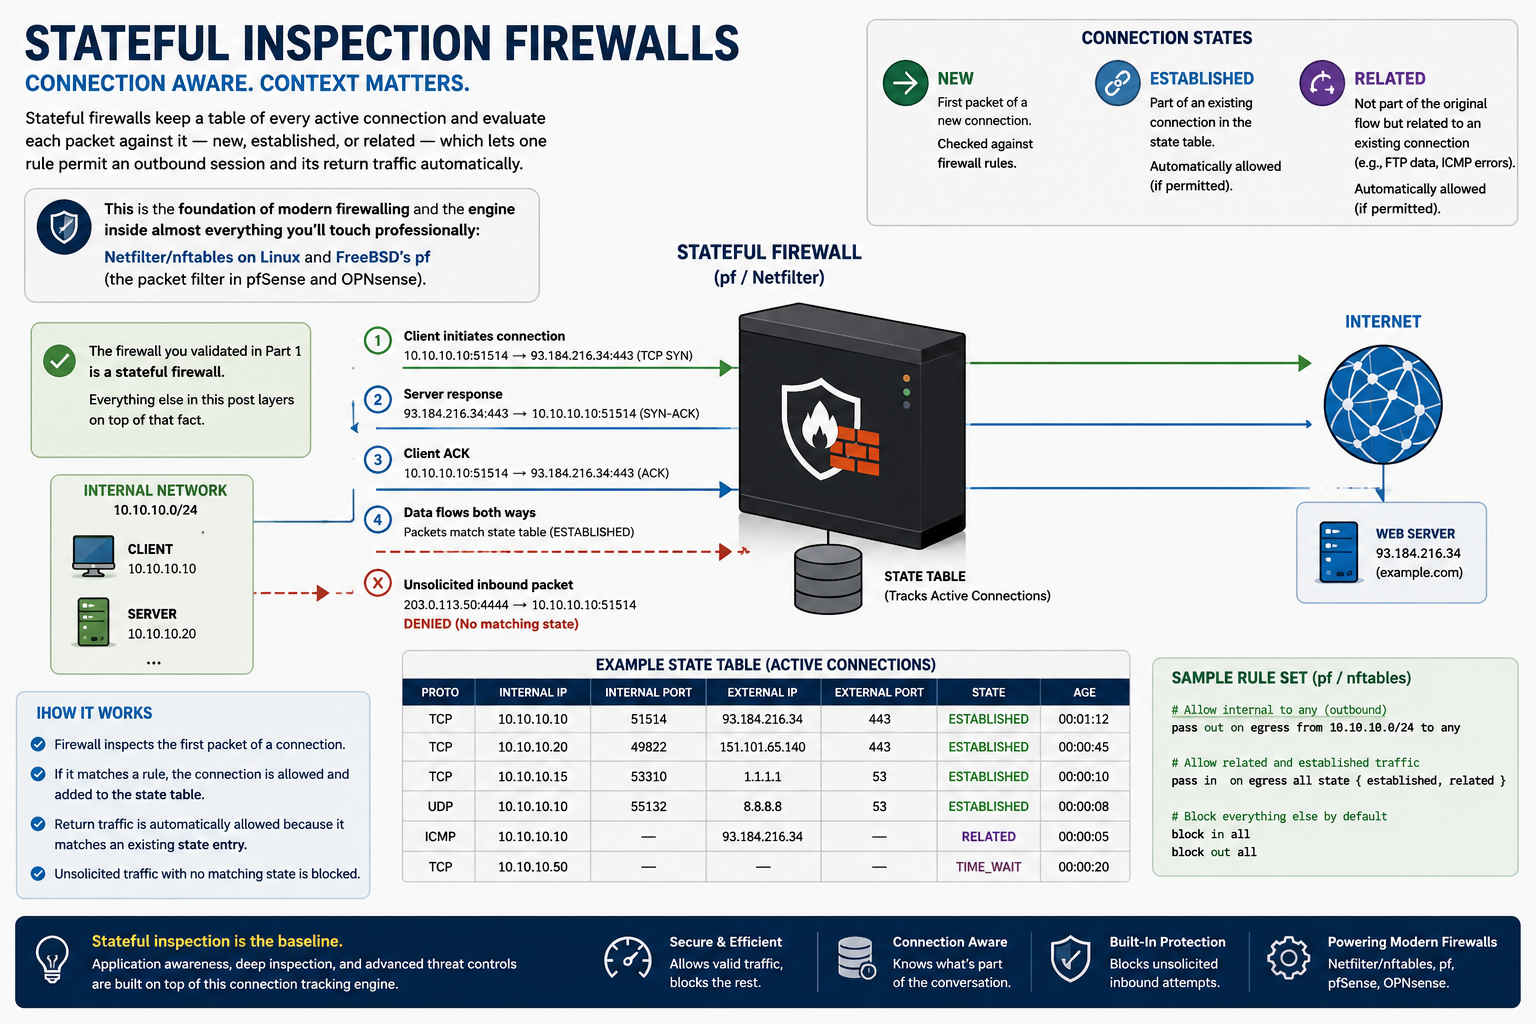
Stateful firewalls keep a table of every active connection and evaluate each packet against it — new, established, or related — which lets one rule permit an outbound session and its return traffic automatically. This is the foundation of modern firewalling and the engine inside almost everything you'll touch professionally: Netfilter/nftables on Linux, and FreeBSD's pf, which is the packet filter running inside both pfSense and OPNsense. The firewall you validated in Part 1 is a stateful firewall. Everything else in this post layers on top of that fact.
Proxy / Application-Layer Firewalls
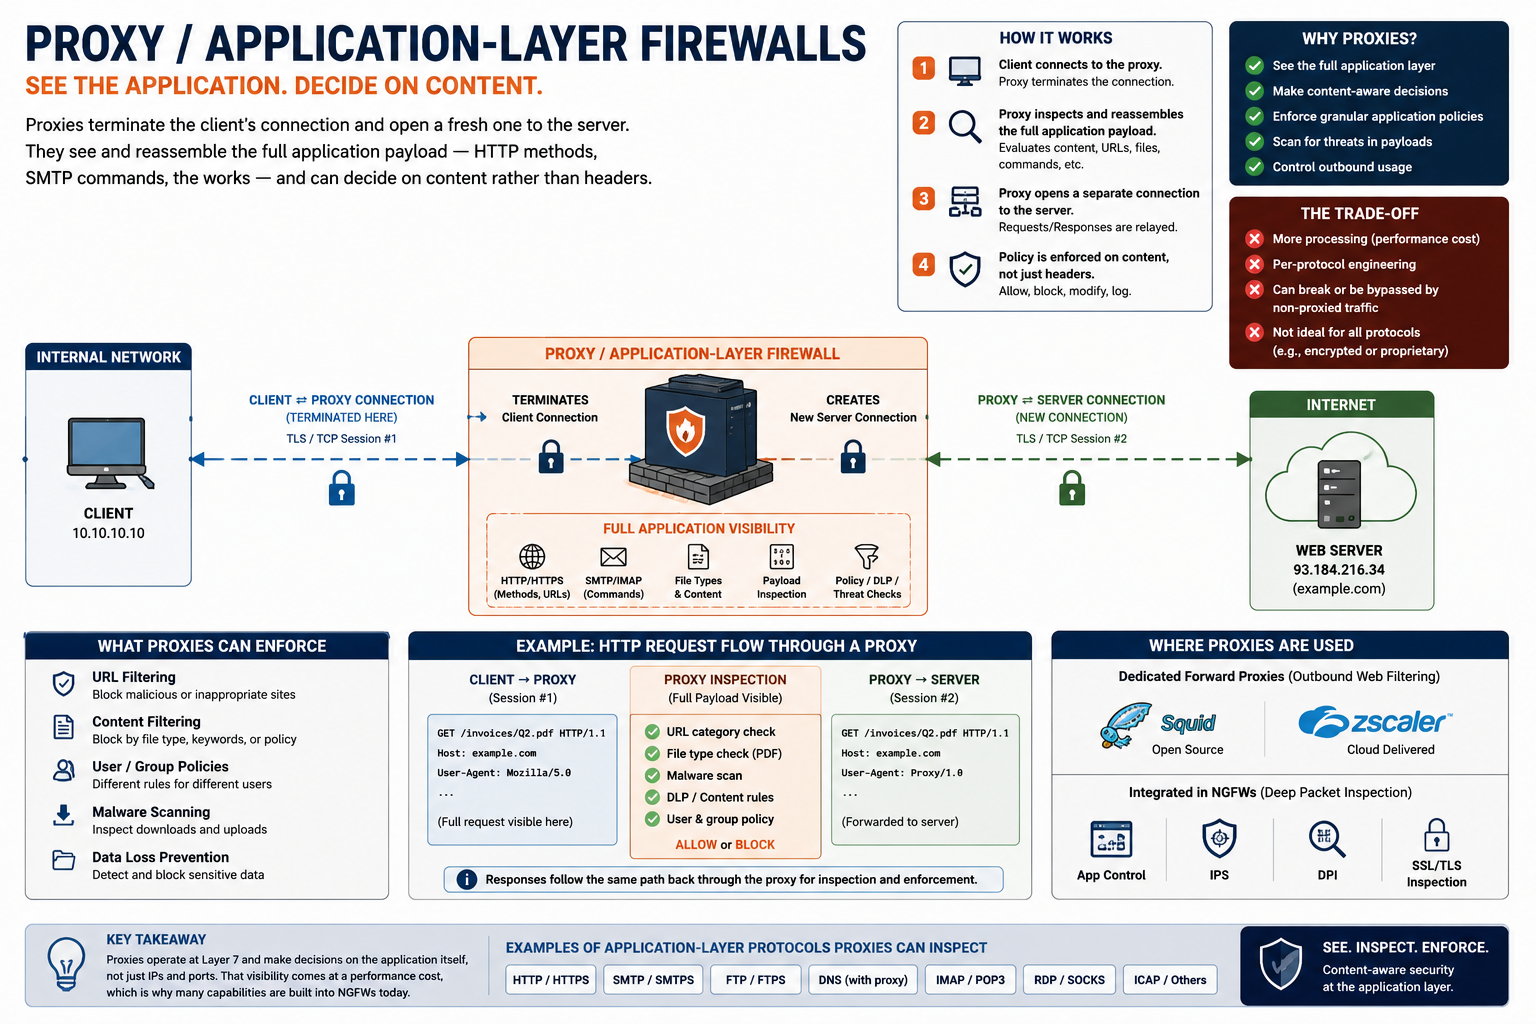
Proxies terminate the client's connection and open a fresh one to the server, which means they see and reassemble the full application payload — HTTP methods, SMTP commands, the works — and can decide on content rather than headers. The cost is performance and per-protocol engineering, which is why the classic proxy firewall was largely absorbed into NGFW deep-packet inspection, though dedicated forward proxies still anchor outbound web filtering (Squid on the open-source side, Zscaler in the cloud-delivered category).
Next-Generation Firewalls (NGFW)
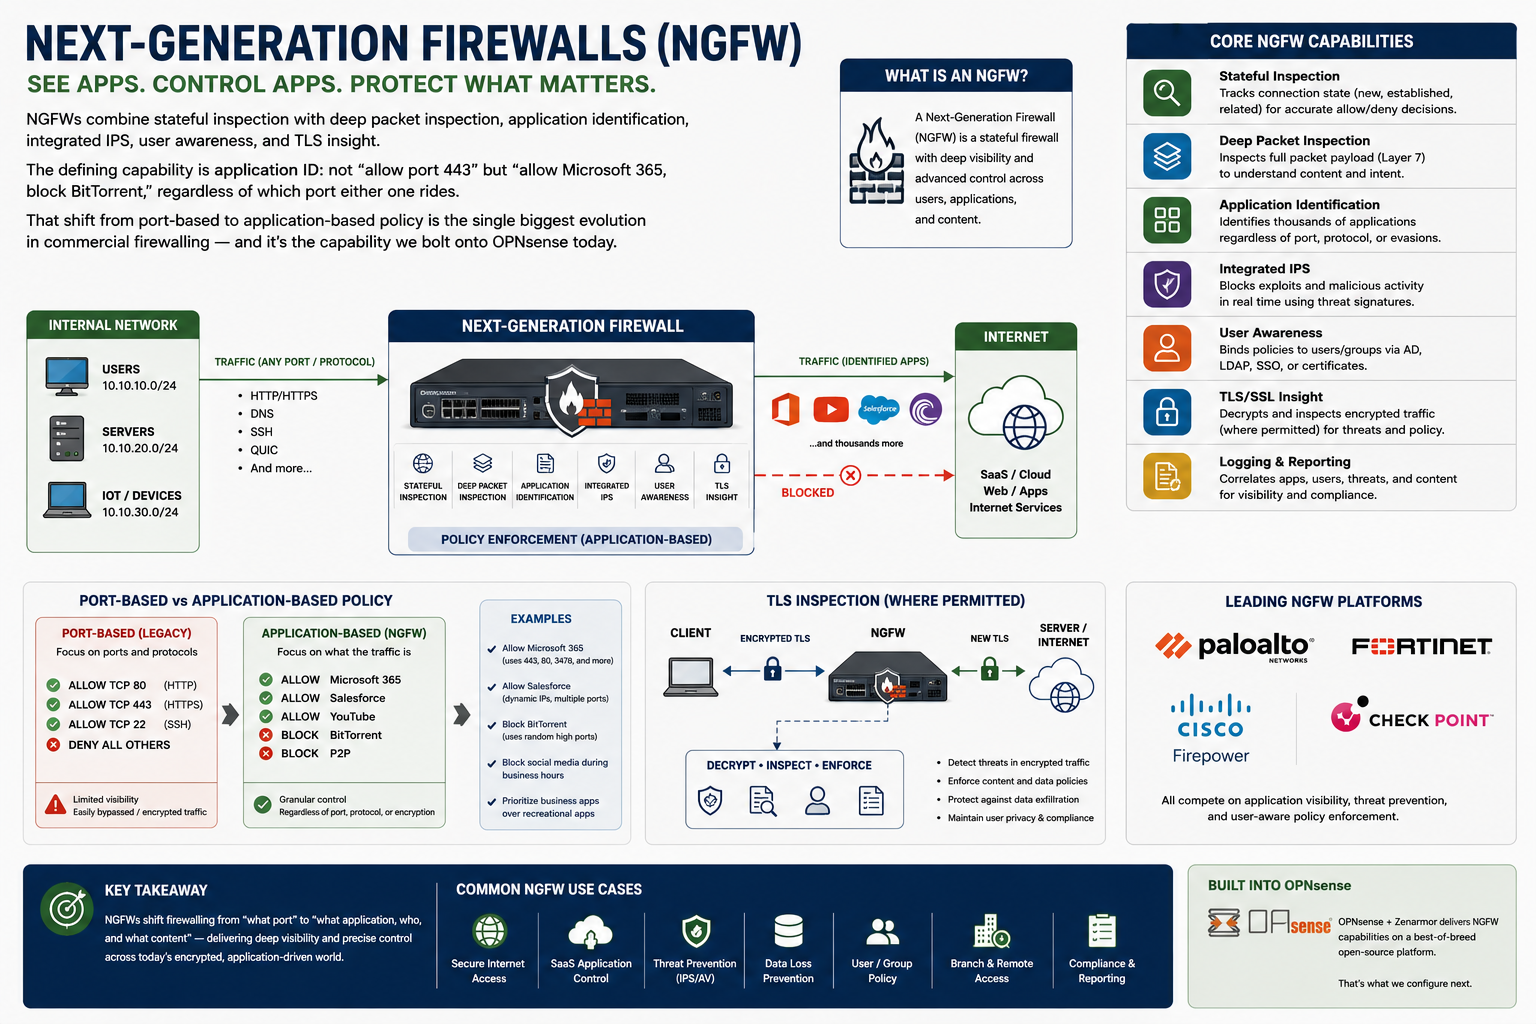
The NGFW combines stateful inspection with deep packet inspection, application identification, integrated IPS, user awareness, and TLS insight. The defining capability is application ID: not "allow port 443" but "allow Microsoft 365, block BitTorrent," regardless of which port either one rides. That shift from port-based to application-based policy is the single biggest evolution in commercial firewalling — Palo Alto, FortiGate, Cisco Firepower, and Check Point all compete on it. Hold that thought, because it is precisely the capability we bolt onto OPNsense today.
Web Application Firewalls (WAF)
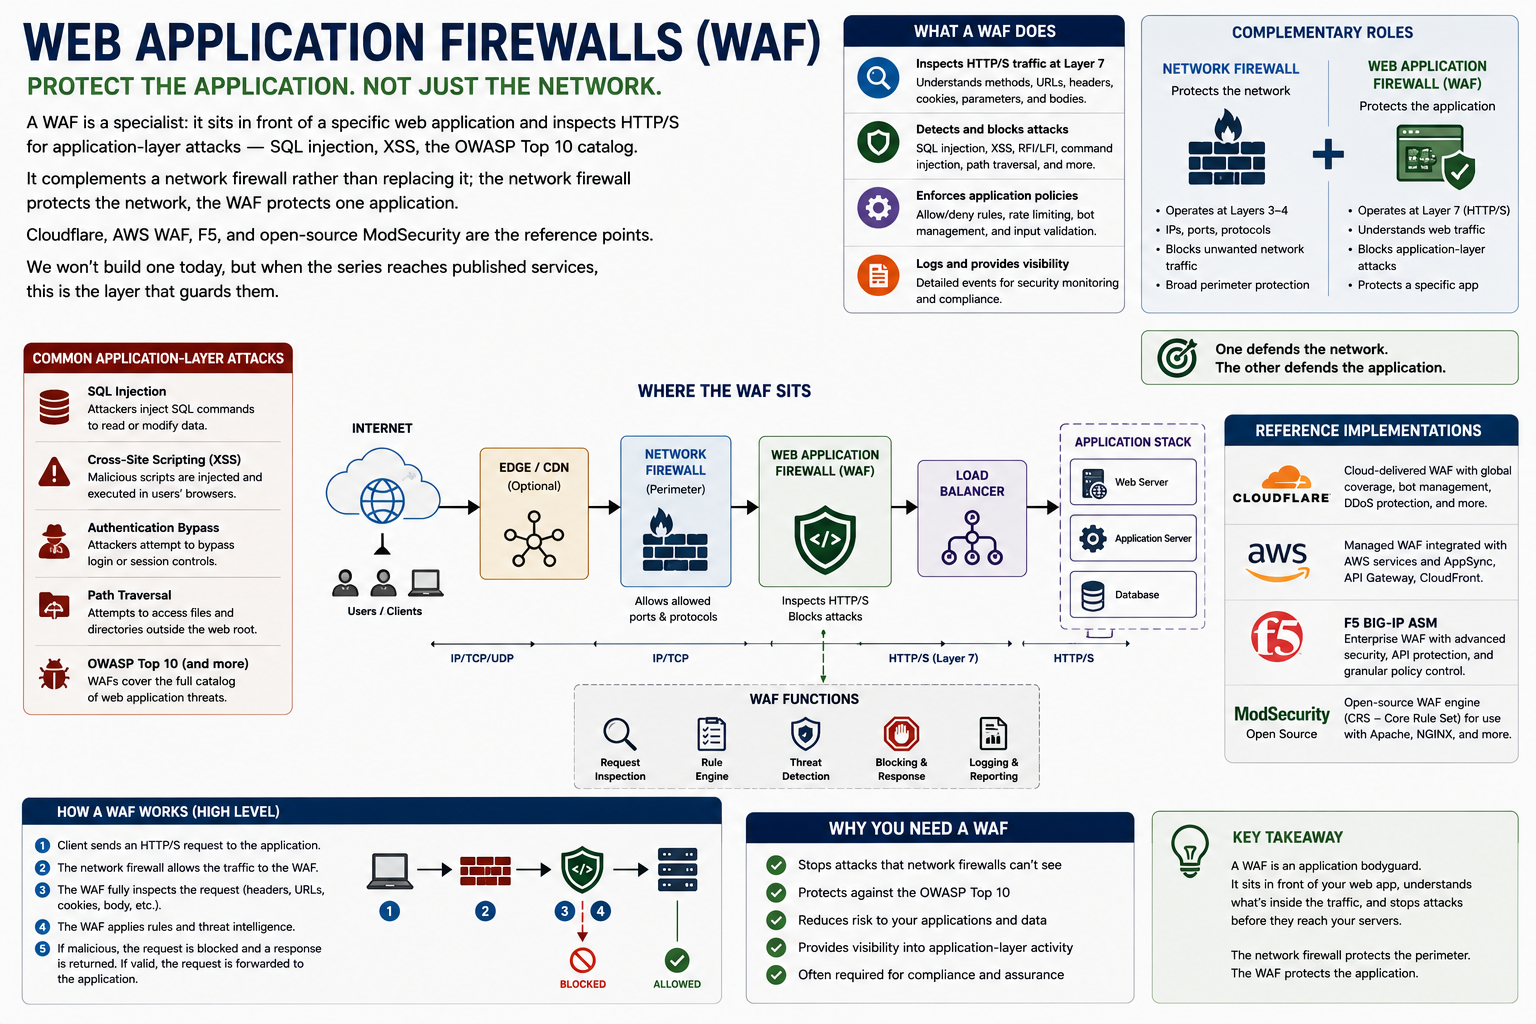
A WAF is a specialist: it sits in front of a specific web application and inspects HTTP/S for application-layer attacks — SQL injection, XSS, the OWASP Top 10 catalog. It complements a network firewall rather than replacing it; the network firewall protects the network, the WAF protects one application. Cloudflare, AWS WAF, F5, and open-source ModSecurity are the reference points. We won't build one today, but when the series reaches published services, this is the layer that guards them.
Cloud Firewalls and Firewall-as-a-Service
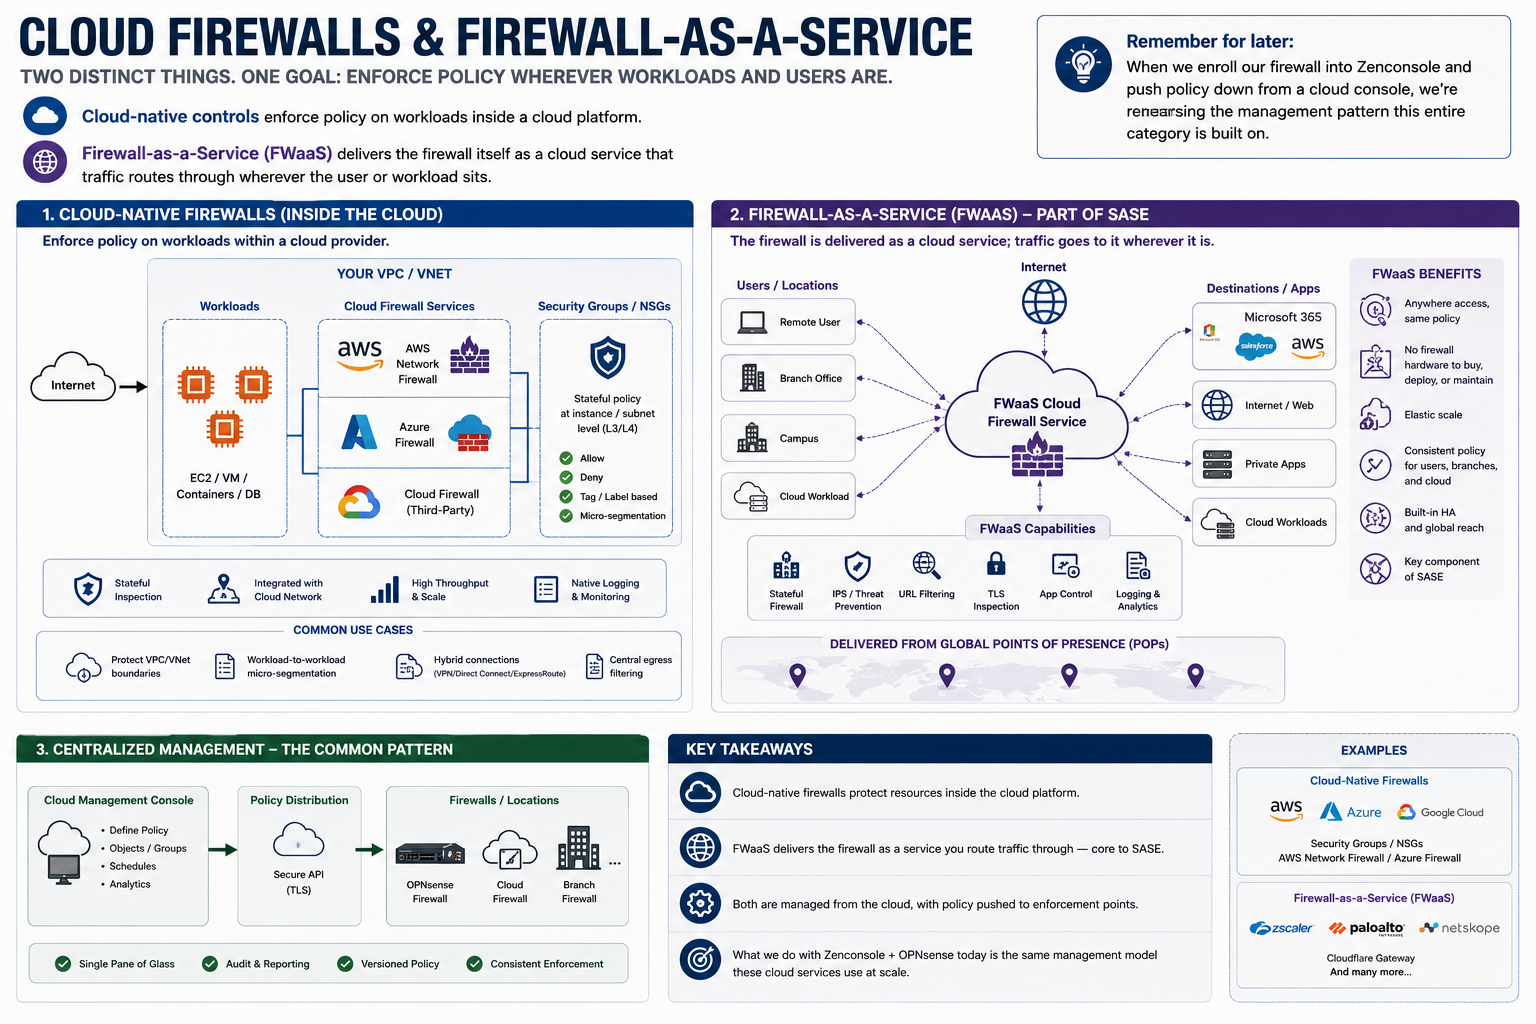
Two distinct things share this label. Cloud-native controls — security groups, NSGs, AWS Network Firewall, Azure Firewall — enforce policy on workloads inside a cloud platform. Firewall-as-a-Service delivers the firewall itself as a cloud service that traffic routes through wherever the user or workload sits, and it's a founding component of the SASE model. Keep FWaaS in mind for later in this post: when we enroll our firewall into Zenconsole and push policy down from a cloud console, we're rehearsing the management pattern this entire category is built on.
Host-Based Firewalls
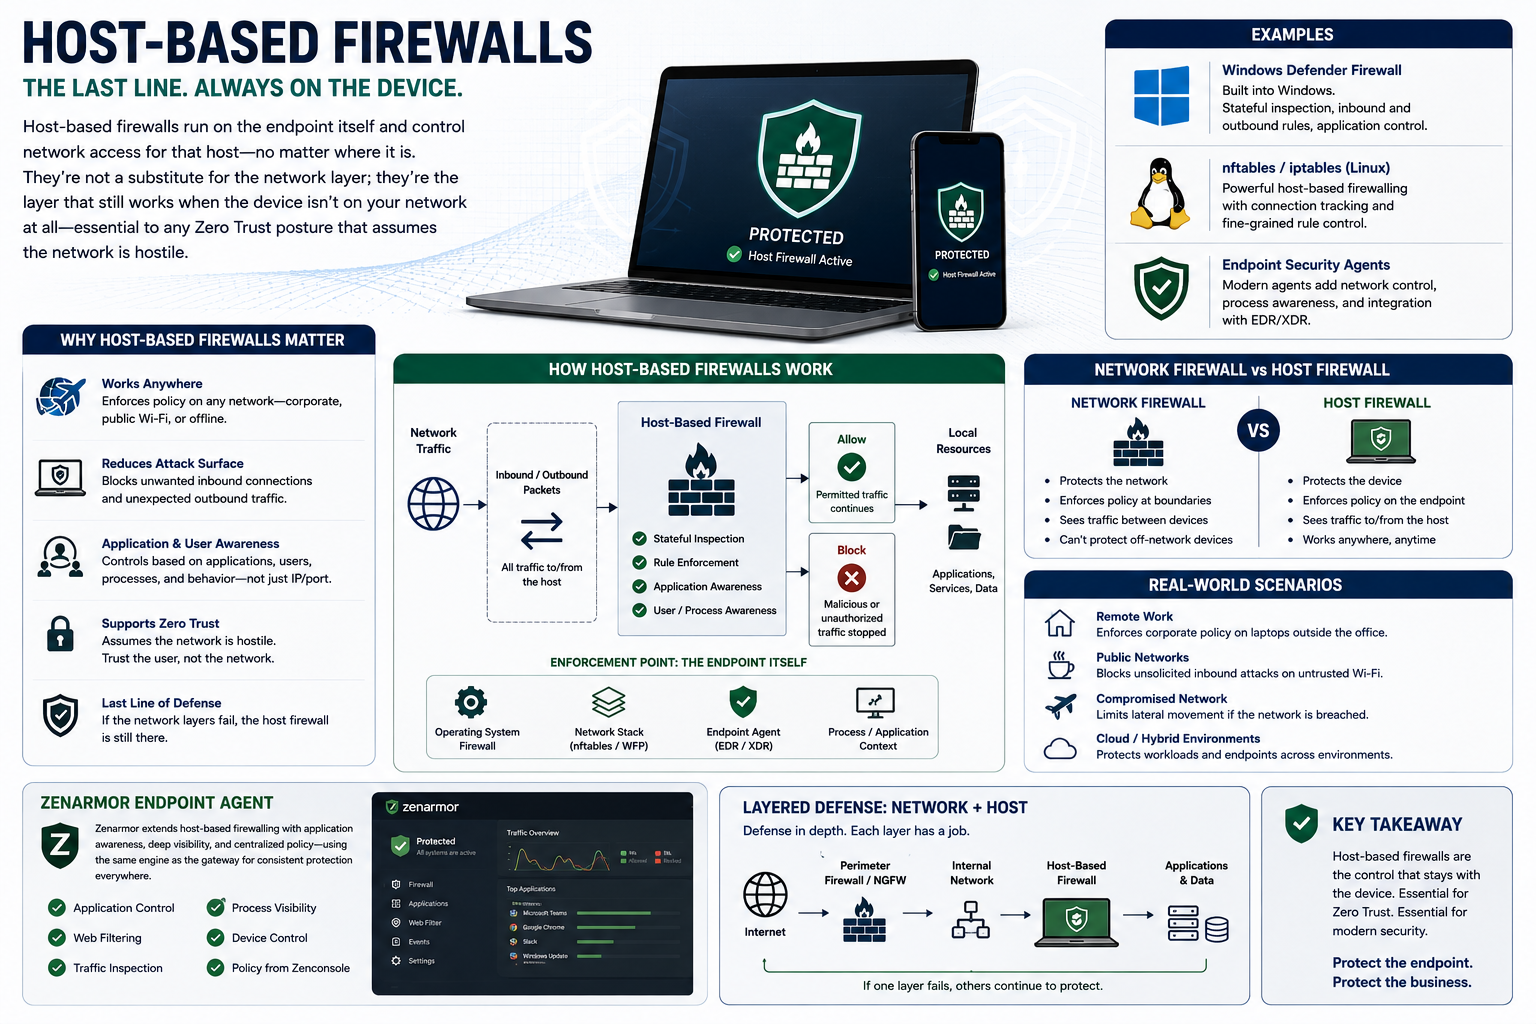
The last line, running on the endpoint itself — Windows Defender Firewall, nftables on a Linux host, or the network controls inside a modern endpoint agent. Host-based firewalls aren't a substitute for the network layer; they're the layer that still works when the device isn't on your network at all, which makes them essential to any Zero Trust posture that assumes the network is hostile. The Zenarmor endpoint agent at the end of this post is this category, upgraded with the same application awareness as the gateway.
Where Today's Build Sits on This Map
Now the plan for this post reads as architecture instead of a shopping list. The OPNsense VM from Part 1 gives us the stateful foundation. Zenarmor adds the NGFW-defining capability — application identification and policy — as a plugin on that same box. Zenconsole borrows the FWaaS/SASE management pattern, and the endpoint agent extends enforcement to the host-based layer for devices that leave the network. Four categories from the taxonomy, one lab VM, zero license spend for the core. Part 2's traditional-versus-transparent question doesn't disappear — it comes back inside the Zenarmor wizard as routed versus bridge mode — but it takes its proper place as one axis of a two-axis decision.
A Version Note Before We Start
The screenshots in this post were captured on the 26.1 "Witty Woodpecker" series. Between capturing them and publishing, OPNsense did what OPNsense does — shipped its July major release on schedule. 26.7 "Xenial Xenops" is the current Community Edition as I write this, built on FreeBSD 15.1, and 26.1 reached end of life the day 26.7 released. If you're installing fresh, download 26.7; if you built your VM from Part 1 on 26.1, the upgrade path is System → Firmware and the update step below carries you across. The menus and workflow in this post are unchanged between the two — where a version string appears in a screenshot, read it as "current release."
That fixed January-and-July cadence, with fortnightly patch releases in between, is one of the reasons I picked OPNsense for this series. It also sets up the first real configuration lesson of this post: only the latest major release gets security updates, so staying current isn't optional hygiene — it's the support model.
Where Part 1 Left You
Quick orientation, because two of the most common failure points in this entire build happen before the web UI ever loads.
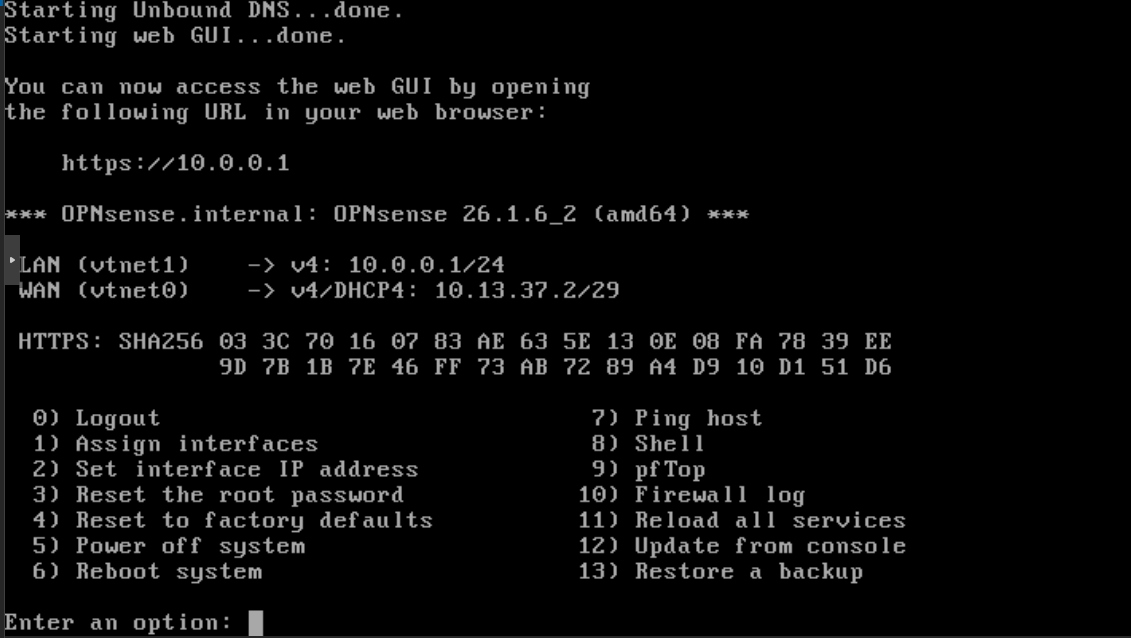
The console login from Part 1 — installer runs the install to disk; root only gives you a live session off the ISO.
At the end of Part 1, you logged in as installer, ran the ZFS install, set a root password, and rebooted. Two traps live right there:
Detach the ISO. If the install media is still mounted at reboot, the VM boots the installer again instead of your installed system — and it's surprisingly easy to sit at a fresh live environment wondering where your configuration went. Eject the ISO in your hypervisor before or immediately after the reboot.
Check the interface assignments. After reboot, the console menu shows which NIC landed on WAN and which on LAN. OPNsense assigns the first detected NIC to WAN (DHCP) and the second to LAN (static 192.168.1.1/24 with a DHCP server handing out .100–.200). Hypervisors do not always enumerate NICs in the order you added them. A swapped assignment — LAN on the internet-facing NIC — is the number-one reason this lab "doesn't work," and the symptom is maddeningly quiet: no DHCP lease on your client, no web UI, nothing obviously broken. If the console shows the wrong mapping, option 1) Assign interfaces walks you through swapping them, including auto-detection by link state.
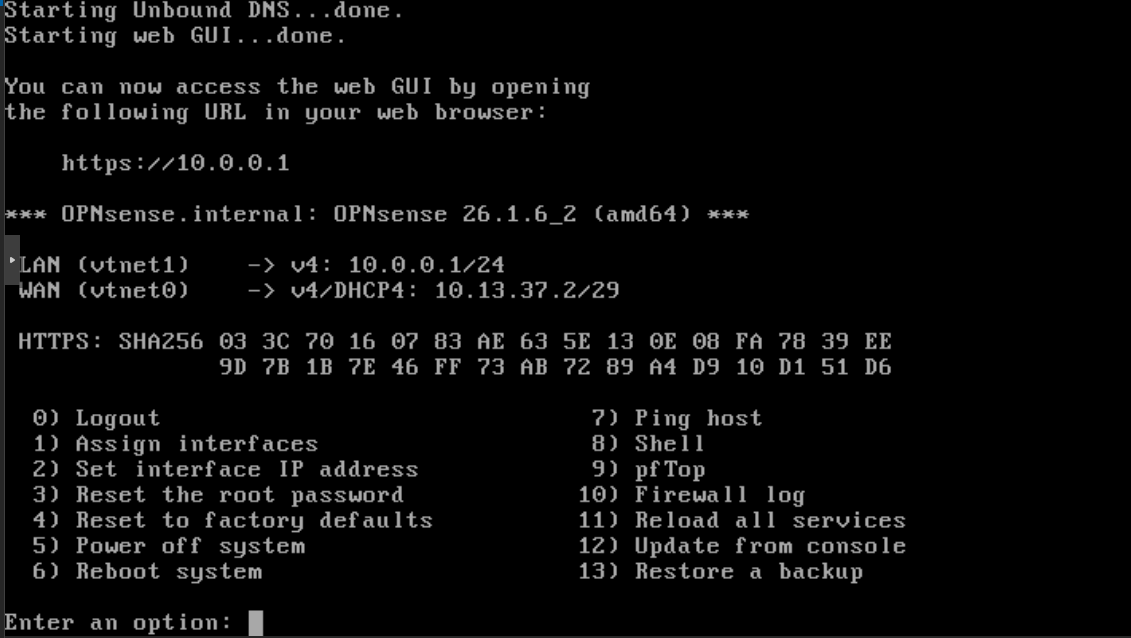
The post-install console menu. Verify the WAN/LAN mapping here before you touch anything else — a swapped assignment fails silently.
One more habit before we configure anything: take a hypervisor snapshot of the firewall VM now, and again after every major milestone in this post. Every destructive experiment from here forward — a rule that locks you out, a plugin that misbehaves — becomes a ten-second revert instead of a rebuild.
Reaching the Web UI
Boot your LAN-side client VM — Linux, Windows, anything with a browser — attached to the same internal network as the OPNsense LAN interface.
- Confirm the client picked up an address from OPNsense in the 192.168.1.100–200 range —
ip addron Linux,ipconfigon Windows. If it didn't, stop and re-check the interface assignments above; this is where a swapped mapping first shows itself. - Browse to
https://192.168.1.1. - Accept the self-signed certificate warning. You can put a real certificate on the management UI later with the ACME plugin — for initial setup, self-signed is fine.
- Log in as
rootwith the password you set during install.
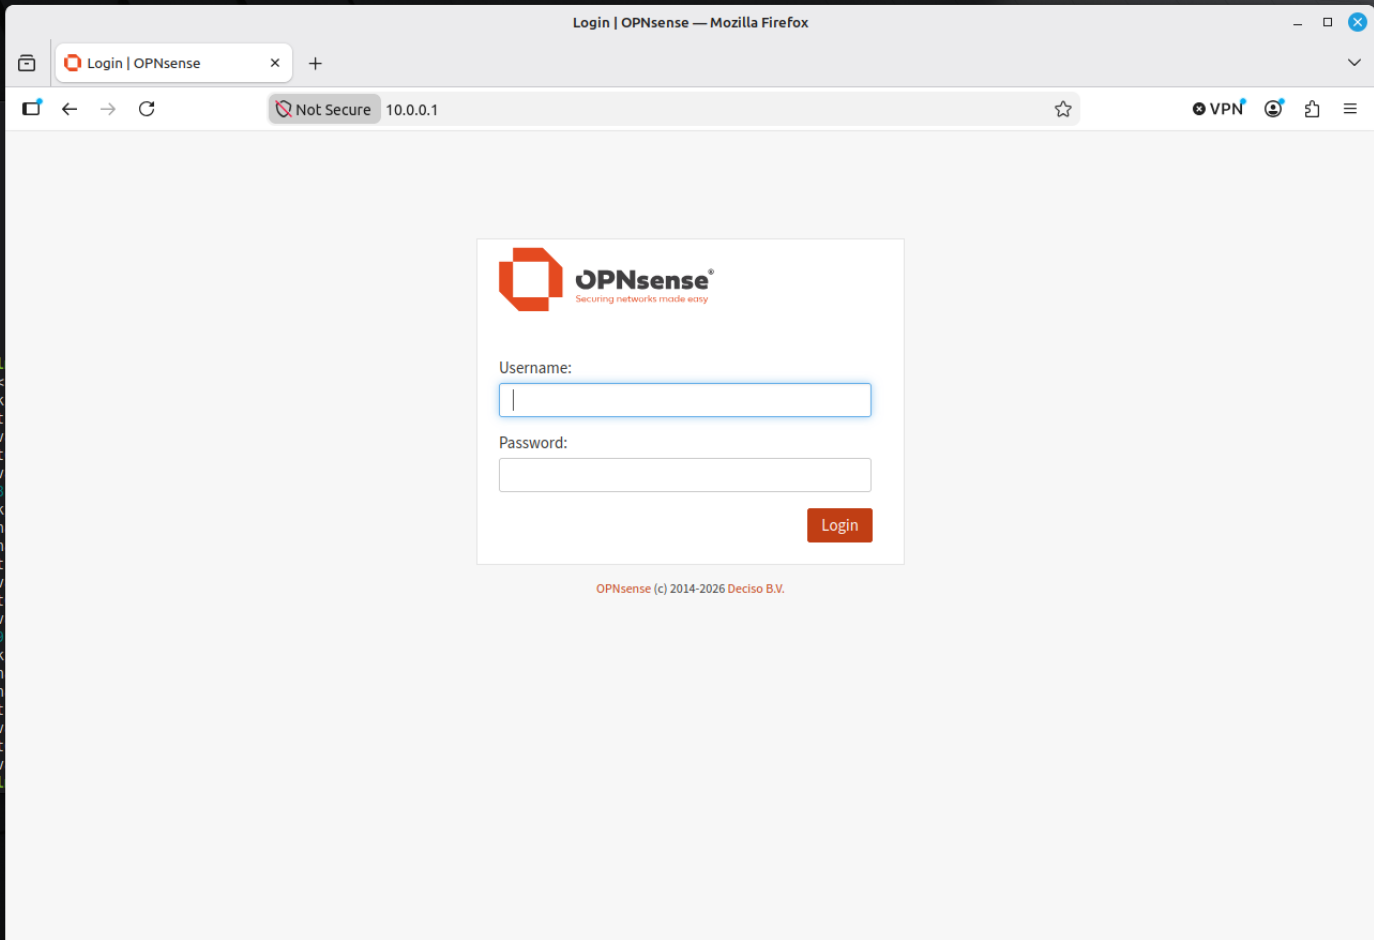
First contact with the web UI from the LAN client. If you got here, DHCP, LAN addressing, and the anti-lockout rule are all working.
That successful login is already a validation step, by the way — it proves the LAN interface, its DHCP scope, and the default anti-lockout rule are all doing their jobs.
The Initial Setup Wizard
On first login, OPNsense launches its setup wizard. Most defaults are sensible; a few deserve deliberate choices.
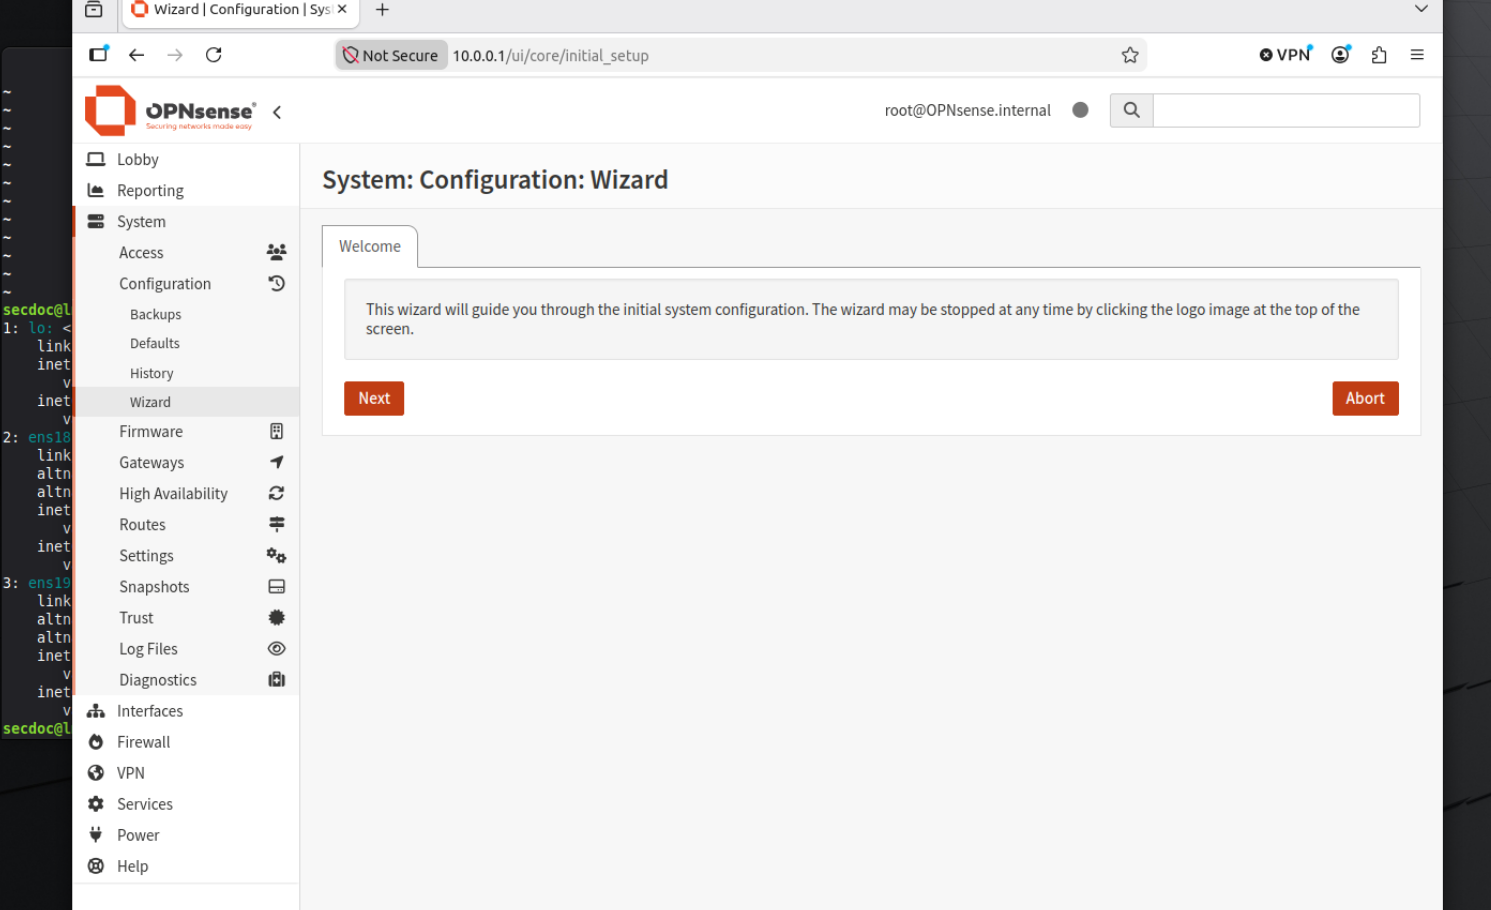
The setup wizard's opening step — hostname, domain, and DNS. Boring fields, but they show up in every log line you'll ever read.
- General Information — Set a hostname (
lab-fw01) and domain (lab.local), and DNS servers — 1.1.1.1 and 9.9.9.9 are reasonable lab defaults. Uncheck Override DNS if you want to keep these regardless of what the WAN's DHCP hands you. - Time Server — Accept the pool.ntp.org defaults and set your timezone. Accurate time matters more than it looks; every log correlation exercise you ever do depends on it.
- Configure WAN Interface — Leave the interface on DHCP, but here's the setting that trips up nearly every lab build: uncheck both Block private networks and Block bogon networks. Those protections are correct on a real internet-facing WAN — RFC 1918 source addresses arriving from the public internet are spoofed or misrouted and should die at the edge. But your lab WAN sits on your hypervisor's NAT subnet, which is RFC 1918 space. Leave the blocks on and OPNsense silently drops your own upstream traffic, and you'll chase a "broken internet" that is actually a rule working exactly as designed. Knowing when a control is protecting you and when it's fighting your topology is the actual lesson here.
- Configure LAN Interface — Defaults are fine (192.168.1.1/24). Change it only if you have an existing 192.168.1.0/24 network elsewhere that would collide.
- Set Root Password — Confirm or rotate the password from install.
- Reload — the wizard applies everything and drops you on the dashboard.
If the dashboard shows DHCPv6 in red on WAN, that just means no IPv6 lease was available — normal in a NAT lab. Ignore it, or set Interfaces → [WAN] → IPv6 Configuration Type to None to clean up the display.
Why Subnet at All? A Question I Get Every Time
That single 192.168.1.1/24 in the LAN step looks like a throwaway default, and it prompts the question I hear more than any other when I teach this material: why do we subnet at all? Since this is the step where you're accepting — or changing — the lab's addressing, it's the right place to answer it properly.
The short version: subnetting takes one large network and breaks it into smaller ones so that traffic between them has to cross a Layer 3 boundary — and every one of those boundaries is a place where you can observe, contain, and enforce policy. That last part is the reason that matters most now, but let me build up to it honestly.
The textbook answer starts with performance, and there's truth in it — just less than the textbooks imply. Every subnet is its own broadcast domain, so ARP requests, DHCP discovers, and the general chatter of a network stay local instead of hitting every host. Twenty-five years ago, on hubs and early switches, that mattered a great deal. On modern switched networks it matters less — switches already keep unicast traffic off ports that don't need it — but it's not zero. Put a few thousand hosts in one broadcast domain and you'll feel it: every device processes every broadcast, and one misbehaving NIC or looped port can degrade the whole segment. Which points to the related benefit I'd rank higher: fault isolation. A broadcast storm, a rogue DHCP server, a chatty device gone wrong — in a subnetted network, the damage stays inside one subnet instead of taking down the building.
Manageability is where the operational payoff really lives. Hierarchical addressing means a well-planned network summarizes: the core doesn't need to know about every /24 in a branch office, just the aggregate route that covers them. That's what keeps routing tables sane at scale, and it's what makes troubleshooting tractable — when addressing follows structure, an IP address tells you where a device is and roughly what it does before you've opened a single tool. You can also delegate cleanly: this block belongs to the Dallas site, this one to the lab, and neither team steps on the other.
But here's the argument I lead with in 2026: subnetting is the precondition for segmentation, and segmentation is how you control blast radius. In a flat network, a compromised host can reach everything — that's the whole game for an attacker after initial access. MITRE ATT&CK catalogs this as the Lateral Movement tactic (TA0008); techniques like T1021, Remote Services, describe an attacker riding RDP or SMB from a beachhead to the systems that actually matter. Flat networks make those techniques trivially available. A subnetted network with policy at the boundaries makes them fight, the attacker has to win one gate at a time. This is least privilege applied to the network itself — NIST SP 800-53 Rev. 5 frames it in AC-6 (least privilege) and SC-7 (boundary protection) — and compliance regimes take it as a given: PCI DSS lets you shrink your assessment scope through network segmentation, which quietly assumes you built a network capable of being segmented in the first place.
Make it concrete. Flat network: the receptionist's workstation and the customer database server sit in the same subnet, and nothing stops a phished receptionist's machine from opening a connection straight to the database port. Subnetted and policied network: the workstation lives in a user subnet, the database in a server subnet, and the rule between them says user machines talk to the application front end and nothing else. Same phish, same compromised workstation — but the attacker's next hop hits a deny rule and, ideally, an alert.
One caveat keeps this honest. Subnetting by itself is addressing, not security. The security arrives when you enforce policy at the boundaries you created. A subnetted network with any-any rules between subnets is a flat network with extra steps — more IP planning, same blast radius. So subnet for the structure, summarization, and fault isolation, but understand that you're really building the enforcement points. What you put on them is where the security lives.
For today's lab, one /24 behind the firewall is exactly right — the boundary we're policing is LAN-to-WAN, and this whole post is about what we put on it. But the firewall you're configuring is also the router that will sit between your future subnets, which is why the VLANs-and-segmentation project in the closing list is the natural next build once this post is done.
The Follow-Up Questions, From the Systems Side of the Room
The subnetting answer never ends the conversation. The sharpest follow-ups I get come from students who grew up on, orbetter understand, the systems side — Windows administration, Active Directory, Event Viewer — and who reason about the network by analogy to what they already run. The analogies are doing real work, so rather than swat them down, I want to show where they land cleanly and where the network world uses different building blocks. These are the five questions I hear most, answered the way I answer them in class.
Is a Layer 3 boundary a firewall? No, and the distinction matters more than it looks. A Layer 3 boundary is a place — the point where traffic must be routed to get from one subnet to another. A firewall is a control that can be applied at that place. Picture a router sitting between your user subnet and your server subnet with no access lists configured. That router is a Layer 3 boundary, and it will happily forward anything to anything. Now add ACLs, or replace it with a firewall — same boundary, but now something at the boundary is filtering. The boundary creates the chokepoint; the rules at the chokepoint do the enforcing. This is why a beautifully subnetted network with permit-any between subnets is still effectively flat from an attacker's perspective. The conflation is an easy one to make, and honestly it comes from how the real world works — firewalls are almost always deployed at Layer 3 boundaries, so in practice the two ideas travel together. But keep them separate in your head, because "we have subnets" and "we enforce policy between subnets" are very different claims.
Does network least privilege mean each subnet has its own rules? Yes — essentially right. Now let me sharpen it. The rules don't live inside the subnet; they live at the boundaries between subnets, and they're directional. The user subnet may initiate HTTPS to the application front end. Nothing may initiate from the server subnet back to the user subnet. Everything not explicitly allowed is denied — and that default-deny is what makes it least privilege rather than a suggestion. This is AC-6 expressed in network terms, with SC-7 covering the boundary protection itself. Take the receptionist example from above one hop further and you'll see the whole design: the receptionist's subnet reaches the application front end, the front end's subnet reaches the database, and the receptionist's subnet has no path to the database at all. Least privilege expressed as topology. If the receptionist's machine gets compromised, the attacker inherits the receptionist's network reach — which is exactly nothing useful.
Is this enforced by Group Policy? No — but the guess has a kernel of truth in it. Group Policy is Windows configuration management: Active Directory pushing settings to domain-joined machines. It configures endpoints; it doesn't sit in the traffic path. Network firewalls and router ACLs are configured on the devices themselves, or through the vendor's central management platform — Panorama, FMC, whatever the shop runs — entirely outside the AD world. Here's the true part, though: Group Policy can centrally configure the Windows Defender host-based firewall on every domain-joined endpoint. So GPO really does touch a firewall — just the one living on each Windows machine, not the ones between subnets. Those are two enforcement layers, and mature shops use both — the taxonomy section above already gave them names.
What are the privilege levels for networks? Meet the analogy honestly here: networks don't have admin/user/read-only ranks. What they have are trust zones — untrusted (the internet), semi-trusted (a DMZ), trusted (internal user and server zones), restricted enclaves for the crown jewels, and a management zone for the gear itself. Trust zones are the network's rough equivalent of user groups, but a subnet's "privilege" isn't a rank — it's the set of flows the policy allows it. The DMZ web tier may initiate to one internal application port and nothing else. The management zone may reach device management interfaces, and nothing may initiate into it from user space. Two subnets in the same zone class can carry different rulesets — the zone is classification, the ruleset is the privilege.
Does a hacker hitting a deny rule create a logged event? Ideally yes, and the instinct is sound — but the pipeline isn't Event Viewer. The enforcing device logs the deny in its own logging system, ships it via syslog to central collection or a SIEM, and there the pattern emerges: forty denies from one internal source probing the database subnet is a detection signal, not forty unread lines. Windows Event Viewer only sees this when the deny happened at the Windows host firewall — the one case where the Event Log instinct is exactly right. Honest caveats: logging every deny is a choice some shops skip for noisy rules, and a log nobody reads is not a control. That's why visibility comes before enforcement in real segmentation programs — a design principle, not a slogan.
The thread to pull next is default-deny plus logging at every boundary. Once those two click together, segmentation stops being a diagram and becomes a program — and the analogy-driven way of working through it is exactly how practicing architects think.
For today's lab, one /24 behind the firewall is exactly right — the boundary we're policing is LAN-to-WAN, and this whole post is about what we put on it. You'll meet both halves of that default-deny-plus-logging thread before this post ends: the Live View log gives you the visibility, and flipping the Zenarmor policy from allow-and-log to default-deny is the enforcement. And the firewall you're configuring is also the router that will sit between your future subnets, which is why the VLANs-and-segmentation project in the closing list is the natural next build once this post is done.
Update Before You Configure Anything
This step comes before plugins, before rules, before Zenarmor — deliberately. The ISO you installed from is a point-in-time image of a major release; every fortnightly patch since then contains fixes, and some of them are security fixes for the very device that's about to become your network's enforcement point. A firewall running known-vulnerable code isn't a control — it's an asset waiting to be inventoried by someone else. Patch first, then build. That ordering is a discipline worth practicing in the lab precisely because production pressure will constantly tempt you to invert it.
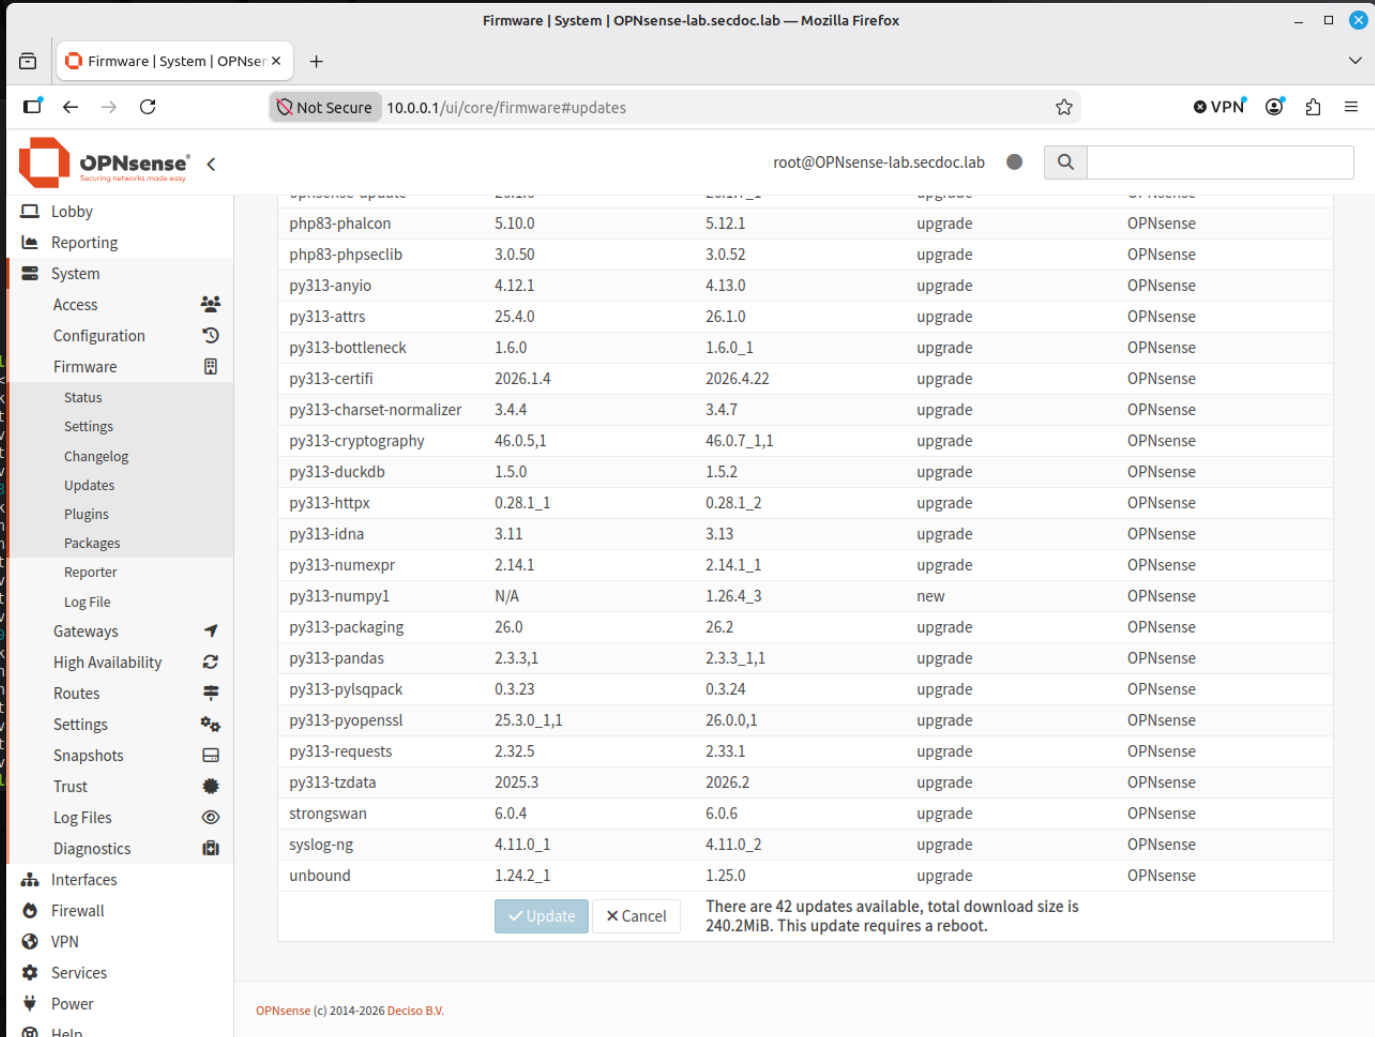
System → Firmware → Status. Patching comes before any configuration — the firewall is the one box that never gets to run stale code.
- Navigate to System → Firmware → Status.
- Click Check for updates.
- Updates will almost certainly be waiting — click Update now. The system downloads, verifies, applies, and may reboot. If you installed from a 26.1 ISO, this is also where the major upgrade to 26.7 is offered; take it, since 26.1 no longer receives security updates.
- After reboot, log back in and confirm the dashboard shows the current version.
Install the Useful Plugins
Plugins are how OPNsense stays lean — the base install is a firewall, and everything else is opt-in. Under System → Firmware → Plugins, find each plugin and click the + to install. Most add their own menu entries under Services or VPN once installed; if a menu doesn't appear, refresh the browser.
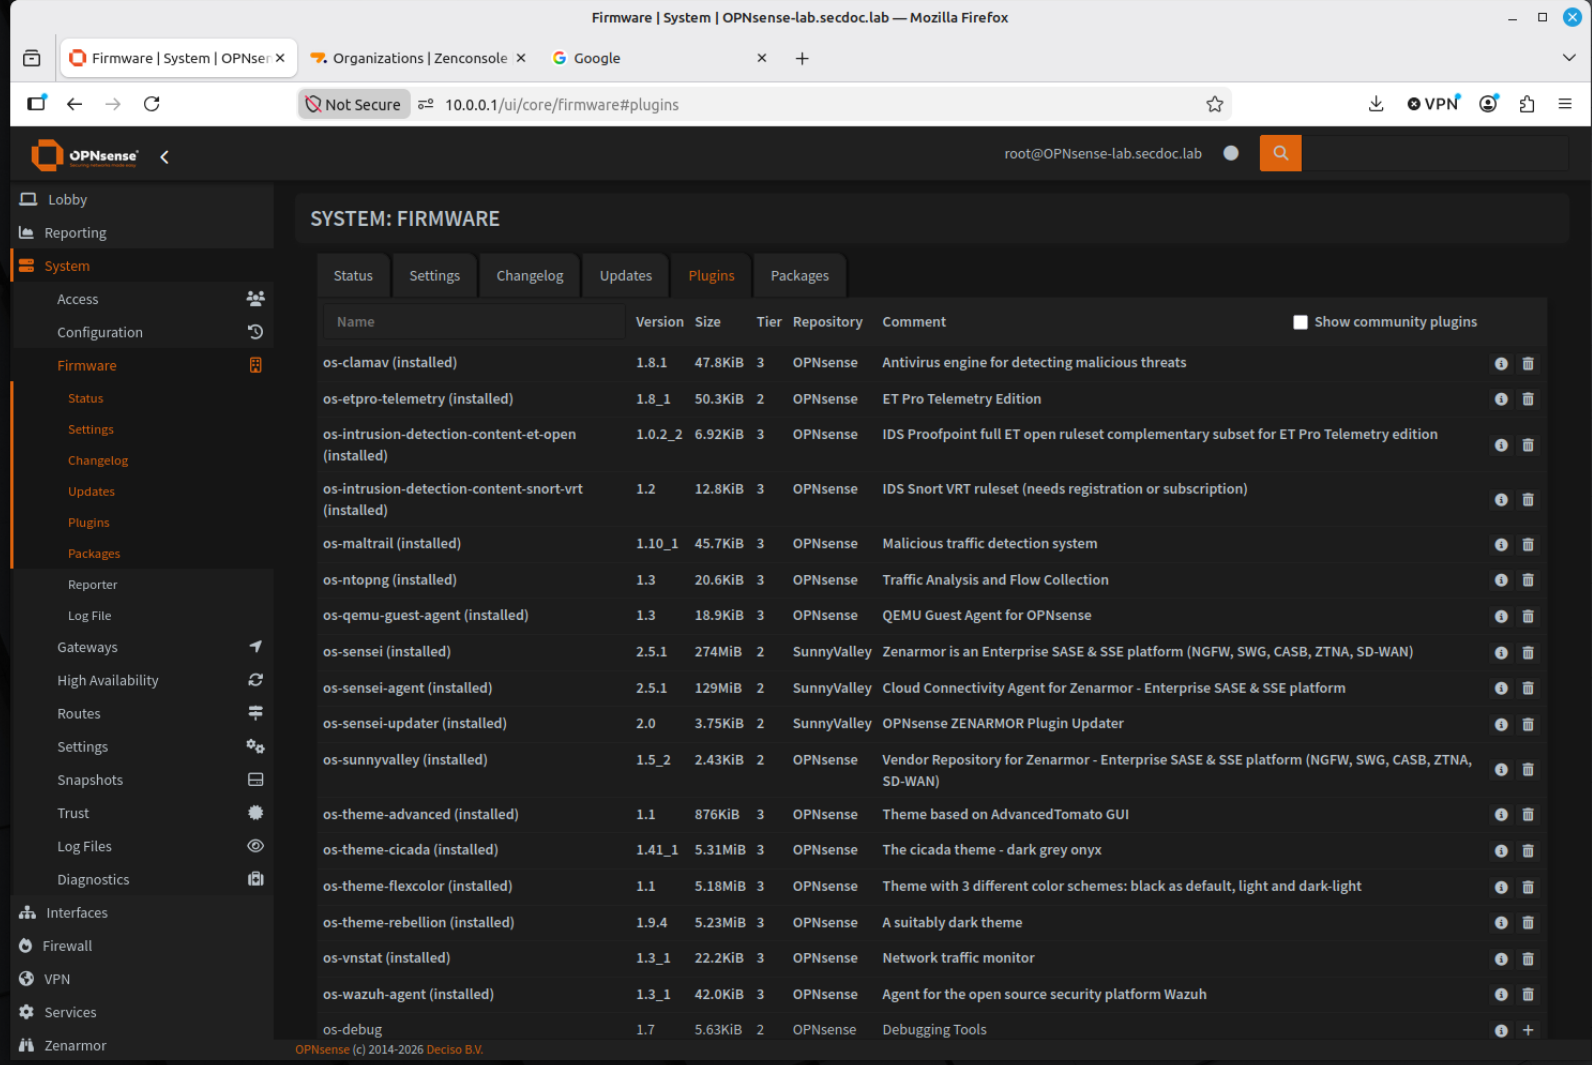
The plugin catalog under System → Firmware → Plugins. The base system stays minimal; capability is opt-in.
Worth installing in any lab:
- Your hypervisor's guest agent —
os-vmware,os-qemu-guest-agent,os-xen, oros-hyperv-agentsto match your platform. Better timekeeping, clean shutdowns, host-side metrics. - os-suricata — the IDS/IPS engine, integrated with OPNsense's rule management. We'll put this to work in a future installment.
- os-acme-client — Let's Encrypt automation, for when you want a real certificate on the management UI.
- os-wireguard — WireGuard VPN. Check first — recent releases ship WireGuard in the base system, and there's no need to install what's already there.
- os-sensei — Zenarmor's package name, and the main event of this post. Hold off on configuring it until the section below; it deserves more than a click-through.
Installing os-sensei — the package name Zenarmor ships under. The Zenarmor menu appears in the left navigation once it completes.
Validate the Install
Before building anything on top of this firewall, prove it does what the rules claim. Validation isn't ceremony — each check below is evidence that a specific control is functioning, and the habit of demanding that evidence is what separates configuration from architecture.
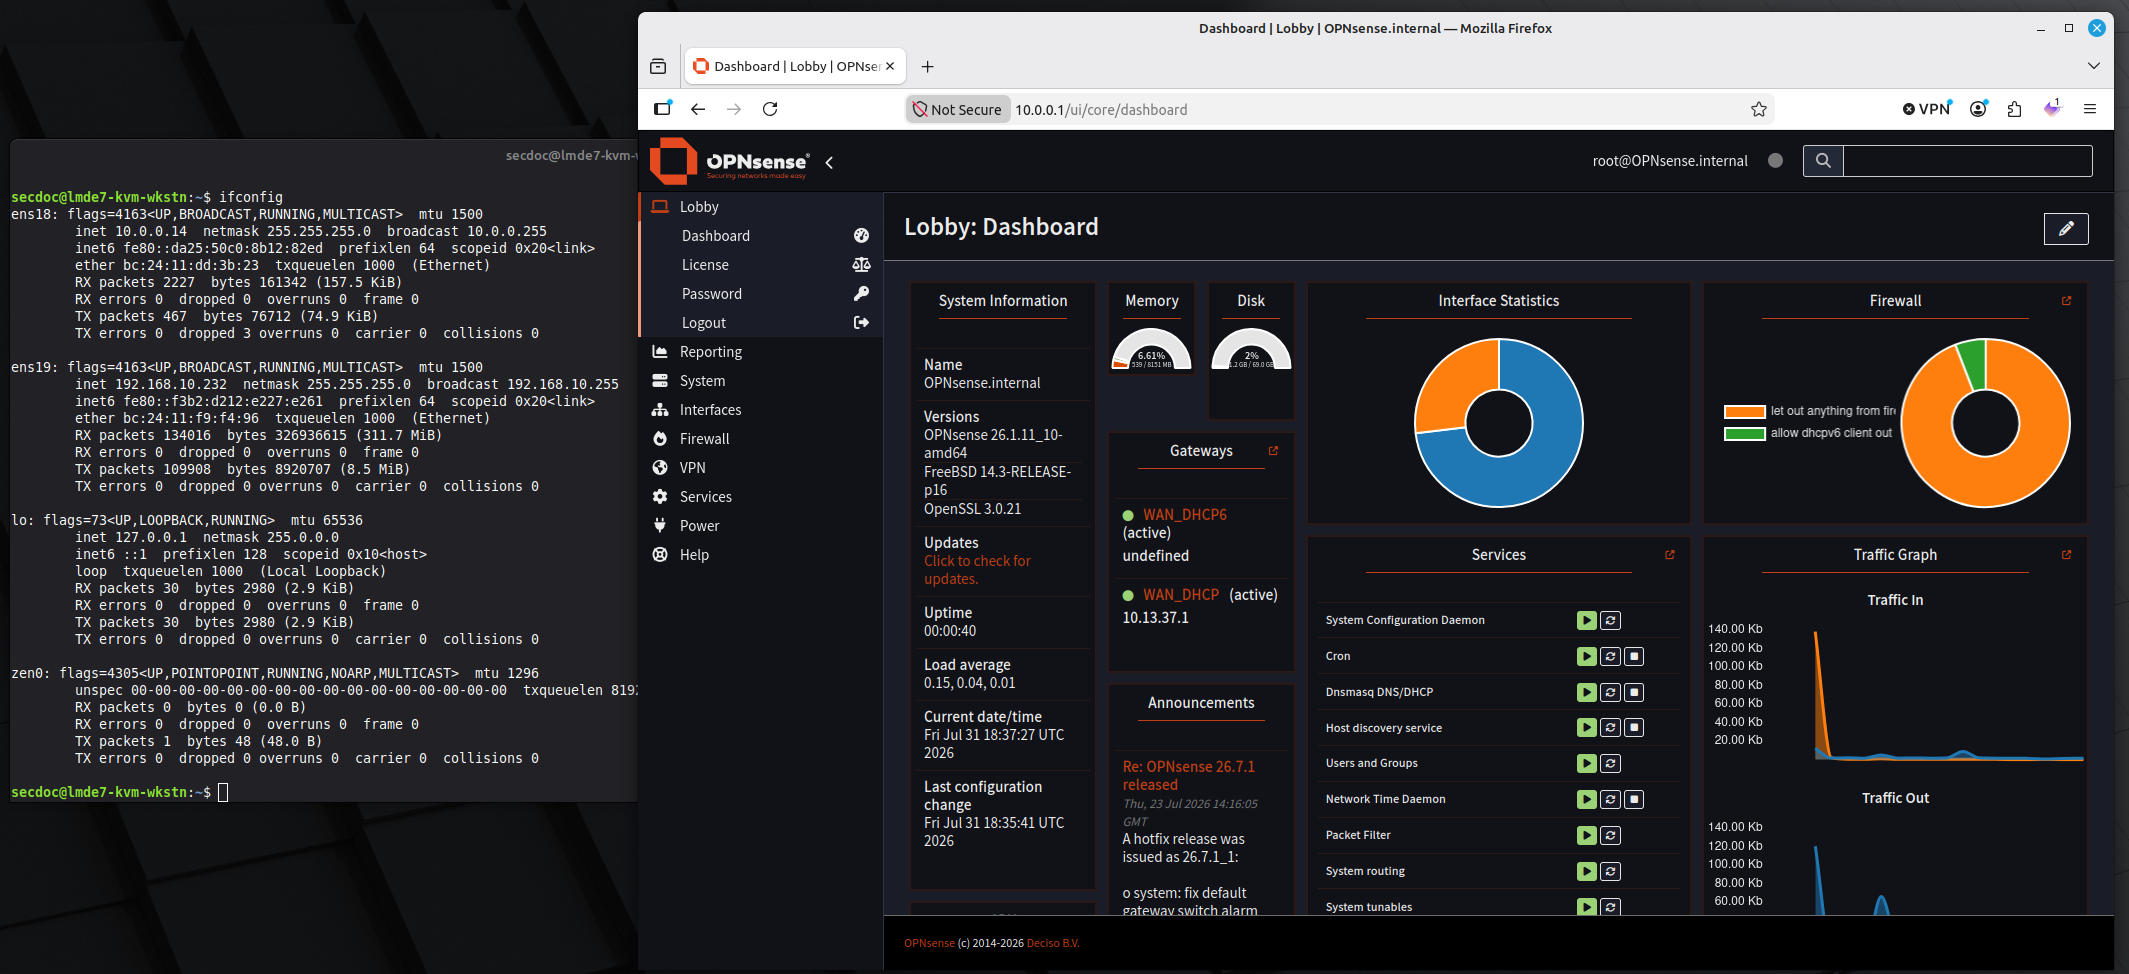
Validation is evidence, not ritual — each check maps to a specific control you're claiming works.
- Browse from the LAN client. Reaching a known site from the LAN-side VM proves outbound NAT and the default LAN-to-any rule are functioning end to end.
- Diagnostics → Ping. From the firewall itself, ping 1.1.1.1 (WAN egress works) and your LAN client (LAN-side reachability works). Two pings isolate which half of the path is broken when something fails later.
- Firewall → Log Files → Live View. Generate some traffic and watch the allow and deny decisions scroll past. This is your first look at what the firewall is actually deciding, as opposed to what you believe you configured — and the gap between those two is where most firewall incidents live.
- System → Configuration → Backups. Take a manual backup and store the XML off the firewall. Do it now, before you change anything else. A config backup on the box it backs up is a diary locked inside the house that burned down.
Then take that hypervisor snapshot I mentioned. This is your known-good baseline — everything from here forward is layered on top of it, and everything from here forward is revertible.
Zenarmor: The Main Event
Part 2 ended with a promise, so let's keep it.
Here's the architectural framing before we touch the wizard — this is the inspection axis from the taxonomy section, now made concrete. The stateful firewall you just validated makes decisions on addresses, ports, and connection state — Layers 3 and 4. That's necessary and not sufficient: on a modern network, nearly everything is TCP/443, and "allow port 443 outbound" is functionally "allow everything." Application-layer inspection is the next enforcement layer up — identifying what the traffic actually is regardless of port, and applying policy to the application rather than the socket. Layer it over the stateful base and, later, extend it with an agent on the endpoint itself, and you have three independent enforcement points that each see what the others can't. That's defense-in-depth in the concrete sense — not more products, but complementary inspection at different positions with different views of the traffic.
Zenarmor is how we build that layer in this lab. It installs as an OPNsense plugin and does Layer 7 classification, category-based web filtering, and per-application policy, with an optional cloud console. It is the lab choice, not the only choice — Suricata does signature-based inspection in the same ecosystem and covers part of this ground differently, and the commercial category (Palo Alto's App-ID, FortiGate's application control, Cisco's offerings) solves the same problem at enterprise scale. What Zenarmor gives this series is the full application-control-plus-cloud-management pattern, free, on the firewall we already built — which makes it the best available teaching vehicle for how the commercial category actually works.
Sizing First
Layer 7 inspection holds signature databases and per-connection application state in memory, and it isn't cheap. Before installing the engine, shut down the firewall VM and bump it to 4 vCPUs and 8 GB RAM — 4 GB is the practical floor for the packet engine, 8 GB the sane setting once reporting is on. Make sure the disk has 30 GB or so free if you'll run local reporting; the databases grow. Undersizing here doesn't fail loudly — it fails as mysterious latency and dropped inspection, which is worse.
Deploy the Engine and Choose a Mode
If you installed os-sensei in the plugin step, open Zenarmor → Settings to begin the initial deployment. The engine downloads its packet-processing components and signature databases on first run — it needs working WAN internet access and can take several minutes.
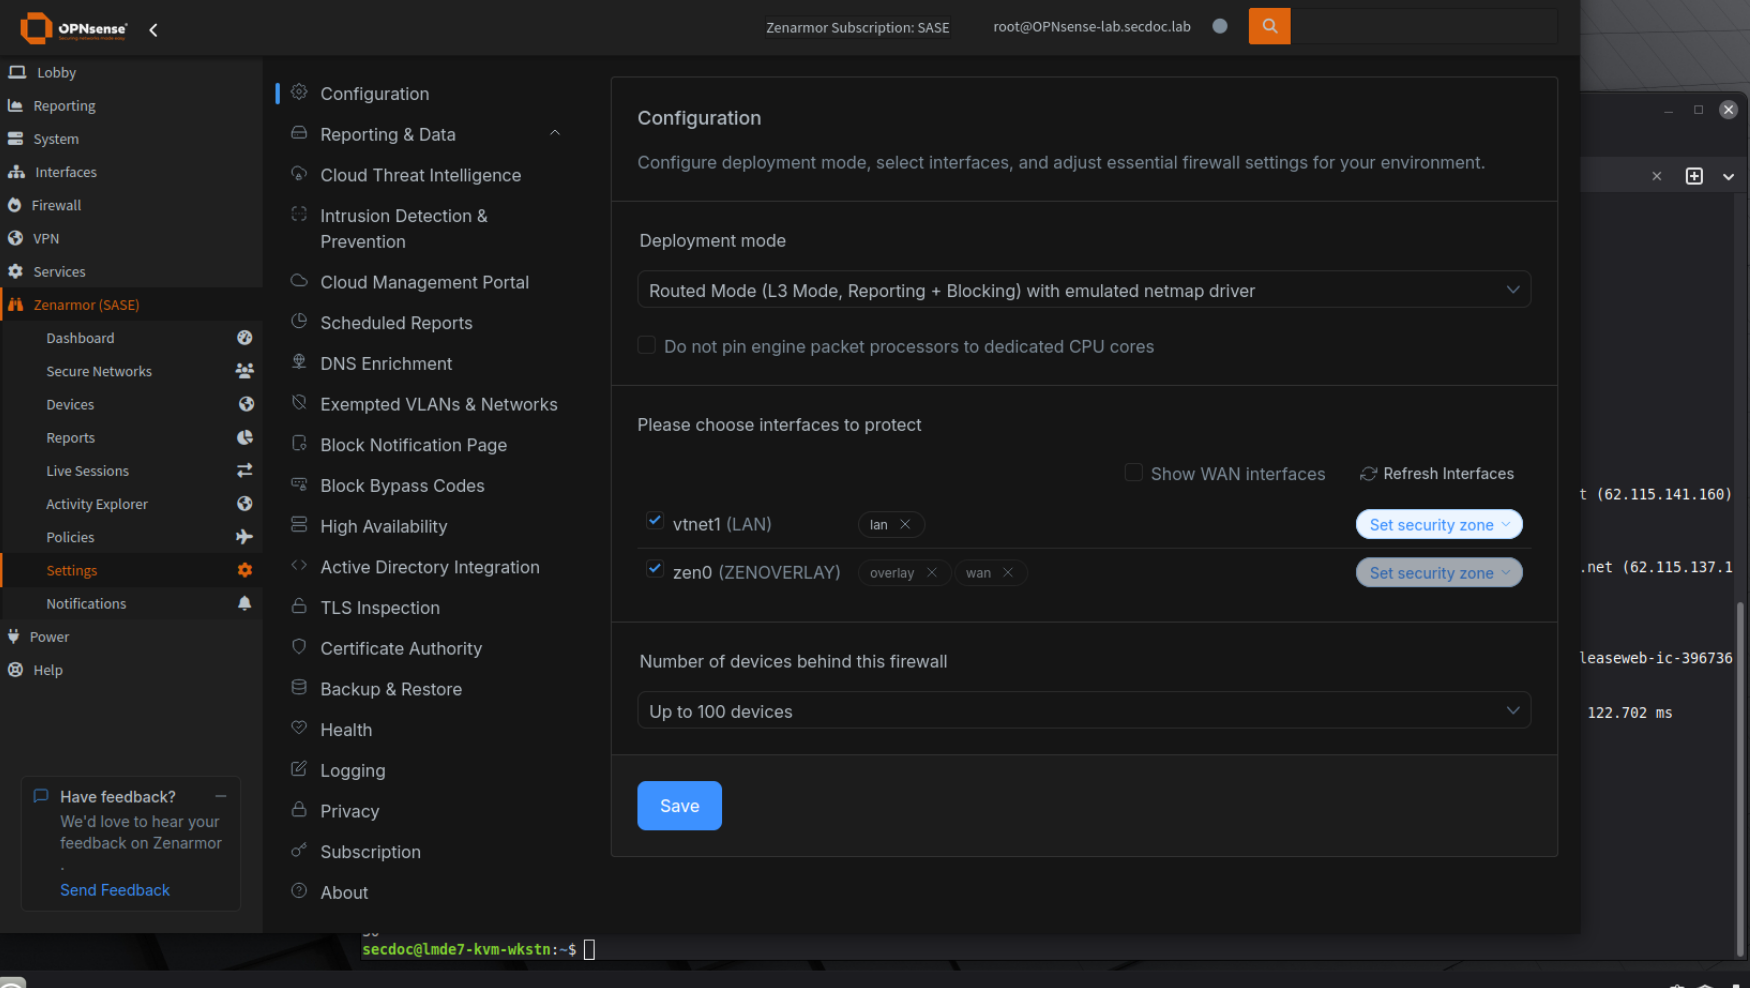
Zenarmor's deployment wizard on first launch. The mode choice here is Part 2's traditional-versus-transparent decision, asked again at the inspection layer.
The wizard's first real decision is deployment mode, and if Part 2's discussion stuck, you already understand it:
- Routed mode — Zenarmor inspects traffic crossing the firewall's routed interfaces. This is the application-layer version of the traditional firewall deployment from Part 2: the firewall is the gateway, traffic routes through it, and inspection rides the same path. Select this for the lab, because our OPNsense VM is the LAN's gateway.
- Bridge mode — Zenarmor inspects on a transparent bridge, inserting inspection without changing IP routing. This is Part 2's transparent-bridged pattern, and it's how you'd add Layer 7 inspection in front of a network segment you can't re-address — the same reason transparent deployment exists at all.
Then:
- Select LAN as the protected interface, so all client traffic headed toward the WAN gets inspected.
- Choose local reporting for now — we'll connect the cloud console shortly.
- Apply, let the engine start, and confirm it's running under Zenarmor → Dashboard. The live view starts populating the moment a LAN client generates traffic.
The Free Edition License
Zenarmor's Free Edition is genuinely free — no time limit — and it's licensed for non-commercial use, which describes a learning lab exactly. Create a free account at zenarmor.com, retrieve the Free Edition key from the Zenconsole portal, and enter it under Zenarmor → Subscription in OPNsense. Confirm application control and reporting show as active.
Know the upgrade boundary going in: Free covers Layer 7 application control, a base set of web categories, DNS-based filtering, and local reporting — enough to complete the core of this post. The full elastic category sets, identity integration, and the roaming endpoint agents that deliver true off-network enforcement live in the paid tiers. Zenconsole offers a 15-day trial of the paid editions without payment information, which is the honest way to work through the endpoint-agent section at the end of this post. Feature tiers shift between releases, so check the current comparison at zenarmor.com rather than trusting any blog post — including this one — as the permanent record.
Build Application- and Category-Based Policies
This is the heart of the post: policy defined by what the traffic is, not which port it uses.
Start by giving the engine something to classify. From your LAN client, browse a handful of sites and touch a few application types — a streaming service, a social platform, something file-sharing-adjacent. Then open Zenarmor → Dashboard and look at the live classification. Everything you just did was TCP/443. The dashboard names the applications anyway. Sit with that for a second — it's the entire argument for this layer, rendered as a table.
Now go to Zenarmor → Policies and edit the default policy (or create one bound to the LAN). A reasonable first egress policy for the lab:
- Block category: Peer-to-Peer / File Sharing
- Block category: Phishing / Malware
- Block application: BitTorrent
- Allow application: Microsoft 365
- Block category: Anonymizers / Proxy — this one closes the evasion path around everything above it
- Default: Allow + Log for now — tighten to default-deny once you've baselined what your LAN legitimately uses
Apply it, then prove it: from the LAN client, attempt something in a blocked category — start a torrent client, or hit a known-safe test URL from a phishing test list. Confirm the attempt fails on the client and that a block event appears in Zenarmor → Reports. A block you didn't verify is a hope, not a control. While you're in Reports, look at traffic by application, by category, and by client — this is the baseline you'll use when you eventually flip the default rule to deny.
That flip is worth naming in Zero Trust terms, because it's the whole principle in one setting: moving from allow-and-log to default-deny means the network no longer permits unknown egress. Every application must be explicitly sanctioned or it doesn't leave. "Never trust, always verify," operationalized at Layer 7 on a lab VM — the Handbook's Zero Trust chapters describe this pattern in narrative form, and you just built it.
Connect Zenconsole Reporting
Local reporting works, but the pattern the industry has converged on — and the one worth learning — separates the management and analytics plane from any single gateway. That's the management half of the SASE model: policy and visibility live in a cloud console, and enforcement points enroll into it.
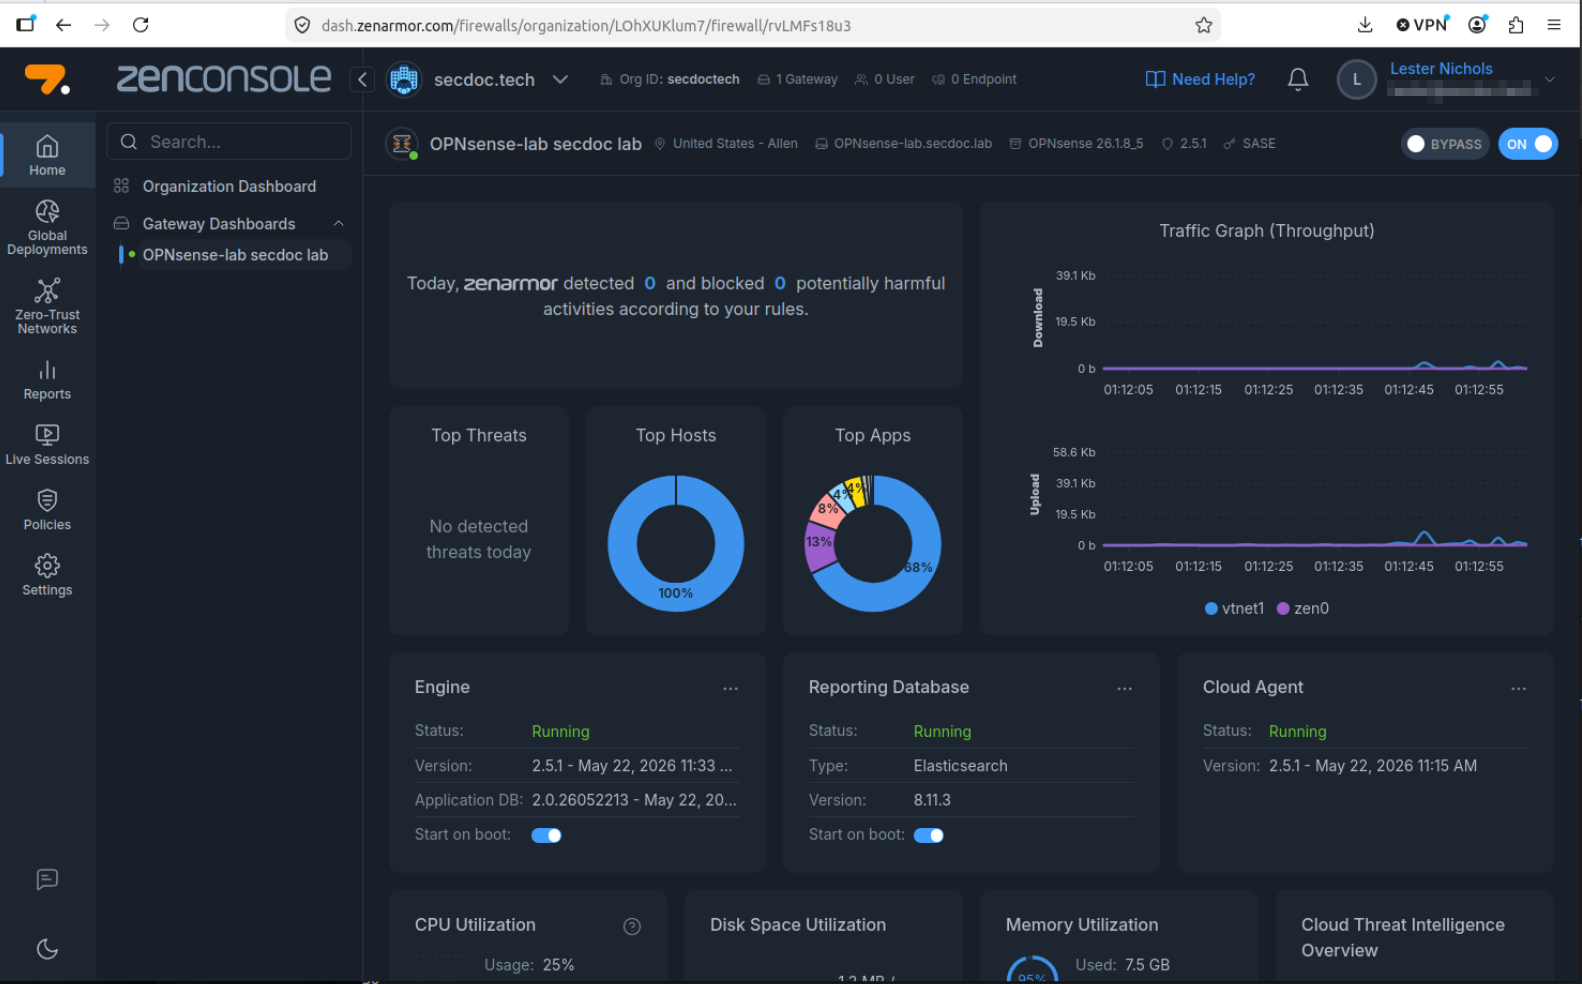
Zenconsole with the lab firewall enrolled — reporting and policy now live above the gateway rather than on it.
- In the Zenconsole portal (dash.zenarmor.com), create your organization and copy the enrollment token for a new node.
- In OPNsense, under Zenarmor → Cloud / Centralized Management, enable cloud management and register the node with the token. The firewall appears as a managed node in the console.
- Review the consolidated dashboards — application usage, blocked threats, node health — now aggregated centrally instead of read off the local box.
- Author or adjust a policy in the console and push it down. Confirm the change appears in the OPNsense-side Zenarmor policy view. That round trip — cloud-authored policy landing on a local enforcement point — is the management-plane behavior every SASE vendor is selling, demonstrated on one free node.
One node doesn't make a fabric — multi-site central policy is a paid-tier capability — but the architecture pattern is fully visible at lab scale, and the pattern is what transfers.
Deploy the Endpoint Agent
The last piece answers the question the perimeter can't: what happens when the device leaves? A laptop at a coffee shop isn't behind your firewall, and the classic answer — backhaul everything through a VPN so it is behind the firewall — trades user experience and bandwidth for enforcement. The SASE answer moves the enforcement point onto the device: a lightweight agent inspects locally, enrolls against the same cloud console, and applies the same policy on any network. Gateway, console, agent — the third enforcement layer, and the one that makes policy follow the identity rather than the network.
Endpoint agents sit in Zenarmor's paid tiers. Use the 15-day Zenconsole trial to build this section hands-on, or read through it and file the pattern — either way, this is the component that turns the lab from a perimeter NGFW into an off-network enforcement architecture.
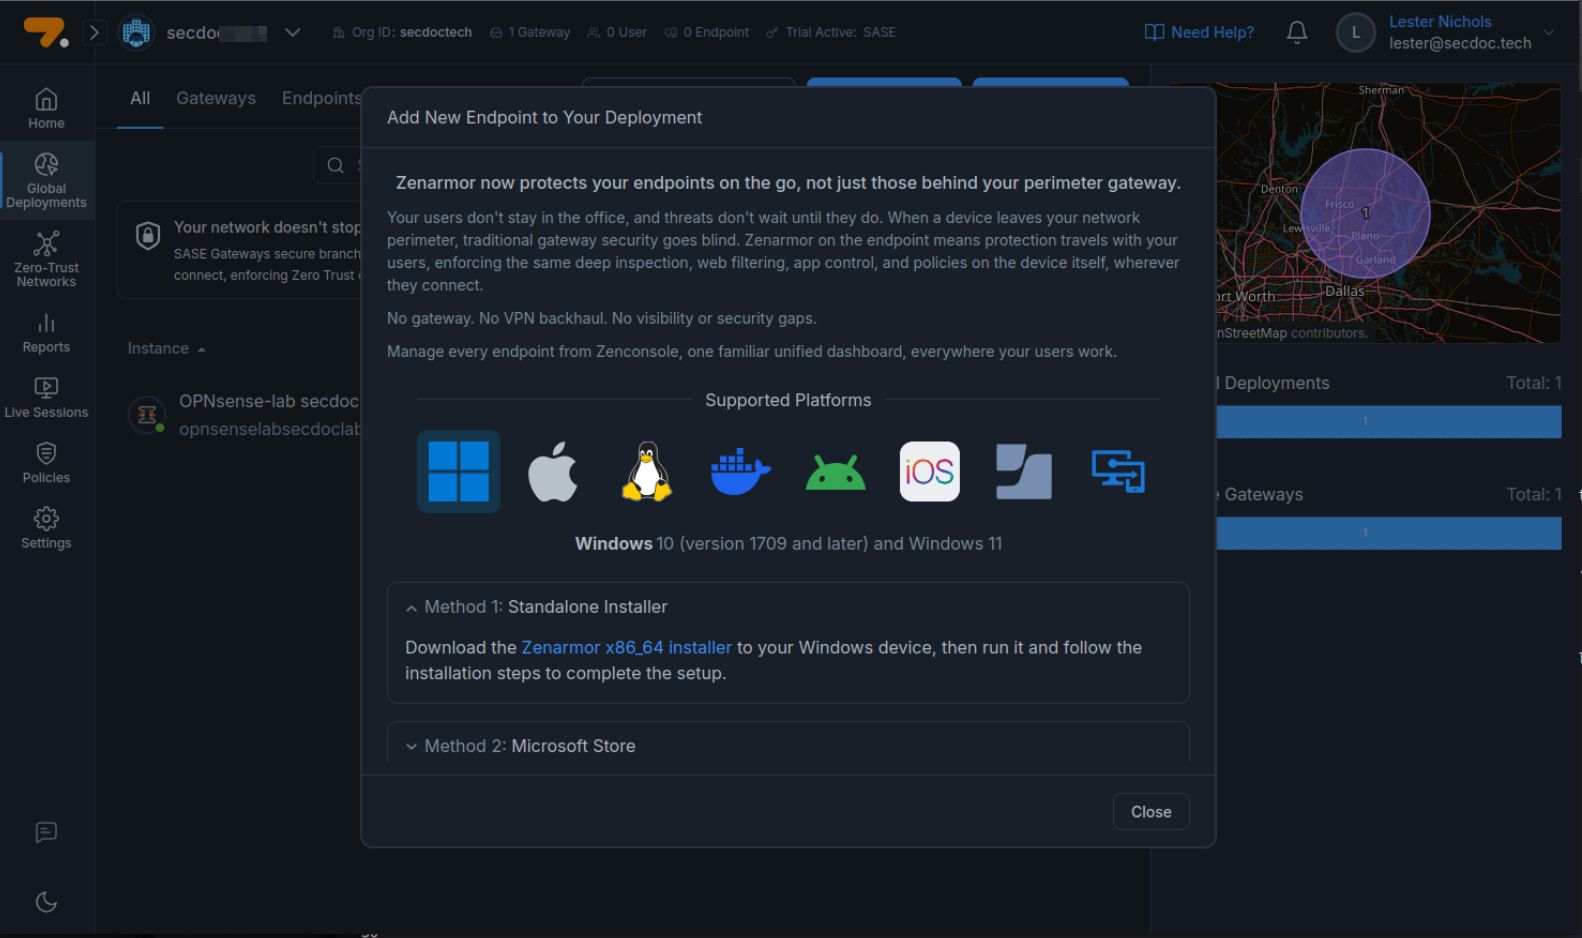
The Endpoints section of Zenconsole — agent installers by platform, enrolled against the same organization as the gateway.
- In Zenconsole, open the Endpoints / Agents section and download the agent installer for your client OS — start with the Windows agent on a Windows 10/11 client VM.
- Install it and enroll against your organization with the provided key. The endpoint appears as a managed device in the console.

The agent enrolled on the Windows client. The enforcement point now travels with the device instead of waiting at the gateway.
- Now the test that matters: move the client off the LAN. In your hypervisor, reattach the client VM's adapter to the NAT/WAN-side network so its traffic no longer routes through OPNsense at all. From there, attempt to reach a destination your policy blocks. The agent should still enforce the block — locally, with no firewall in the path and no VPN backhaul.
- Back in Zenconsole, confirm the roaming device's telemetry appears alongside the gateway-inspected traffic. Same policy, same visibility, different network. That's the off-network half of the Zero Trust story, working.
Prove the Whole Thing Works
Same discipline as before — the deployment achieved its objectives only if you can produce the evidence:
- The Zenarmor dashboard identifies live LAN applications by name, including traffic riding TCP/443.
- A blocked application or category produces a block event visible in local reporting and in Zenconsole.
- A policy authored in Zenconsole pushes down and appears on the OPNsense node.
- An enrolled endpoint agent enforces policy while the client is off the LAN (paid tier or trial).
- Reporting attributes activity to specific clients, which is the raw material for device- and identity-aware policy.
Five checks, three enforcement layers, one lab VM. Take a final snapshot — this is the new known-good baseline the rest of the series builds on.
Evening and Weekend Projects
Everything below is a learnable evening or weekend project on the firewall you now have, and each one builds skill that transfers directly to the commercial platforms you'll meet in production. The vendor and the UI change; the concepts don't.
- Explicit rule design — retire the default "LAN to anything" rule and write deliberate allow/deny rules with logging.
- VLANs and segmentation — separate networks for IoT, guests, and servers on the same firewall.
- VPNs — WireGuard or OpenVPN for remote access; IPsec for site-to-site.
- TLS-aware inspection — enable it on a test Zenarmor policy and compare classification depth on encrypted flows before and after.
- SIEM correlation — feed Zenarmor's Layer 7 events into a Graylog or Wazuh stack and correlate application events with the rest of your telemetry.
- Reverse proxy with real certificates — publish an internal service through Caddy or HAProxy with Let's Encrypt.
- High availability — a second OPNsense VM, CARP, and pfsync, to learn active/passive failover the inexpensive way.
- Housekeeping — if you want the VM's resources back, the Zenarmor packet engine disables under Zenarmor → Settings without uninstalling, and
os-senseiremoves cleanly via the plugin page.
What's Next in the Series
The next installment turns the firewall from an enforcement point into a detection point: we'll bring the Suricata IDS/IPS engine online in inline mode, subscribe to open rule sets, learn to read and tune alerts — and pair it with CrowdSec to add collaborative threat intelligence to the same node. The firewall you configured today decides what's allowed; the next post teaches it to recognize what's hostile.
See you there.


